
The following tutorial will showcase how you could build an issue tracker application with Windmill and Supabase, without ever having to leave your browser.
While running projects, you’ll quickly get lost if you don't keep an eye on the pain points, so tracking and categorising issues is critical in any field. Let's start creating your custom application with setting up a database.
This article is part of a series. You can find the second part here.

Windmill has a community website called Windmill Hub where - among other Scripts and Flows - you can find the full version of this App.
Supabase setup
Supabase is an open-source Backend as a Service with a generous free tier, which means you don't need to setup payment when you are just starting out.
It’s always a good idea to start with the database and come up with the shape of
the data you are going to use. So after creating an account and logging in to
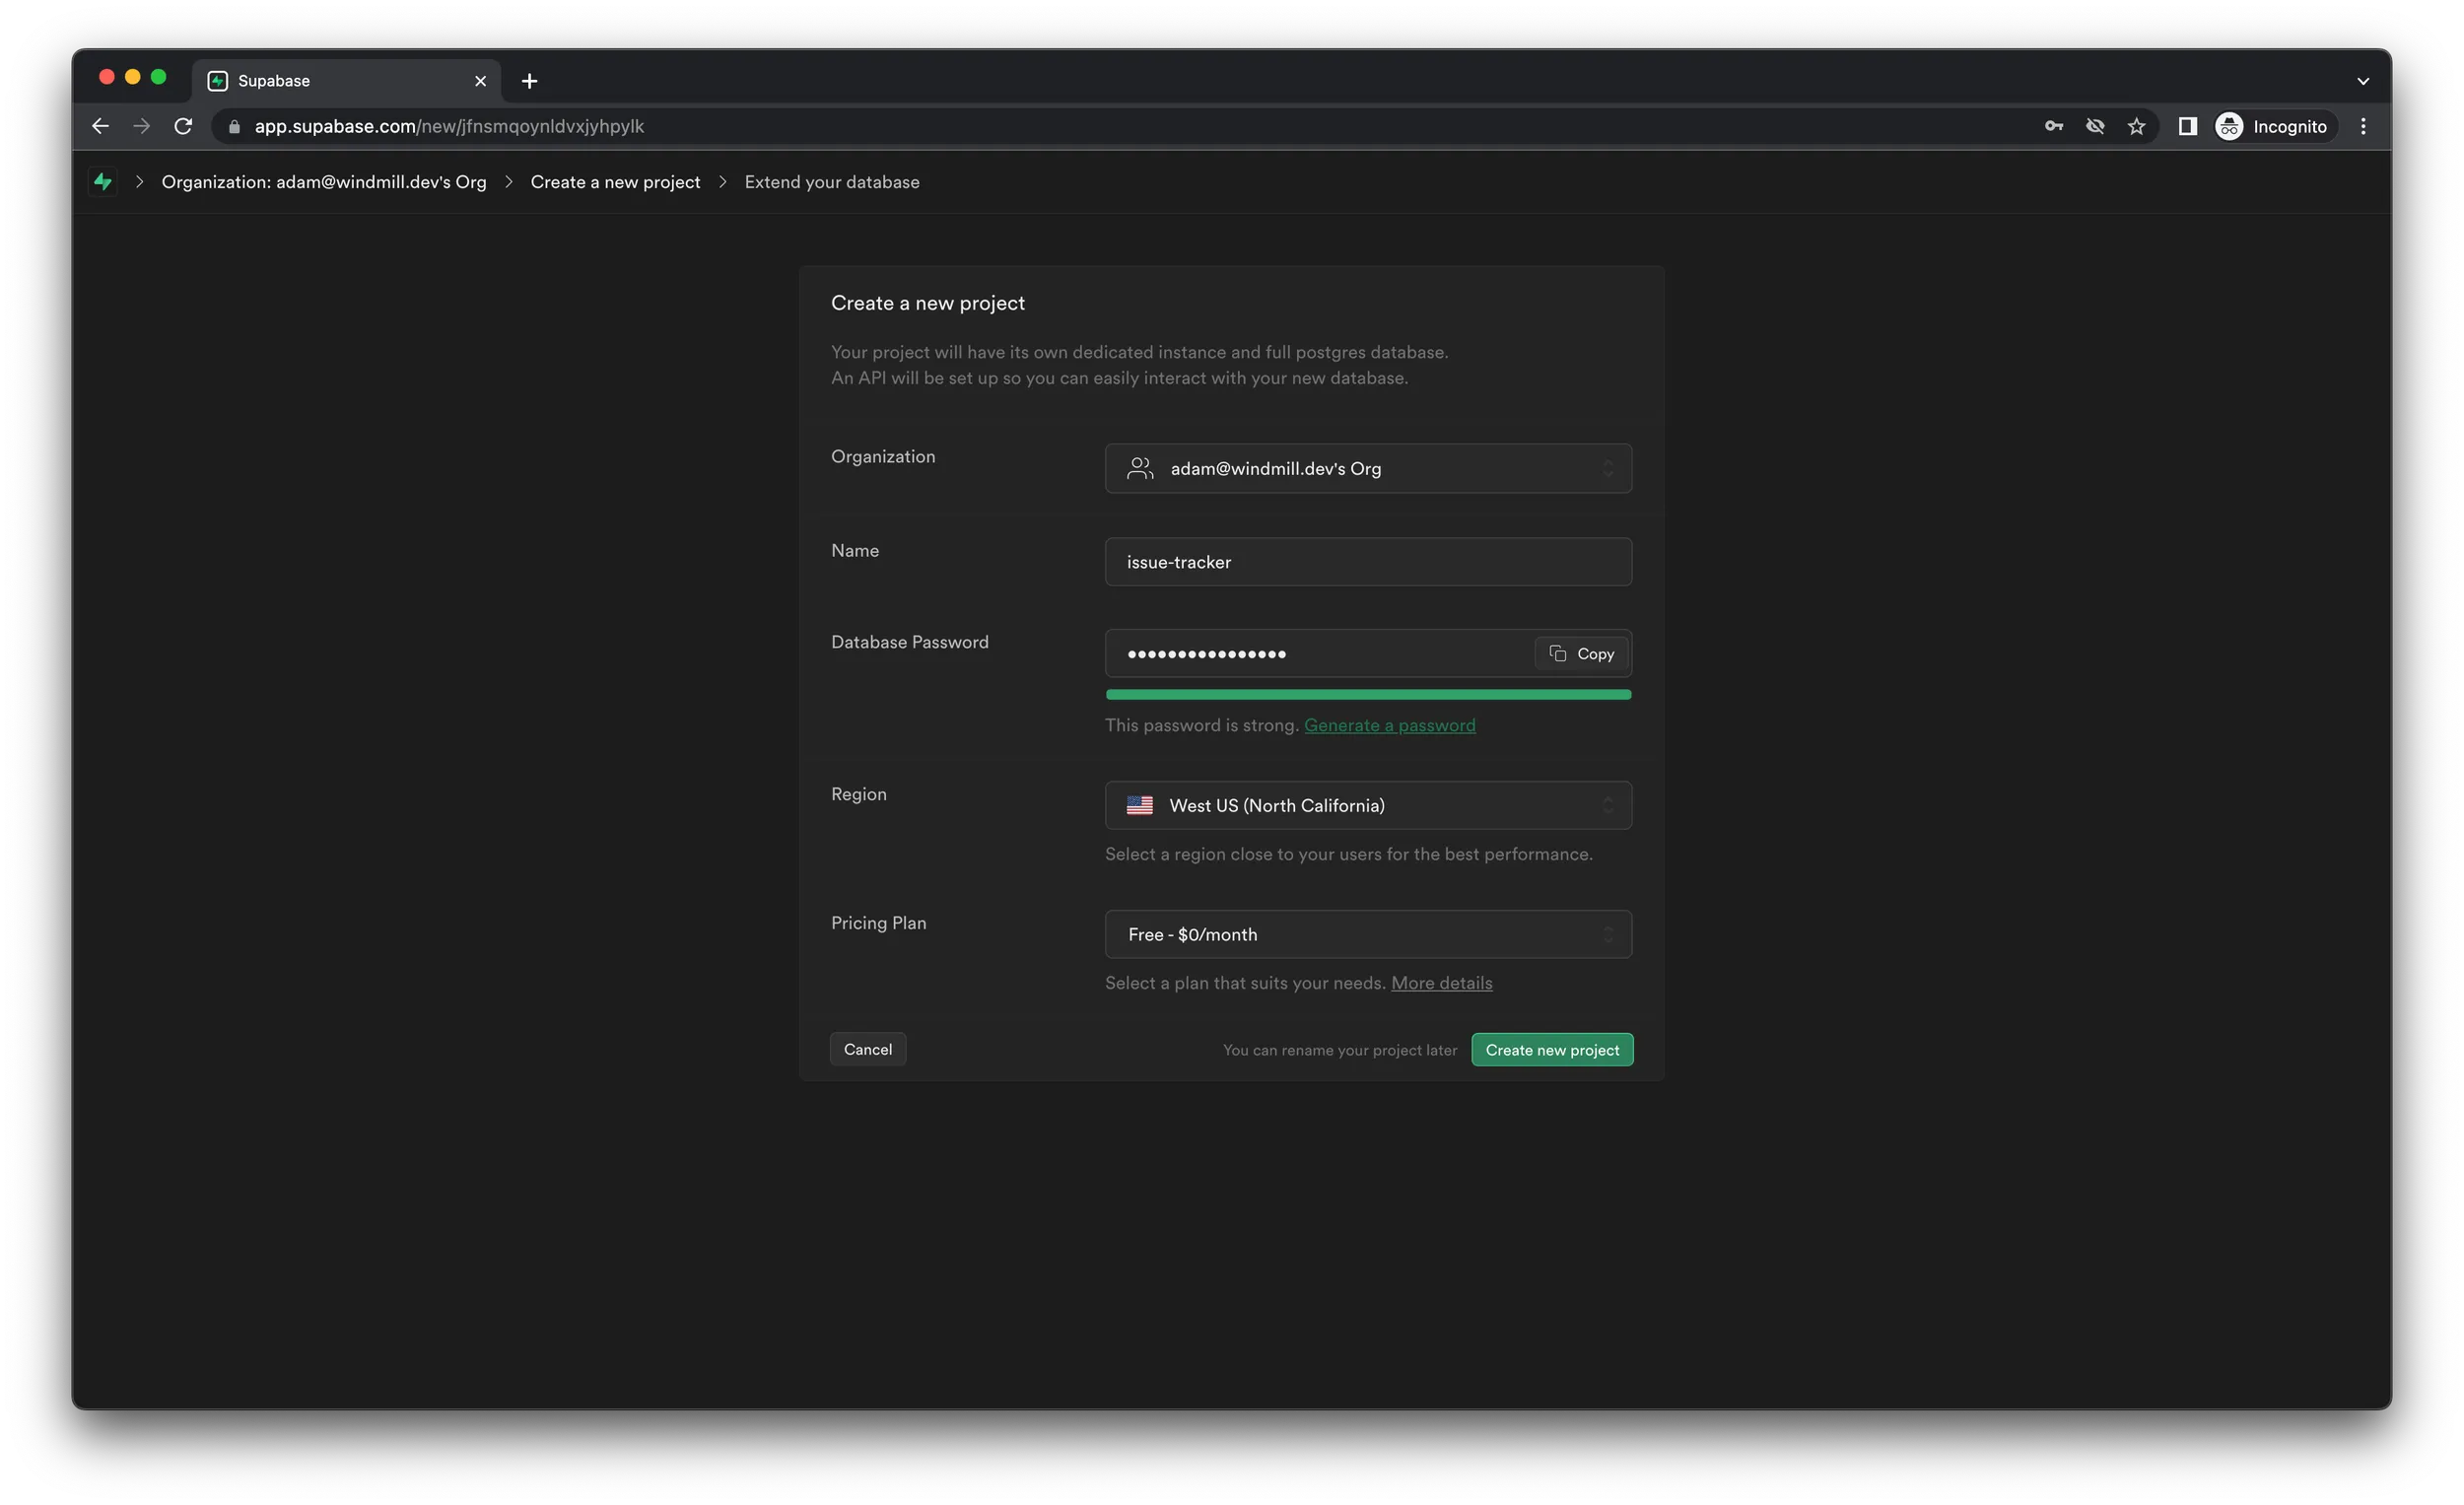
Supabase, go ahead and create a project by clicking “New project” on the
Projects page. Name it issue-tracker, enter a password (we recommend using the
“Generate” button) and select the region closest to your users. You can leave
the pricing plan at free and click “Create new project”.
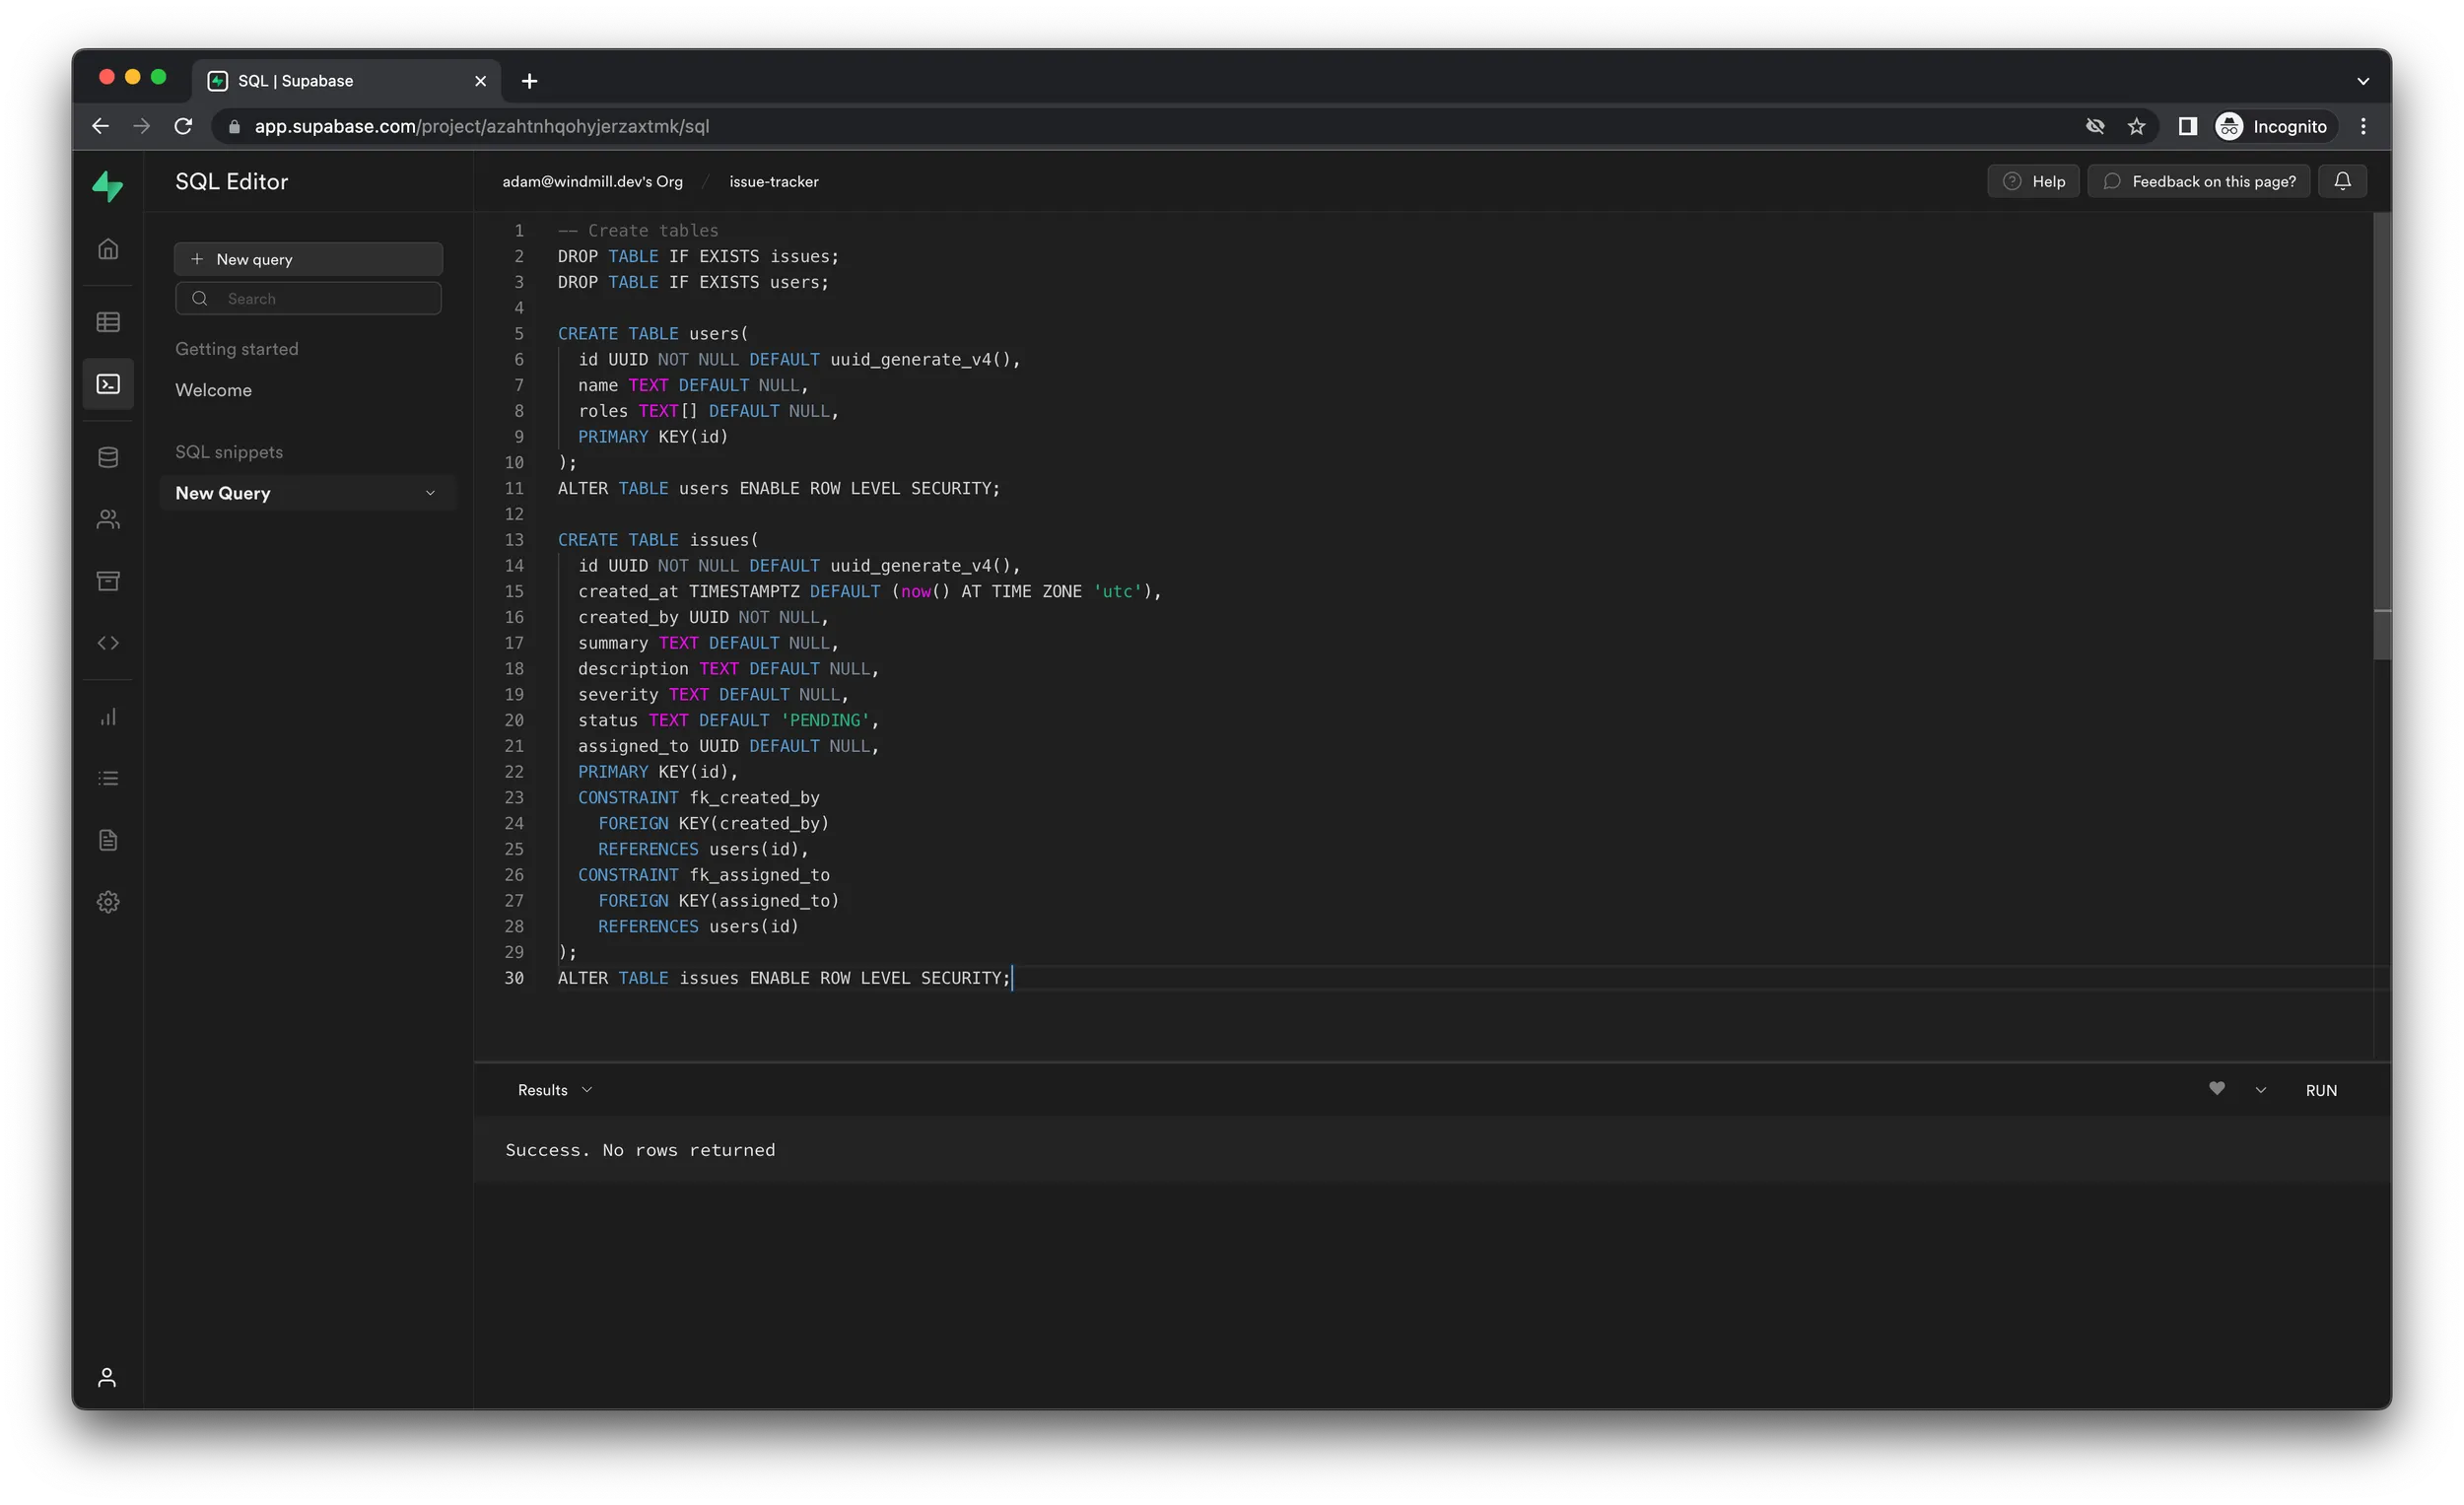
After your project is provisioned (it usually takes just a few minutes),
navigate to the SQL Editor page, click “New query” in to top-left corner and
paste in the following SQL query, which will create both users and issues
table:
-- Create tables
DROP TABLE IF EXISTS issues;
DROP TABLE IF EXISTS users;

CREATE TABLE users(
	id UUID NOT NULL DEFAULT uuid_generate_v4(),
	name TEXT DEFAULT NULL,
	roles TEXT[] DEFAULT NULL,
	PRIMARY KEY(id)
);
ALTER TABLE users ENABLE ROW LEVEL SECURITY;

CREATE TABLE issues(
	id UUID NOT NULL DEFAULT uuid_generate_v4(),
	created_at TIMESTAMPTZ DEFAULT (now() AT TIME ZONE 'utc'),
	created_by UUID NOT NULL,
	summary TEXT DEFAULT NULL,
	description TEXT DEFAULT NULL,
	severity TEXT DEFAULT NULL,
	status TEXT DEFAULT 'PENDING',
	assigned_to UUID DEFAULT NULL,
	PRIMARY KEY(id),
	CONSTRAINT fk_created_by
		FOREIGN KEY(created_by)
		REFERENCES users(id),
	CONSTRAINT fk_assigned_to
		FOREIGN KEY(assigned_to)
		REFERENCES users(id)
);
ALTER TABLE issues ENABLE ROW LEVEL SECURITY;
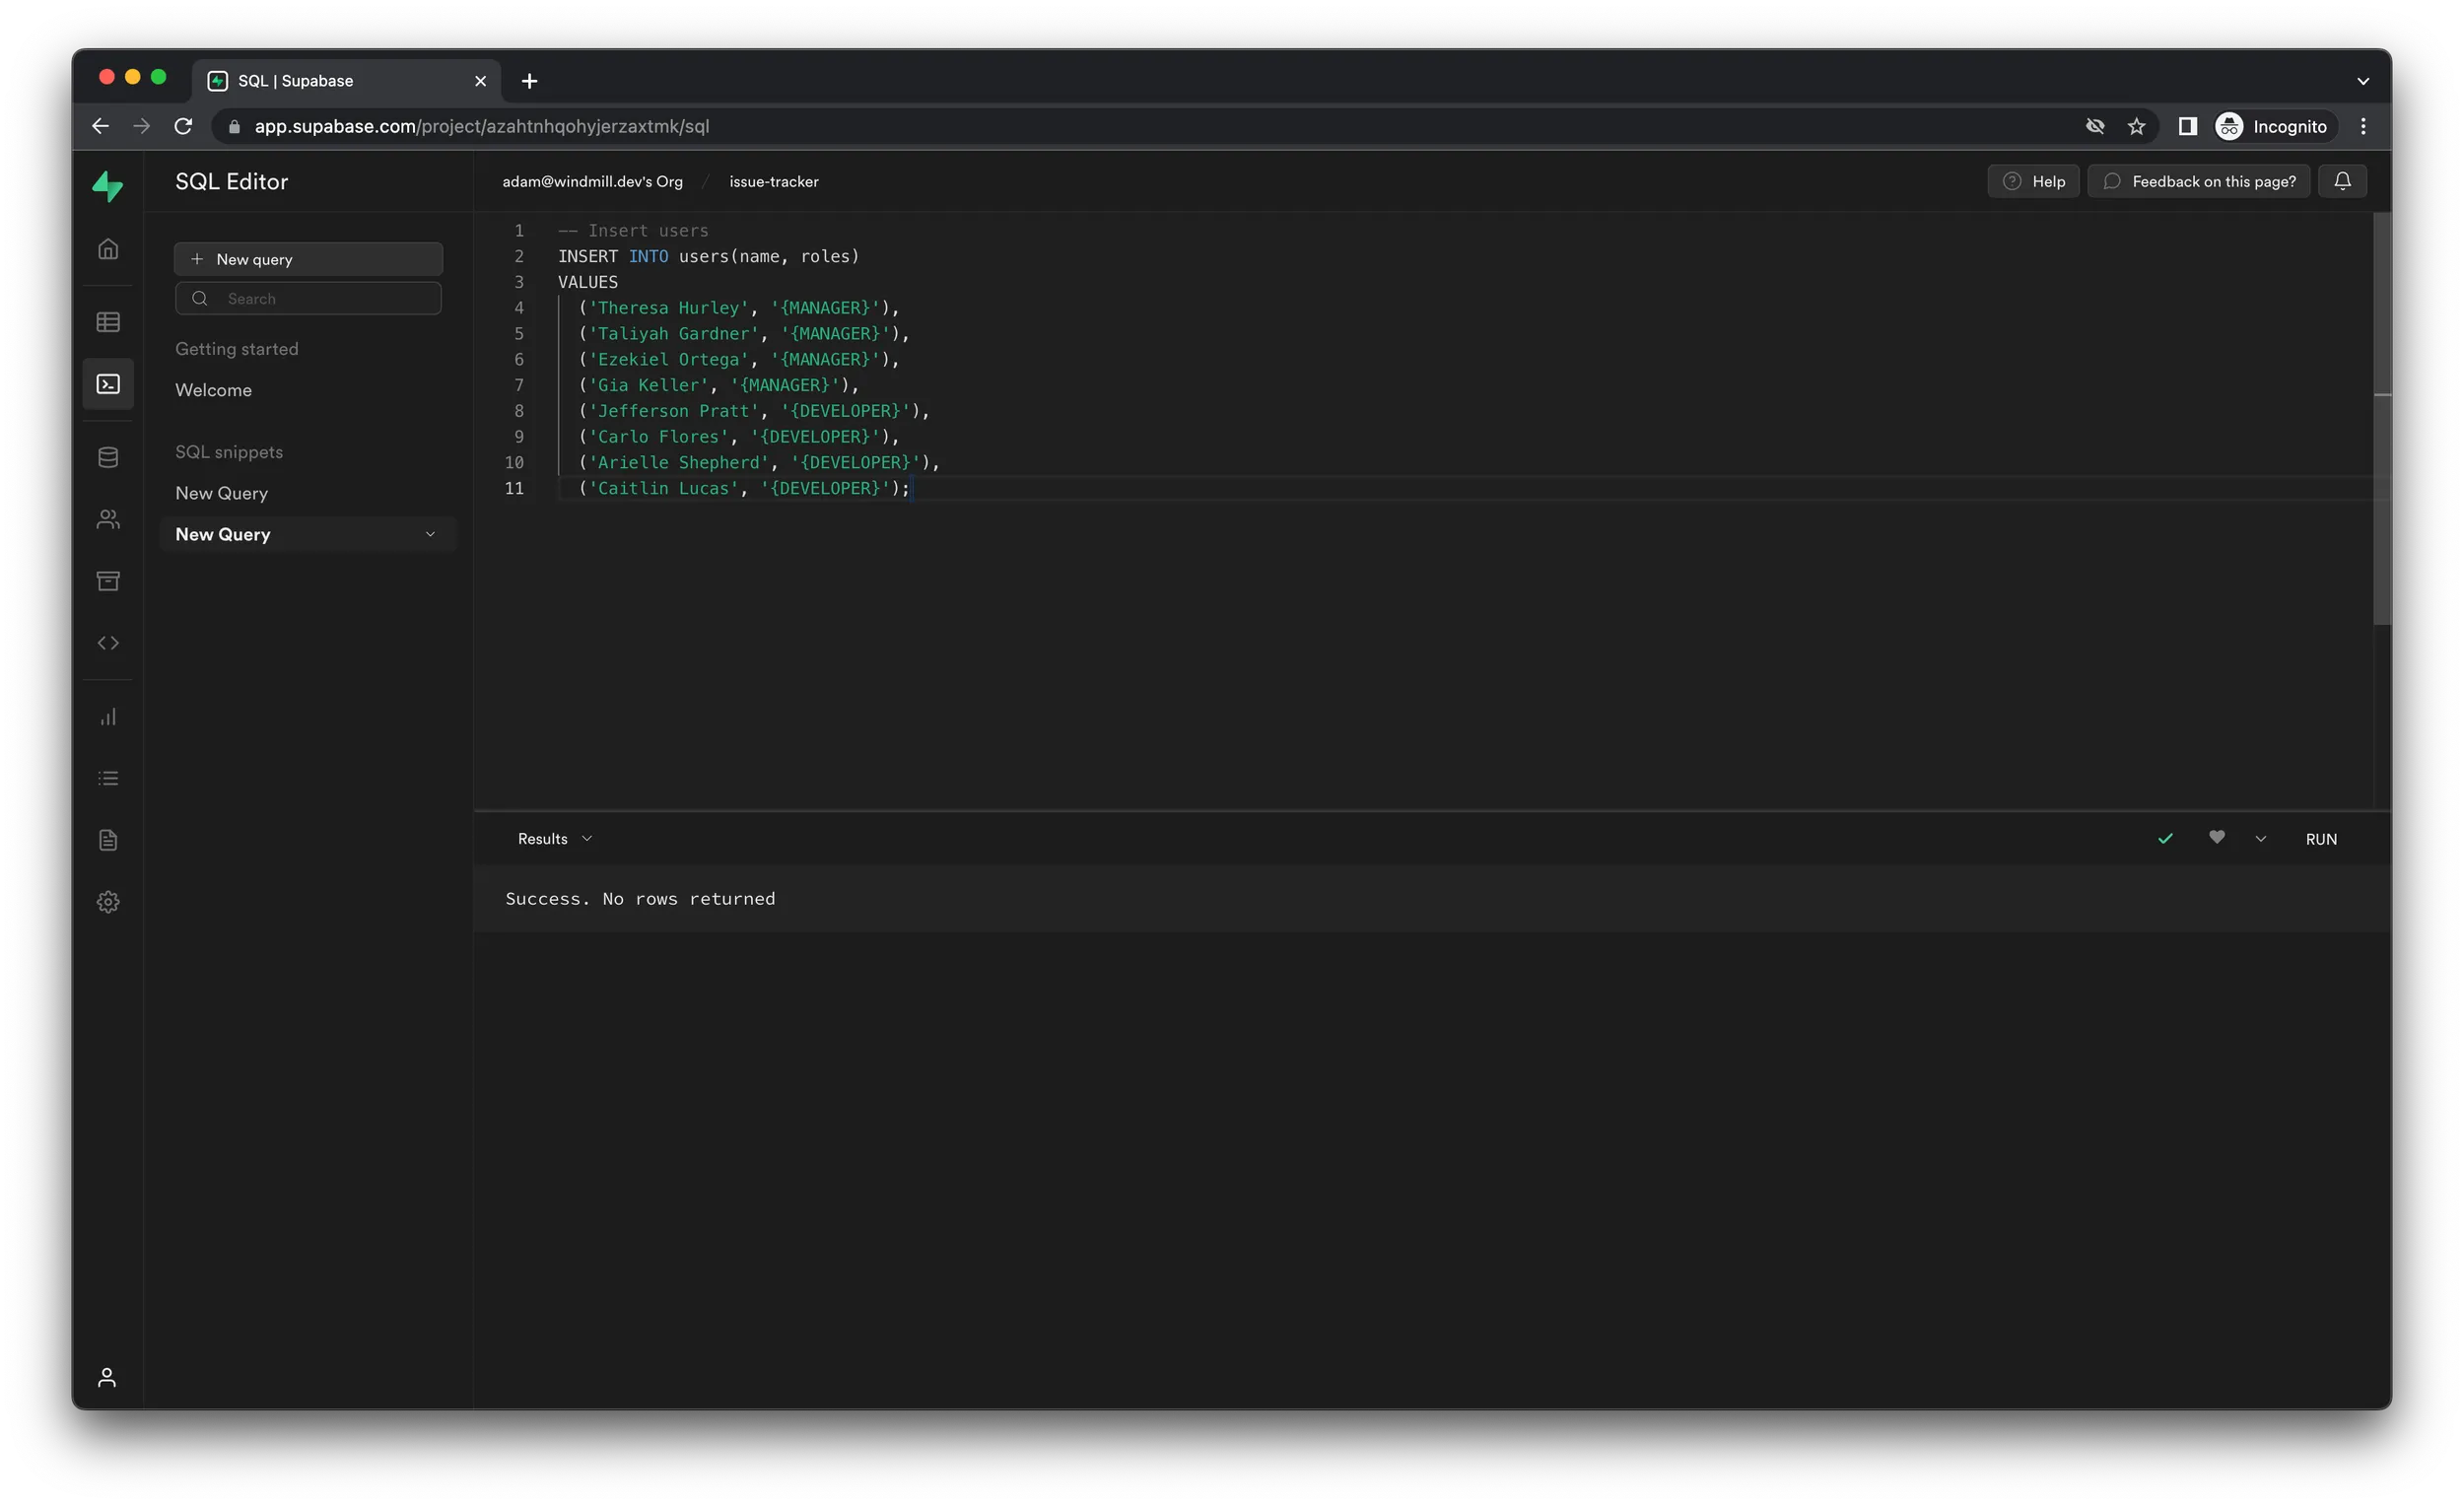
Now that the tables are ready to receive data, let's populate them by running
two more SQL queries. Click "New query" again in the top-left corner and paste
in the following code, which will add 8 people to the users table.
-- Insert users
INSERT INTO users(name, roles)
VALUES
  ('Theresa Hurley', '{MANAGER}'),
  ('Taliyah Gardner', '{MANAGER}'),
  ('Ezekiel Ortega', '{MANAGER}'),
  ('Gia Keller', '{MANAGER}'),
  ('Jefferson Pratt', '{DEVELOPER}'),
  ('Carlo Flores', '{DEVELOPER}'),
  ('Arielle Shepherd', '{DEVELOPER}'),
  ('Caitlin Lucas', '{DEVELOPER}');
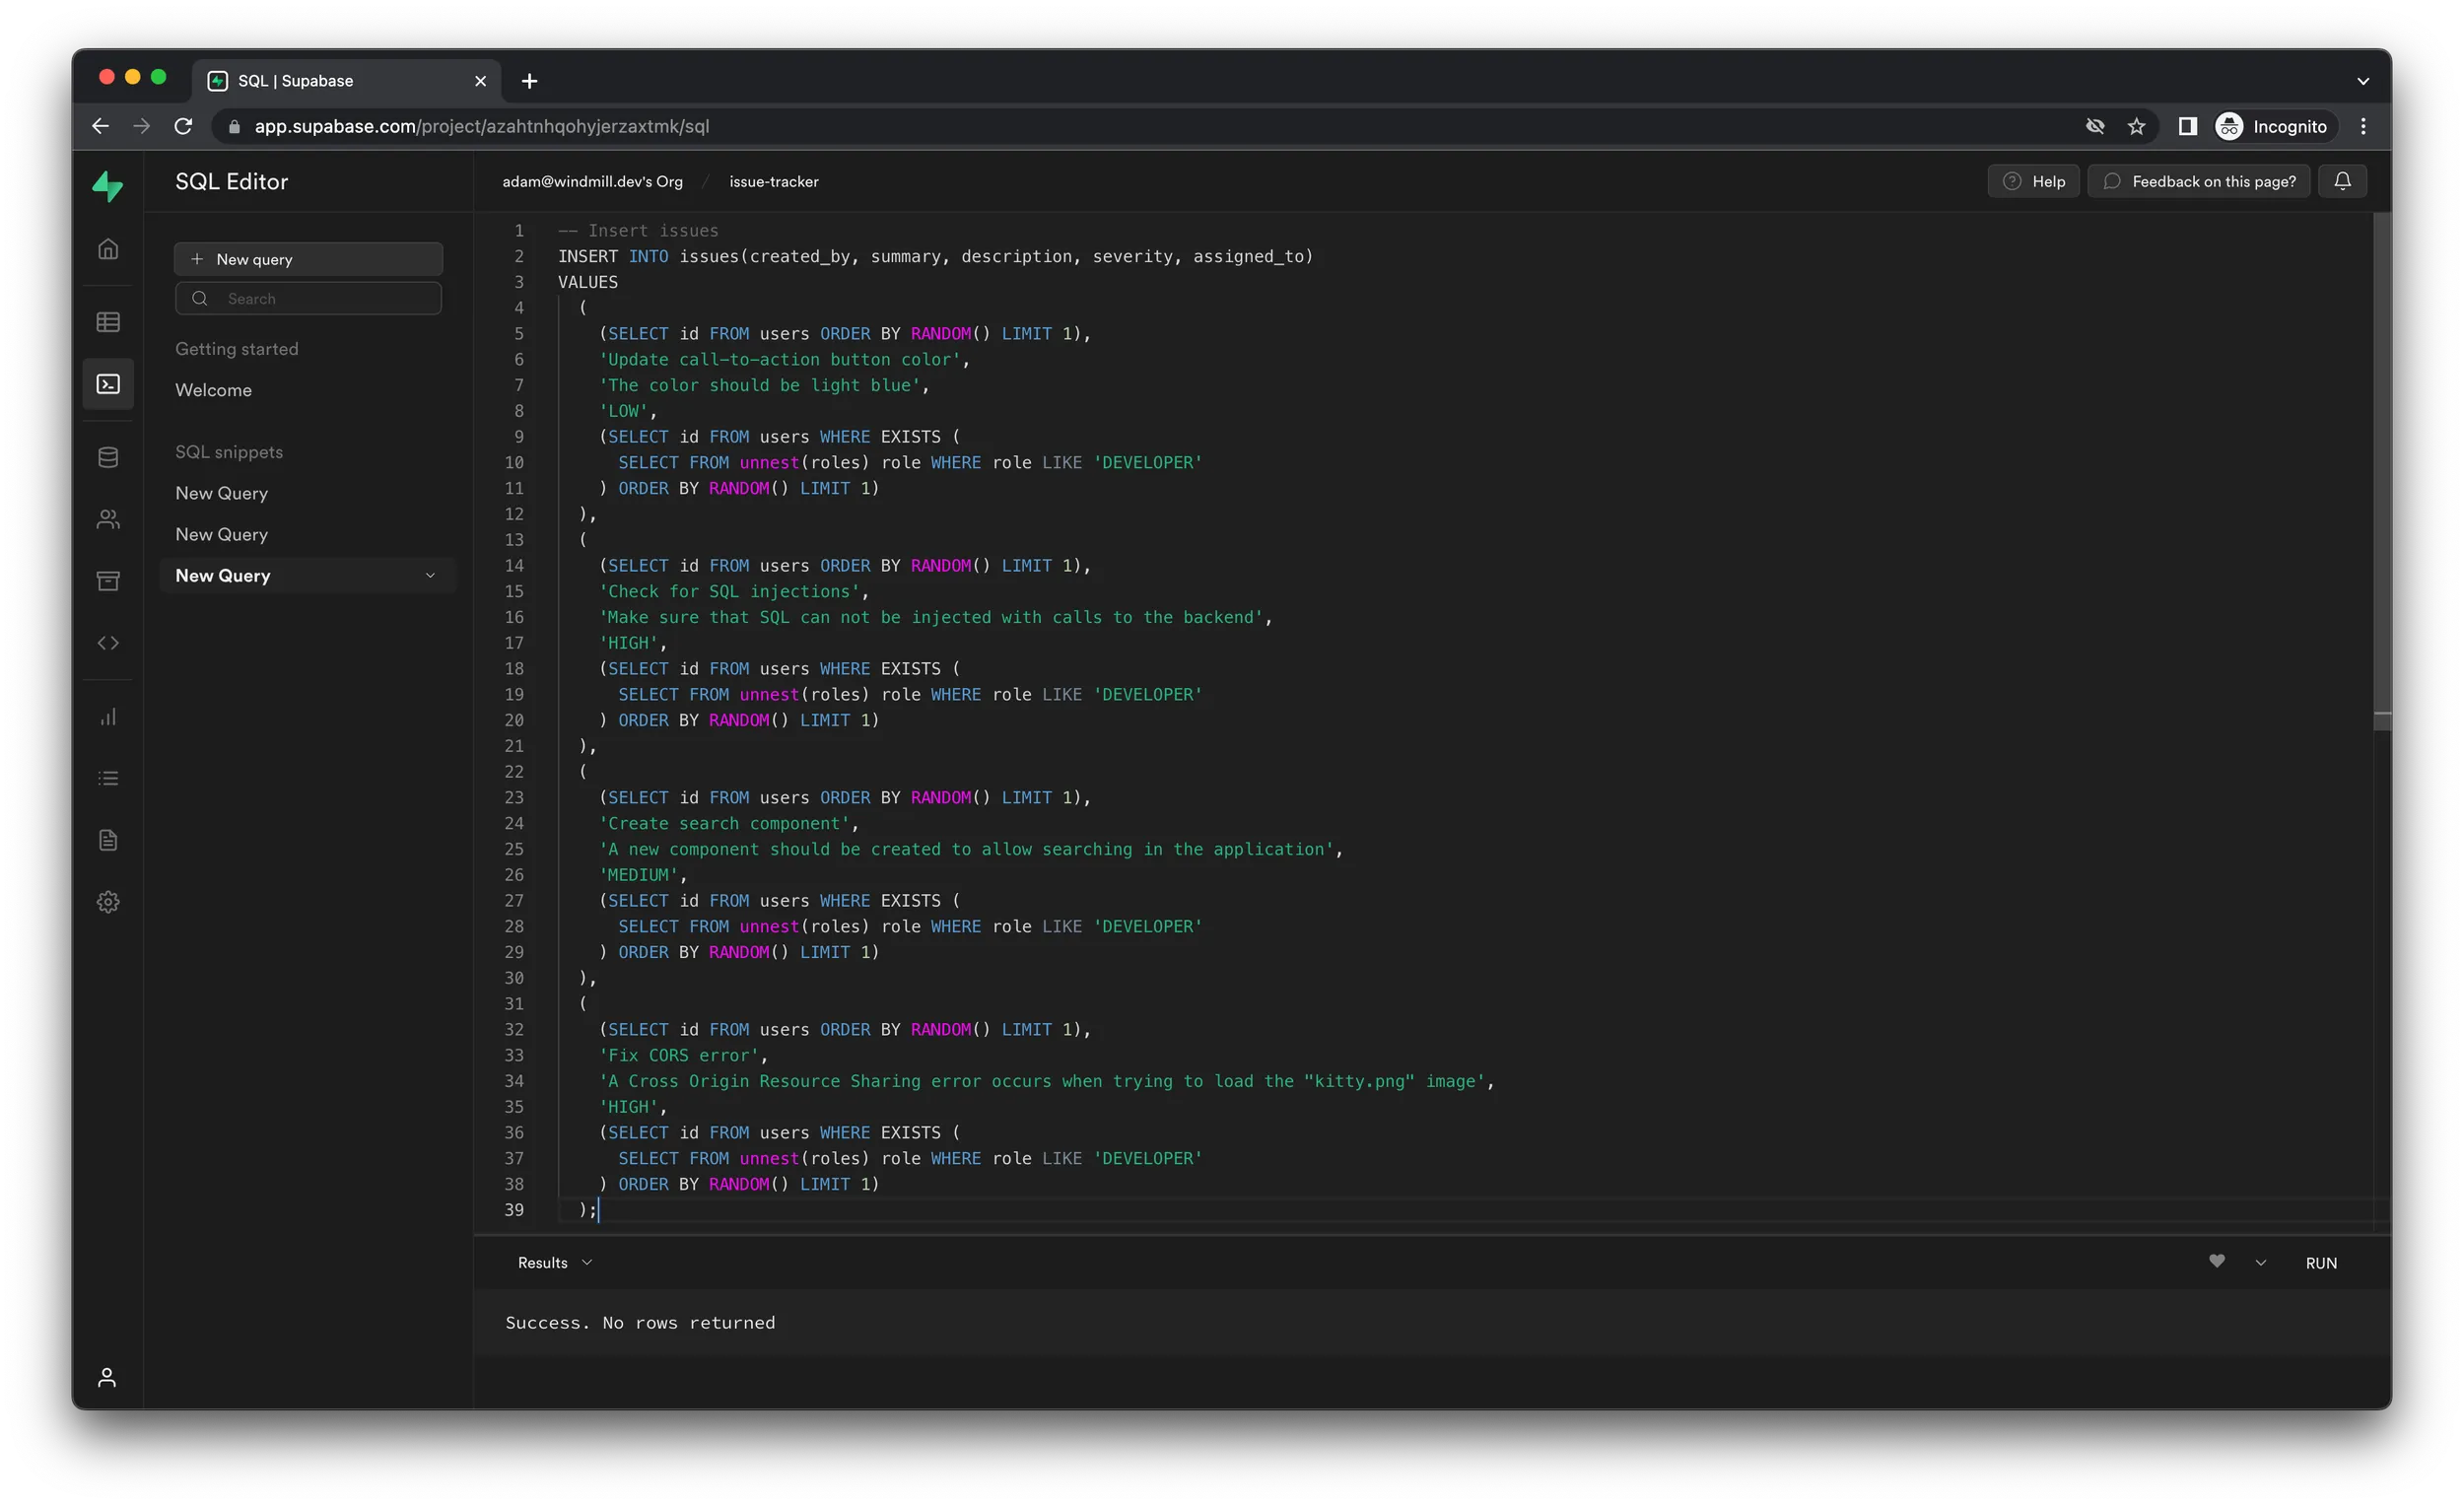
After populating the users table, click "New query" once more and run the next
one, which will insert 4 mock issues to the issues table.
It is important to add the users first, because the following query will make use of the data in that table.
-- Insert issues
INSERT INTO issues(created_by, summary, description, severity, assigned_to)
VALUES
  (
    (SELECT id FROM users ORDER BY RANDOM() LIMIT 1),
    'Update call-to-action button color',
    'The color should be light blue',
    'LOW',
    (SELECT id FROM users WHERE EXISTS (
      SELECT FROM unnest(roles) role WHERE role LIKE 'DEVELOPER'
    ) ORDER BY RANDOM() LIMIT 1)
  ),
  (
    (SELECT id FROM users ORDER BY RANDOM() LIMIT 1),
    'Check for SQL injections',
    'Make sure that SQL can not be injected with calls to the backend',
    'HIGH',
    (SELECT id FROM users WHERE EXISTS (
      SELECT FROM unnest(roles) role WHERE role LIKE 'DEVELOPER'
    ) ORDER BY RANDOM() LIMIT 1)
  ),
  (
    (SELECT id FROM users ORDER BY RANDOM() LIMIT 1),
    'Create search component',
    'A new component should be created to allow searching in the application',
    'MEDIUM',
    (SELECT id FROM users WHERE EXISTS (
      SELECT FROM unnest(roles) role WHERE role LIKE 'DEVELOPER'
    ) ORDER BY RANDOM() LIMIT 1)
  ),
  (
    (SELECT id FROM users ORDER BY RANDOM() LIMIT 1),
    'Fix CORS error',
    'A Cross Origin Resource Sharing error occurs when trying to load the "kitty.png" image',
    'HIGH',
    (SELECT id FROM users WHERE EXISTS (
      SELECT FROM unnest(roles) role WHERE role LIKE 'DEVELOPER'
    ) ORDER BY RANDOM() LIMIT 1)
  );
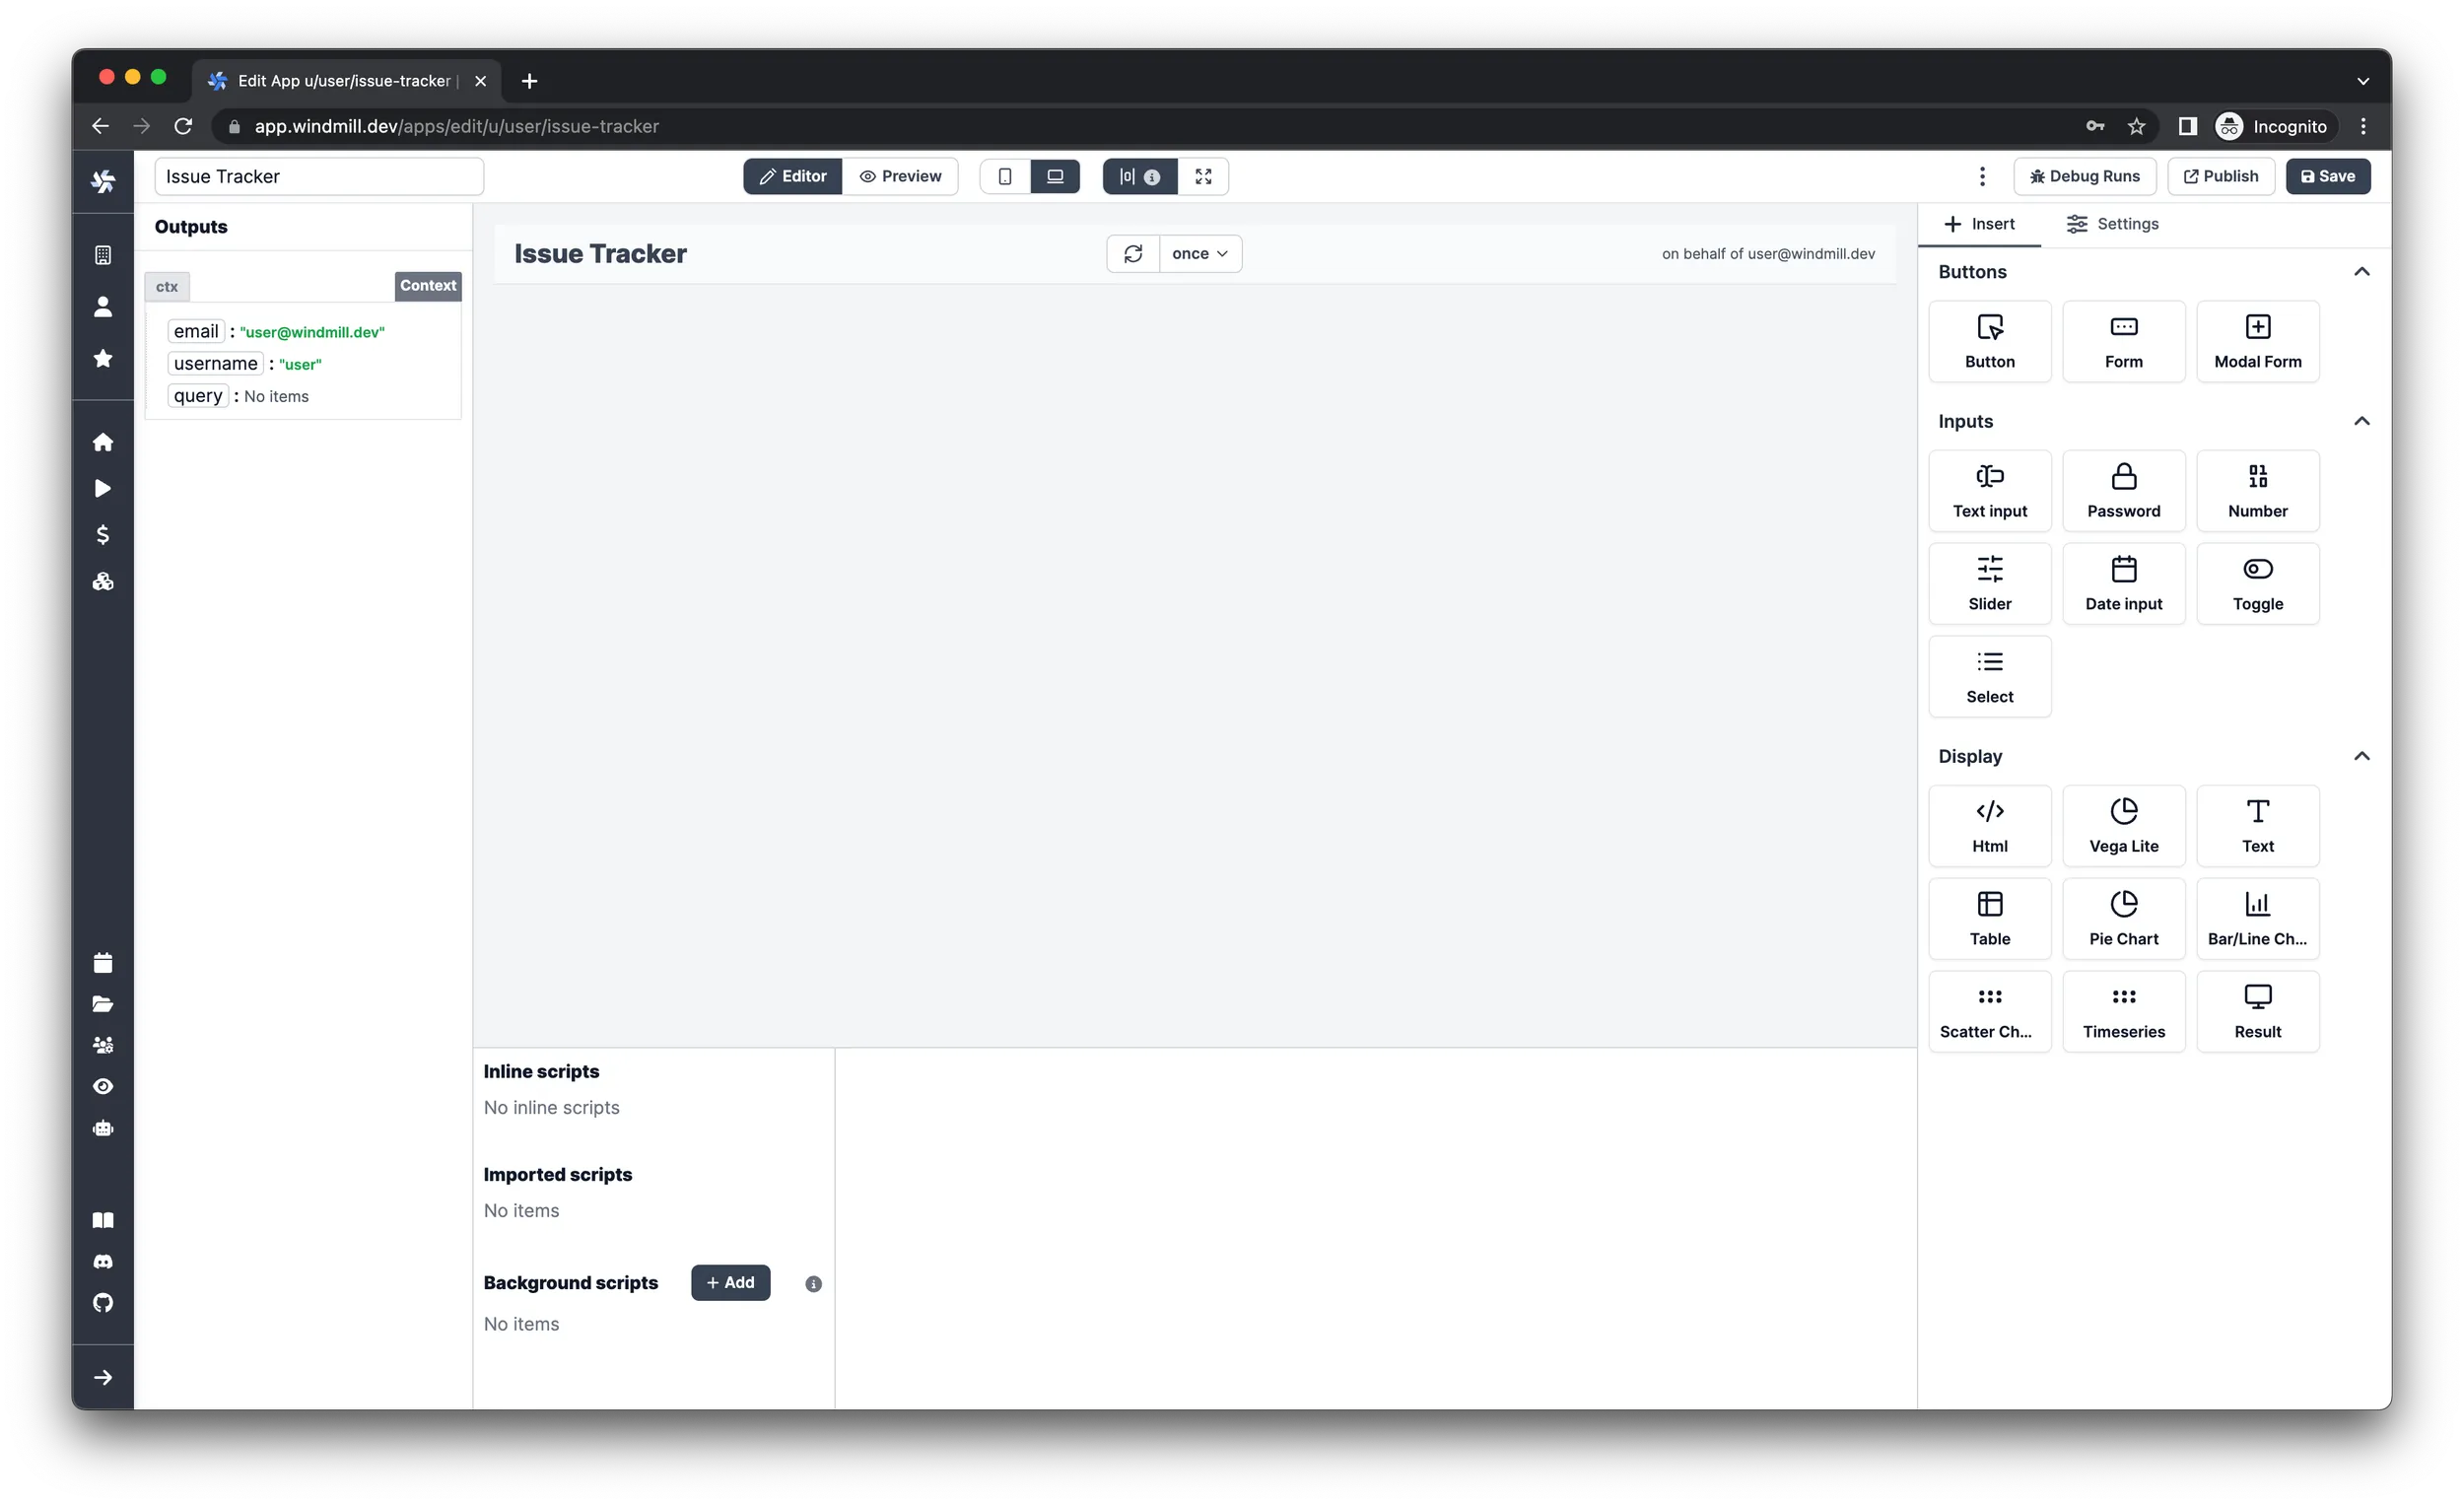
Windmill setup
You can create resources that will allow you to reuse secrets like passwords and tokens without exposing them. To create your Supabase resource, check out the How to Integrate Supabase with Windmill tutorial - it takes only 2 minutes.
After you added your resource, navigate to the Home
page and create a new App in the top-right corner. You can enter an optional App
summary on the left side of the header, let’s use Issue Tracker. Click "Save"
on the other end of the top row, name your app issue-tracker and click "Create
app".
Create the app
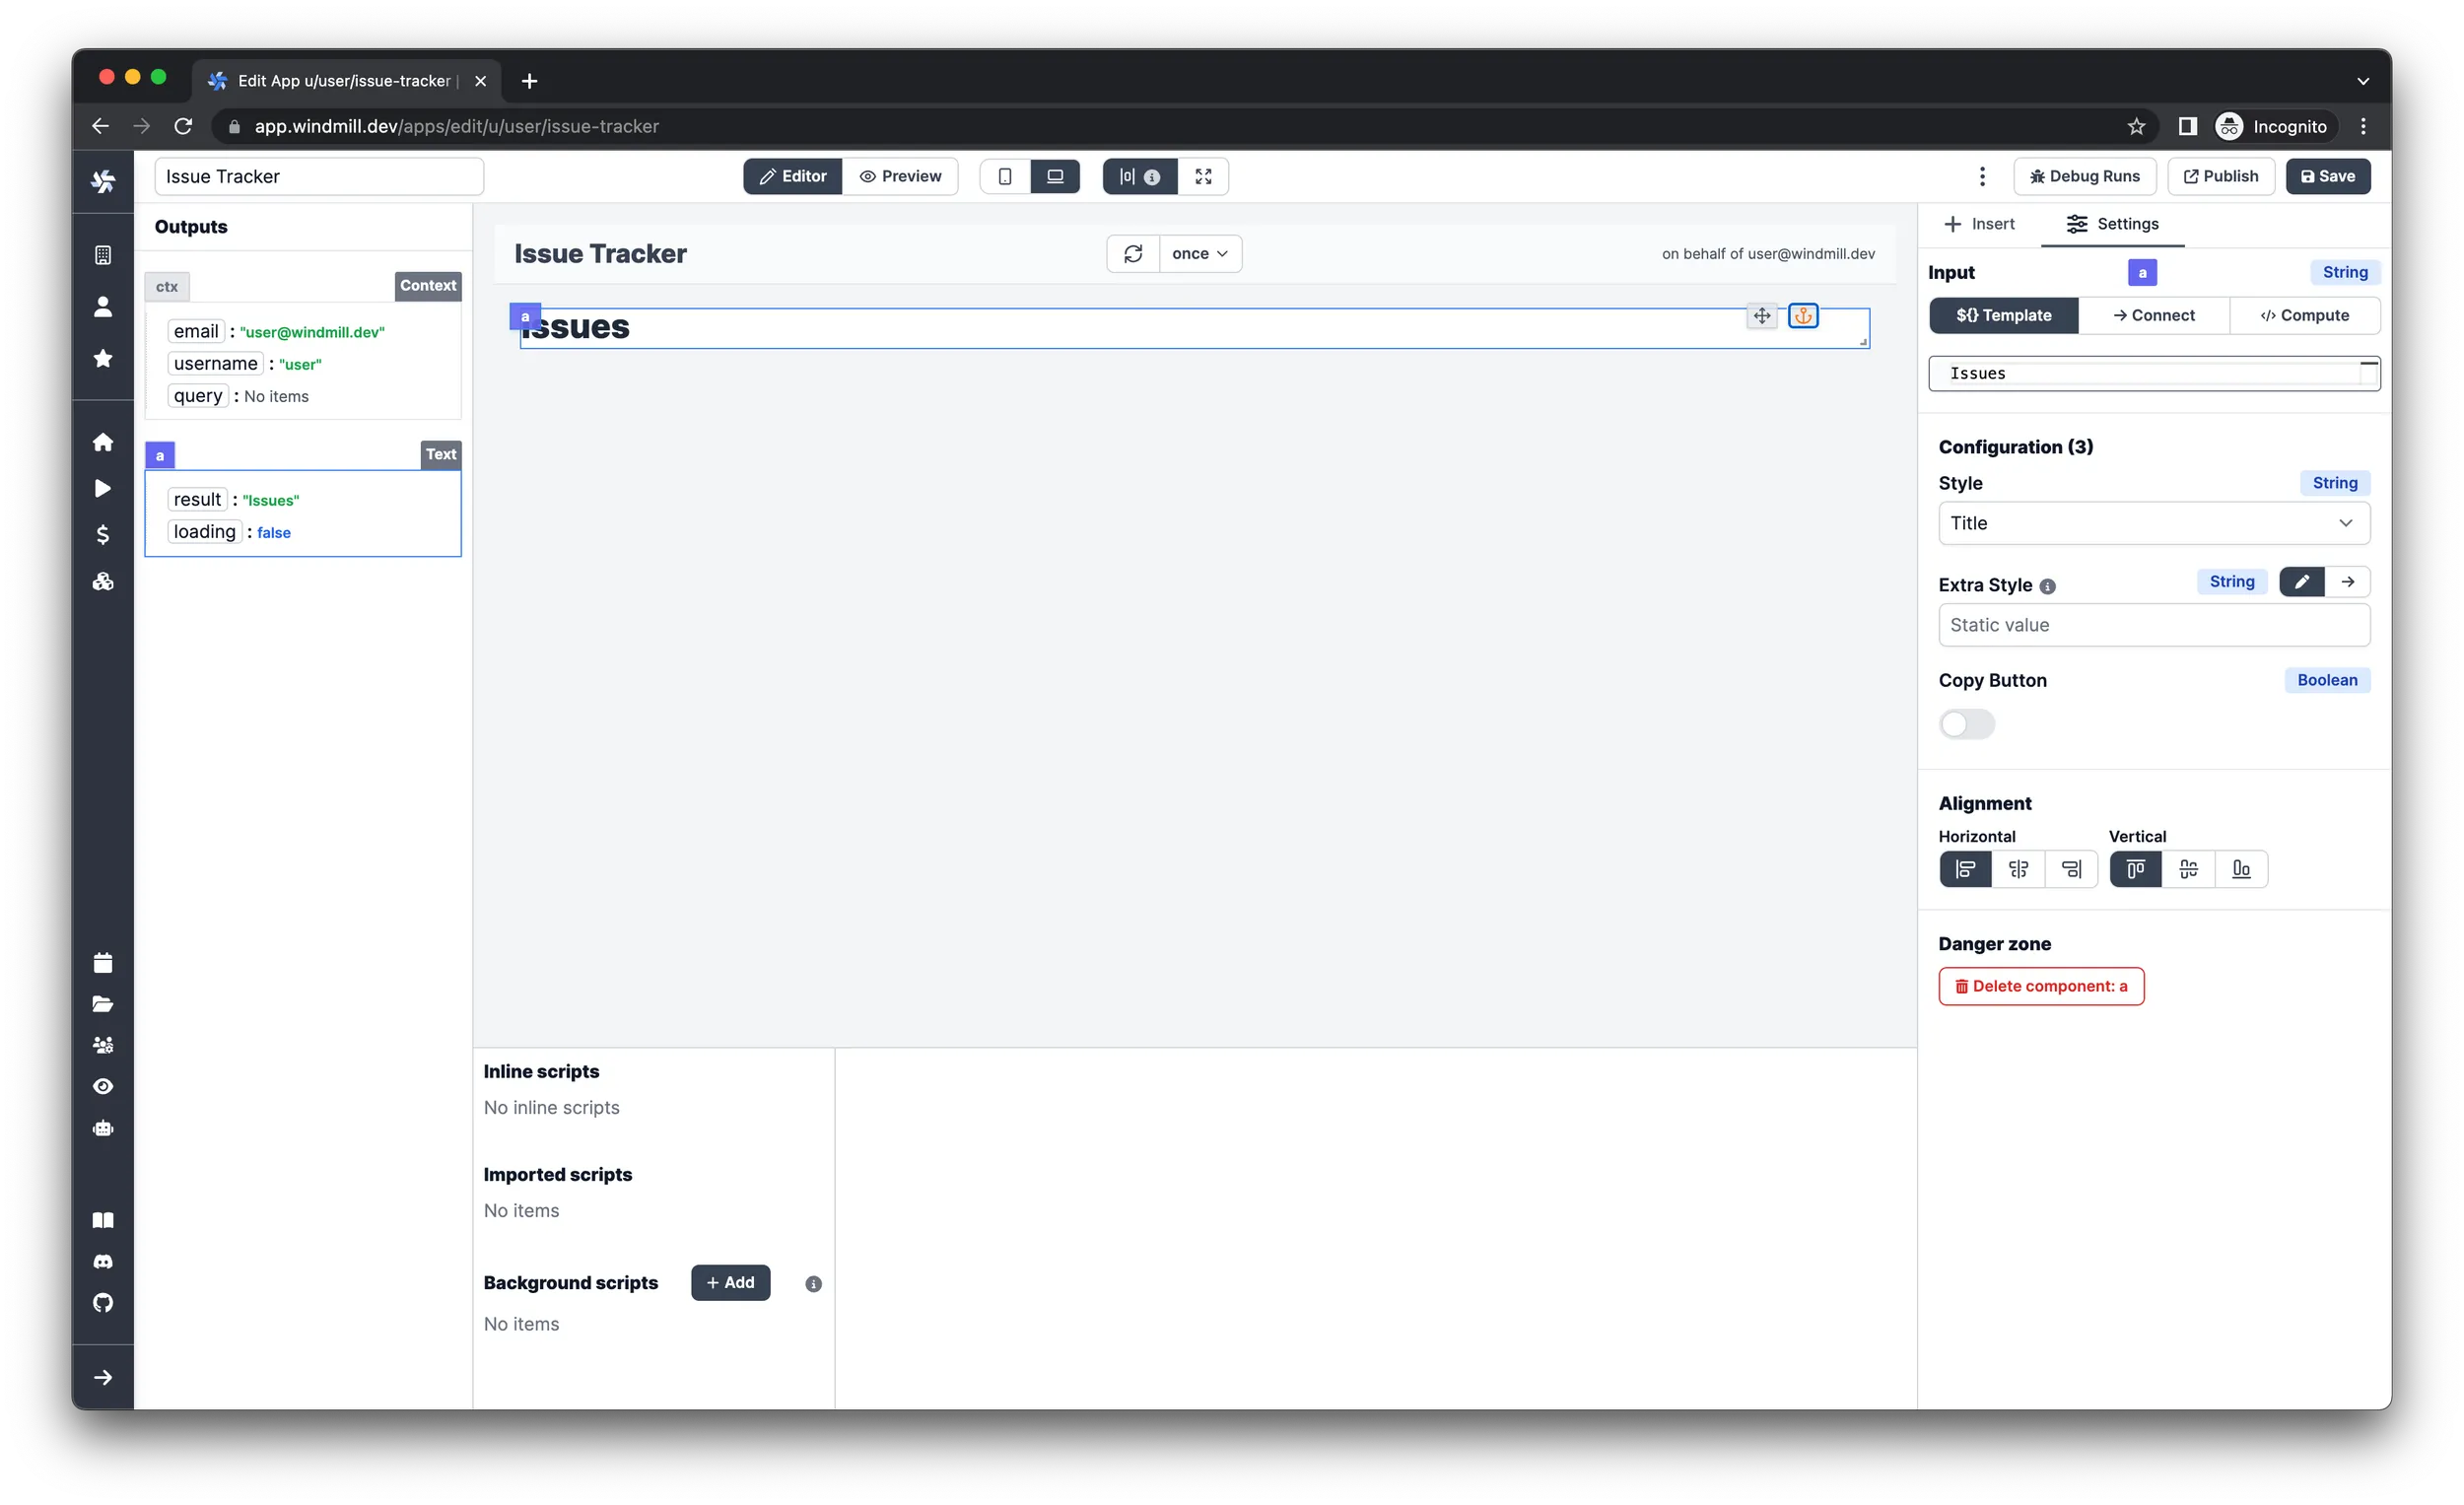
Add a title
Insert a Text component and configure it as the followings:
- Enter
Issuesas the input. - Select
Titleas the style. - Make the component take up the full width of the editor.
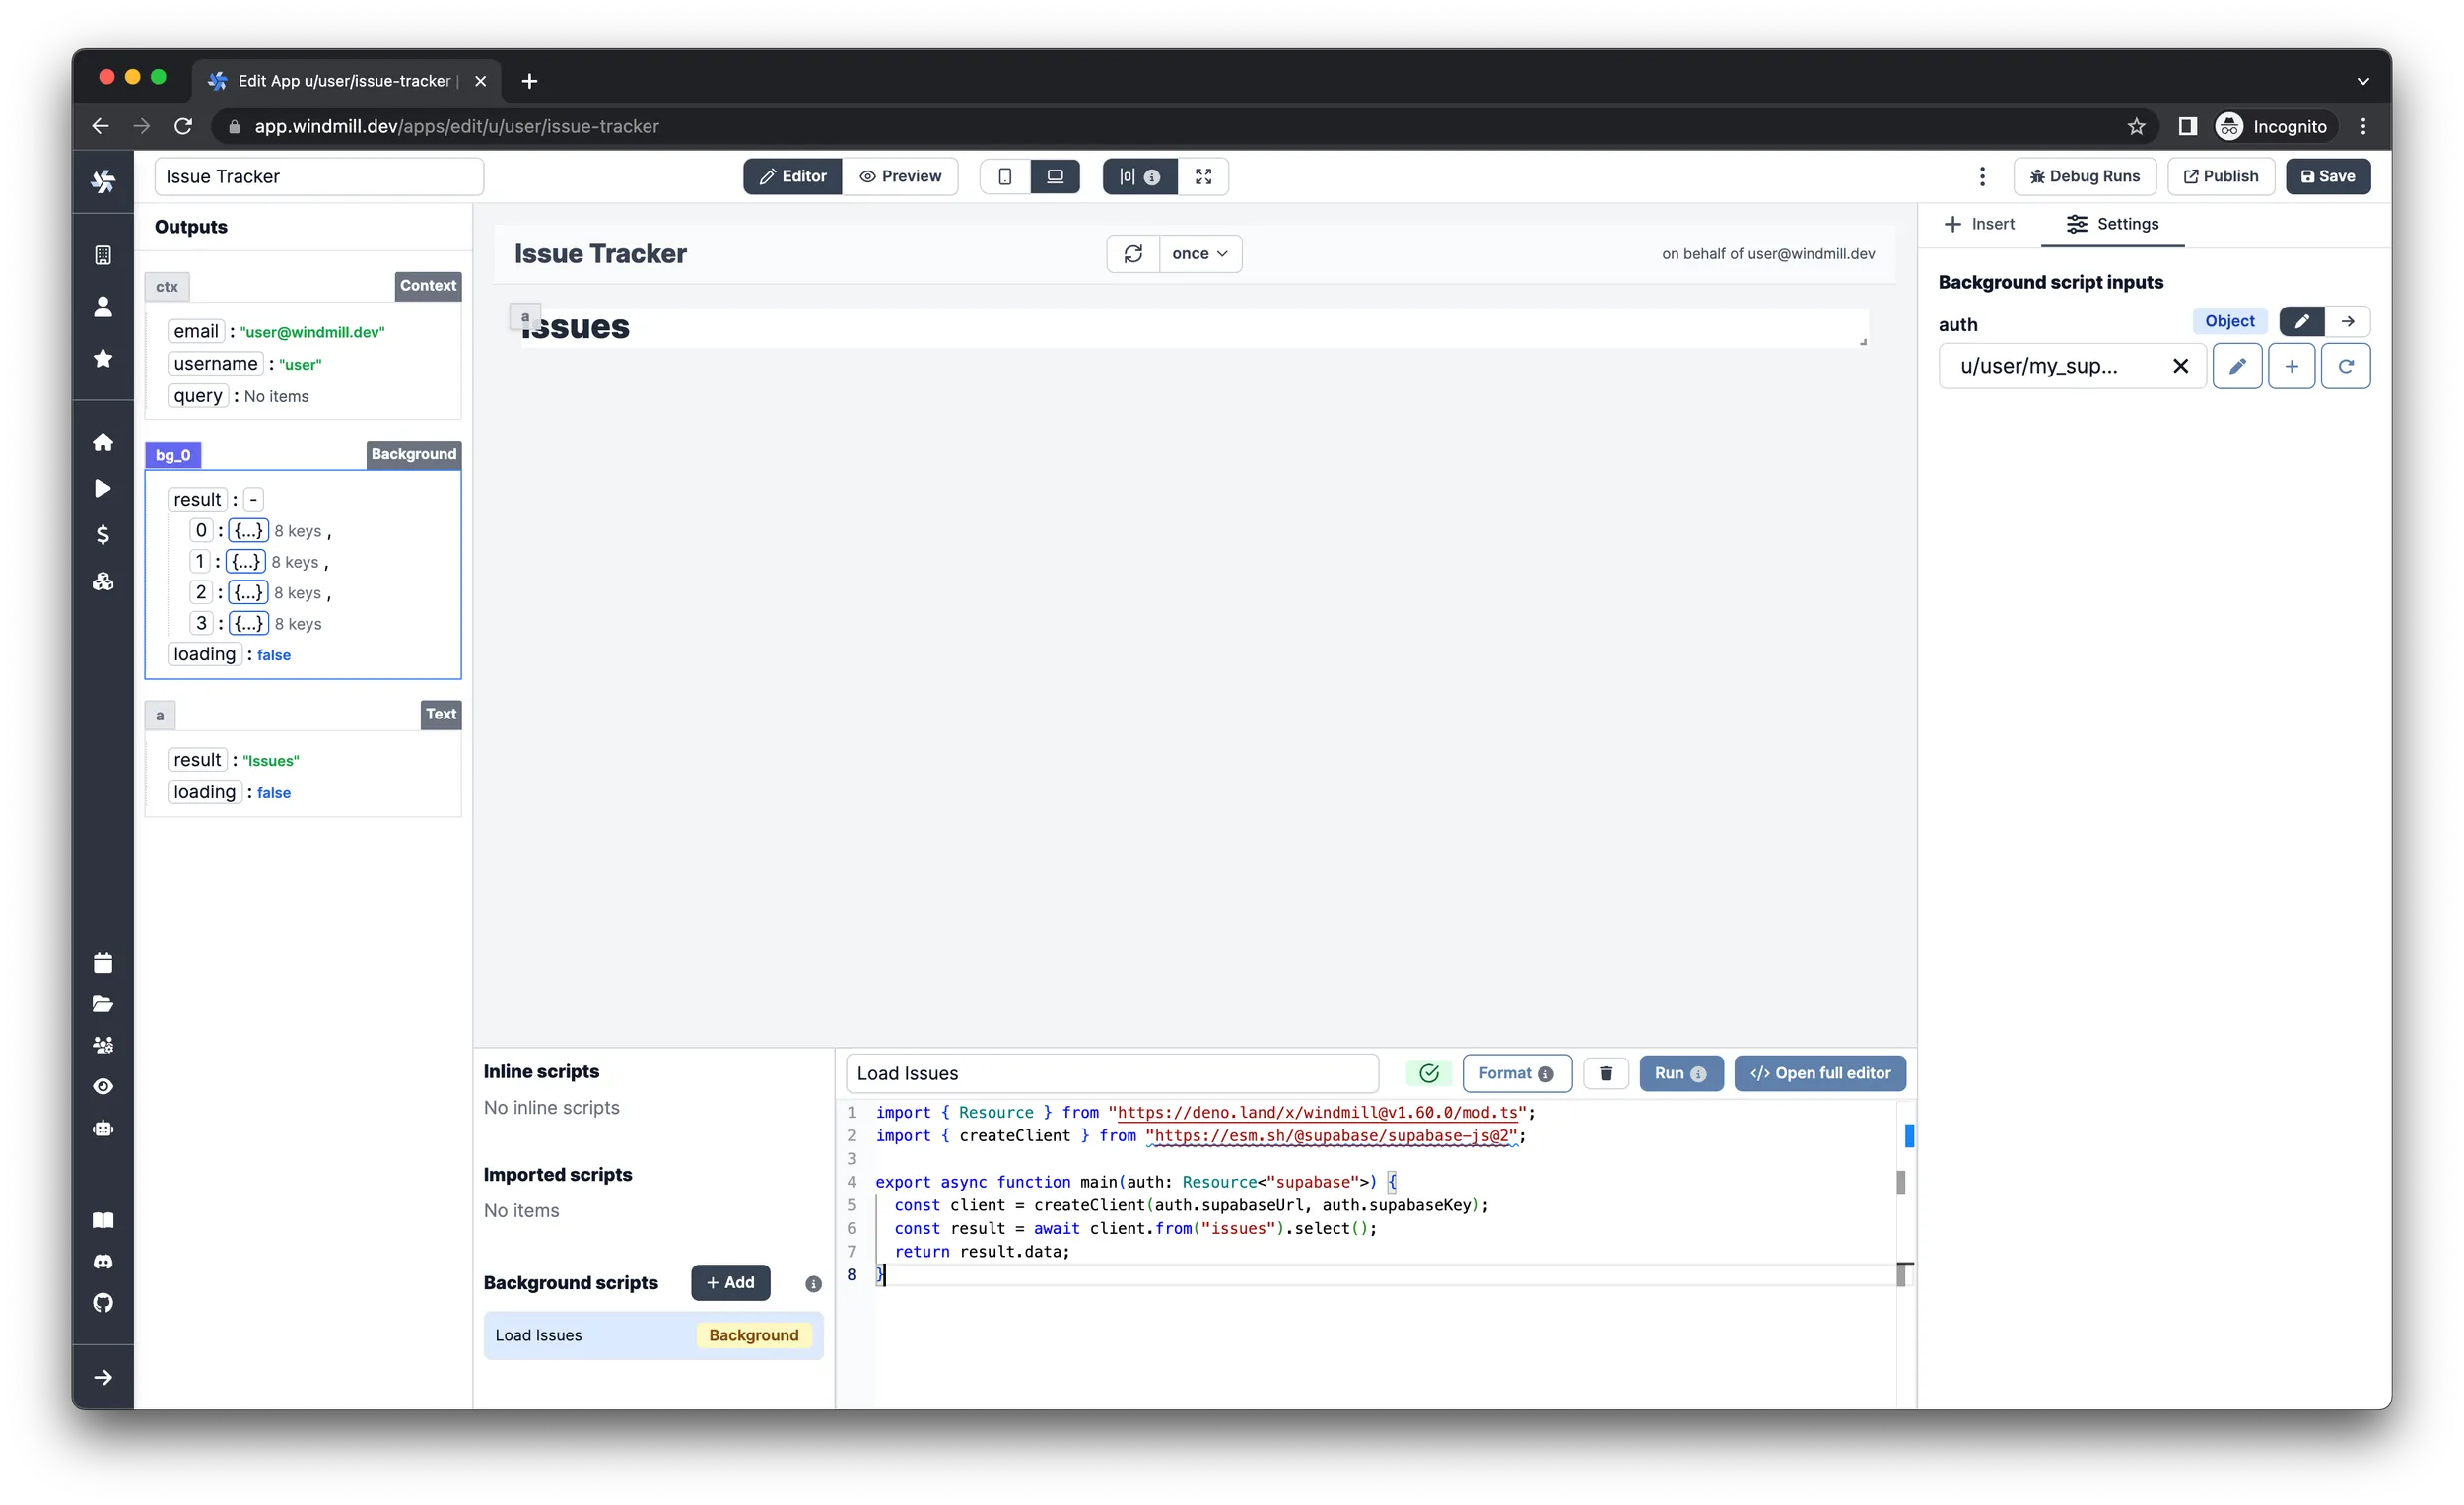
Grab the data
We will use the array of issues in more than one component, so it would be a good idea to query the data once and pass it to the individual components later. This can be achieved by Background runnables.
-
Click
Addnext to theBackground runnableslabel on the bottom left side. -
Make sure the new script is selected and choose
TypeScript (Deno)as the language. -
Name the script
Load Issues. -
Paste in the following code:
import { createClient } from 'https://esm.sh/@supabase/supabase-js@2';

type Supabase = {
	url: string;
	key: string;
};

export async function main(auth: Supabase) {
	const client = createClient(auth.url, auth.key);
	const result = await client.from('issues').select();
	return result.data;
} -
On the right
Settingspane, you can configure what arguments the script will receive. Select the Supabase resource you added in theWindmill setupstep for theauthinput.
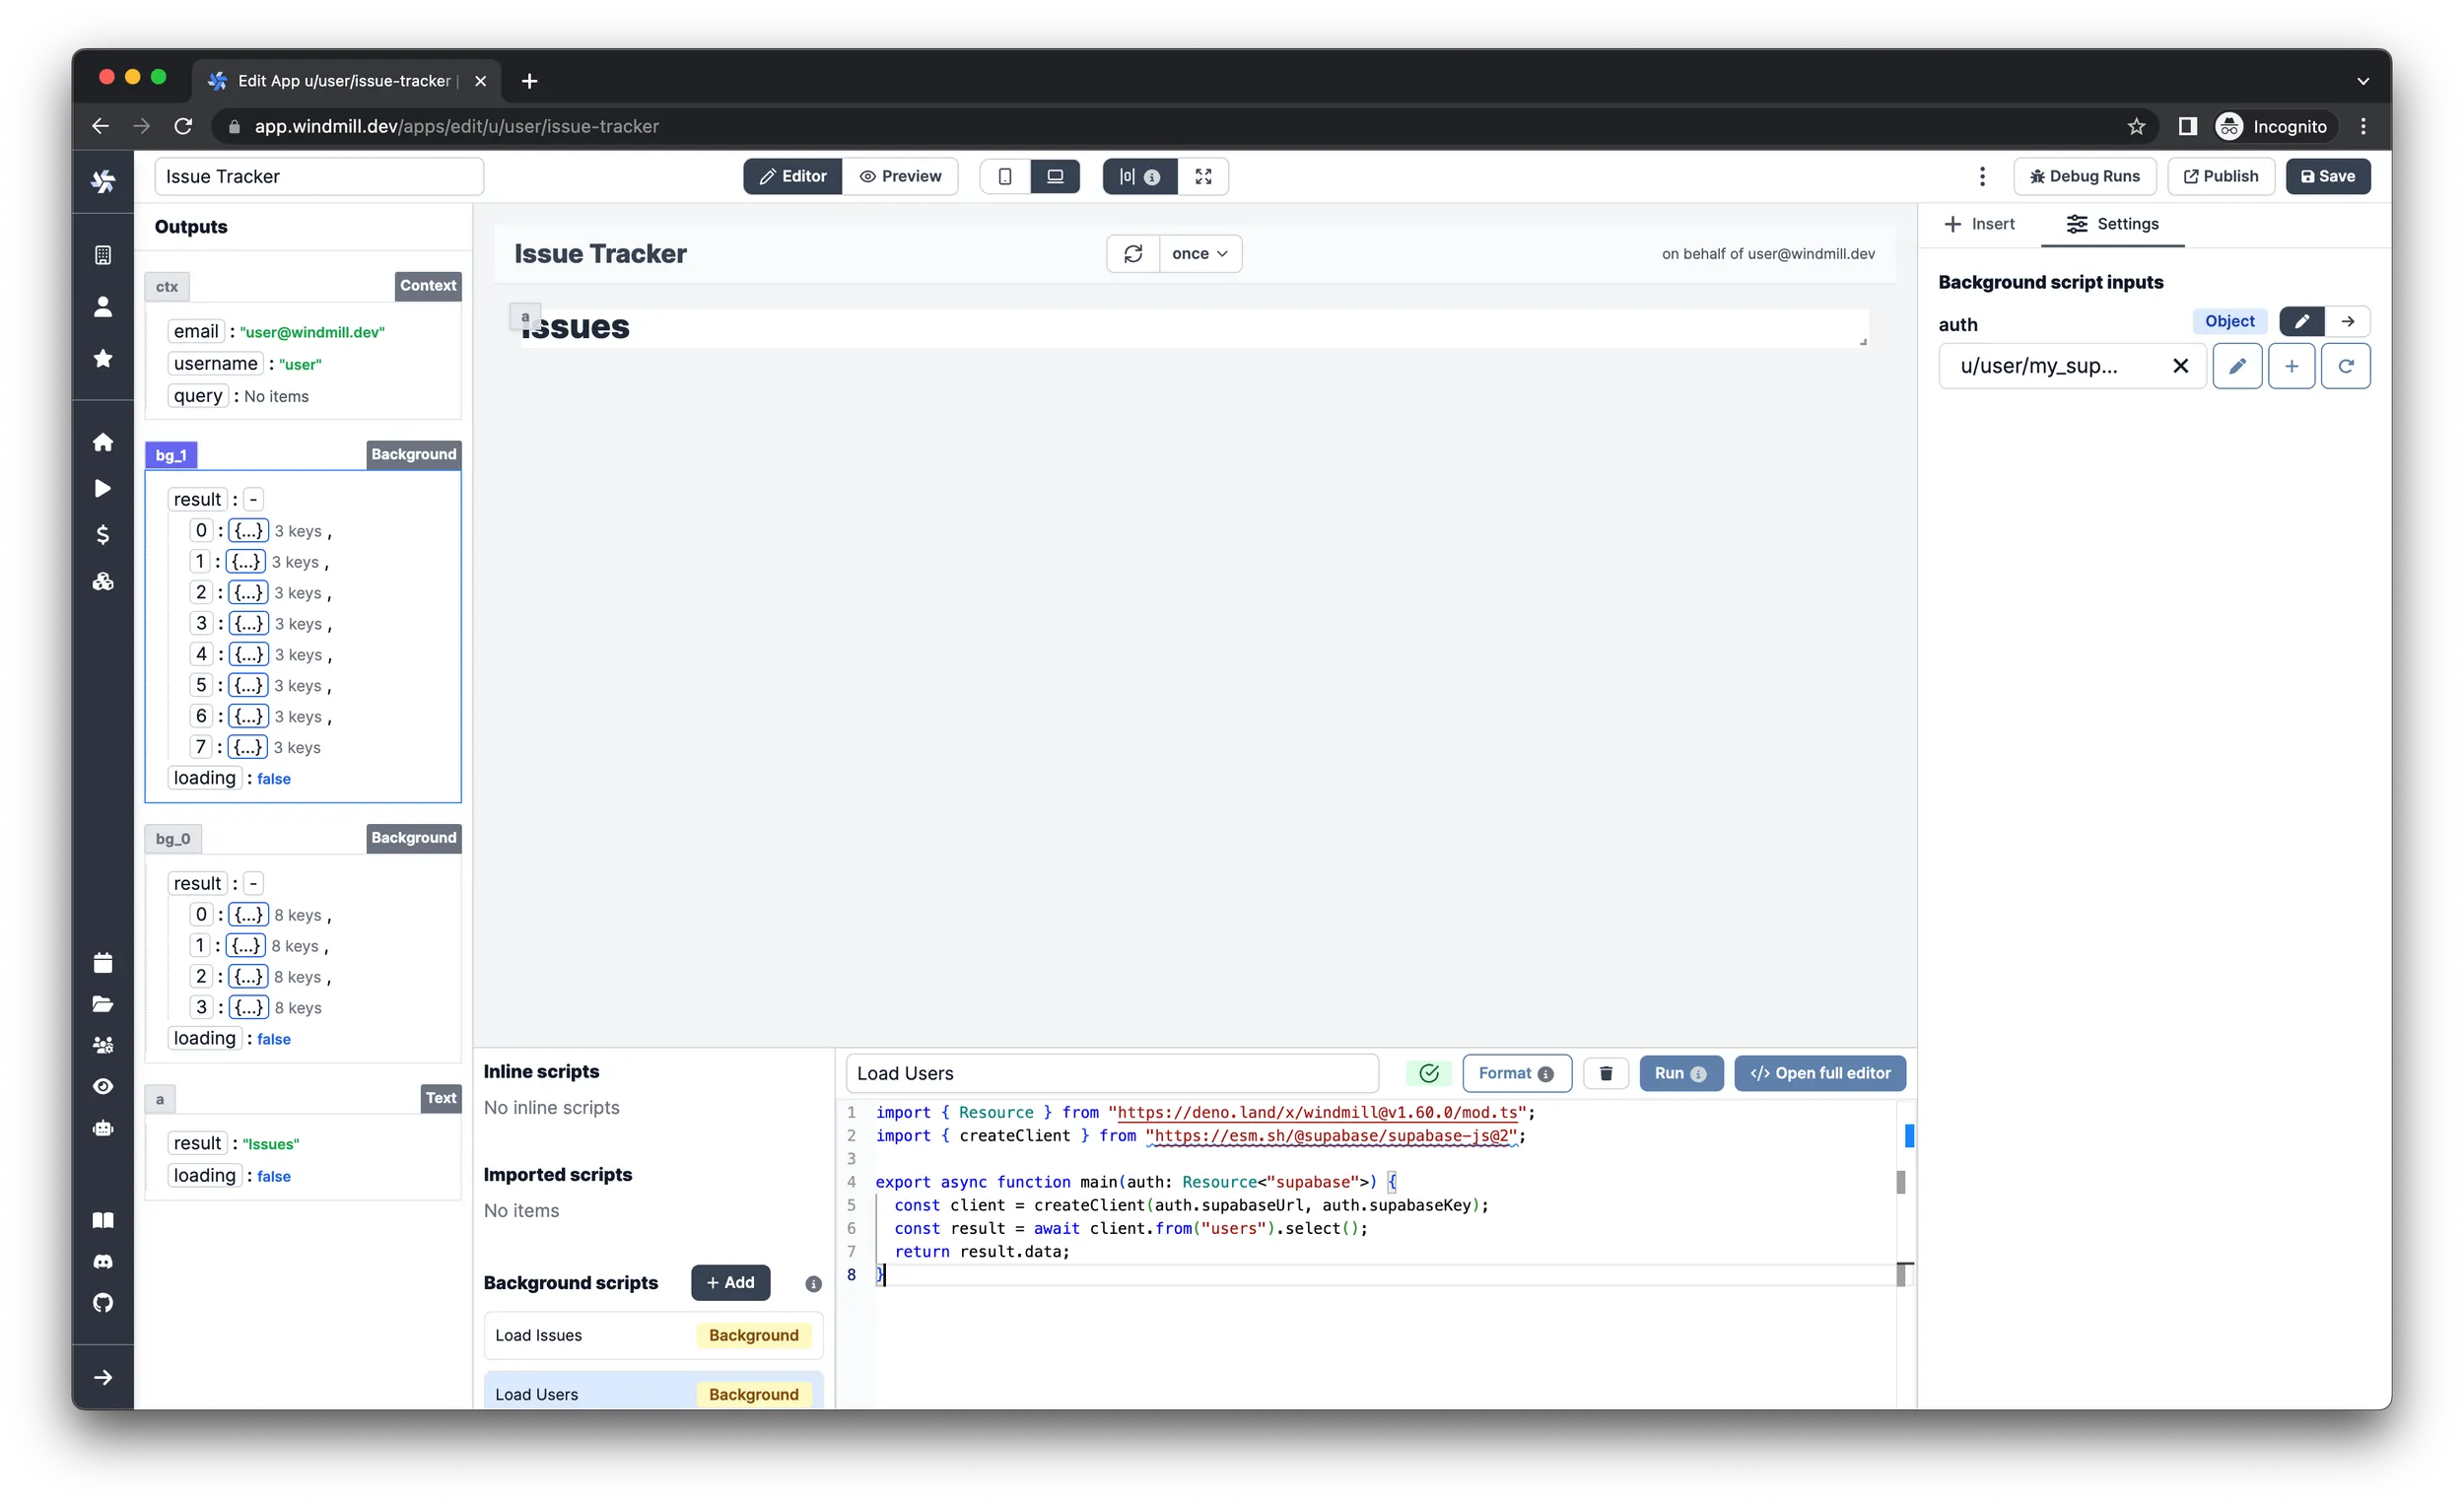
Create one more background runnable the same way as last time, but for the users
now - name it Load Users. The code should be the same, except that the client
should query from the ‘users’ table instead of ‘issues’. Change this on line
6 of the script.
Don’t forget to repeat the last step as well on the second background runnable to make it work.
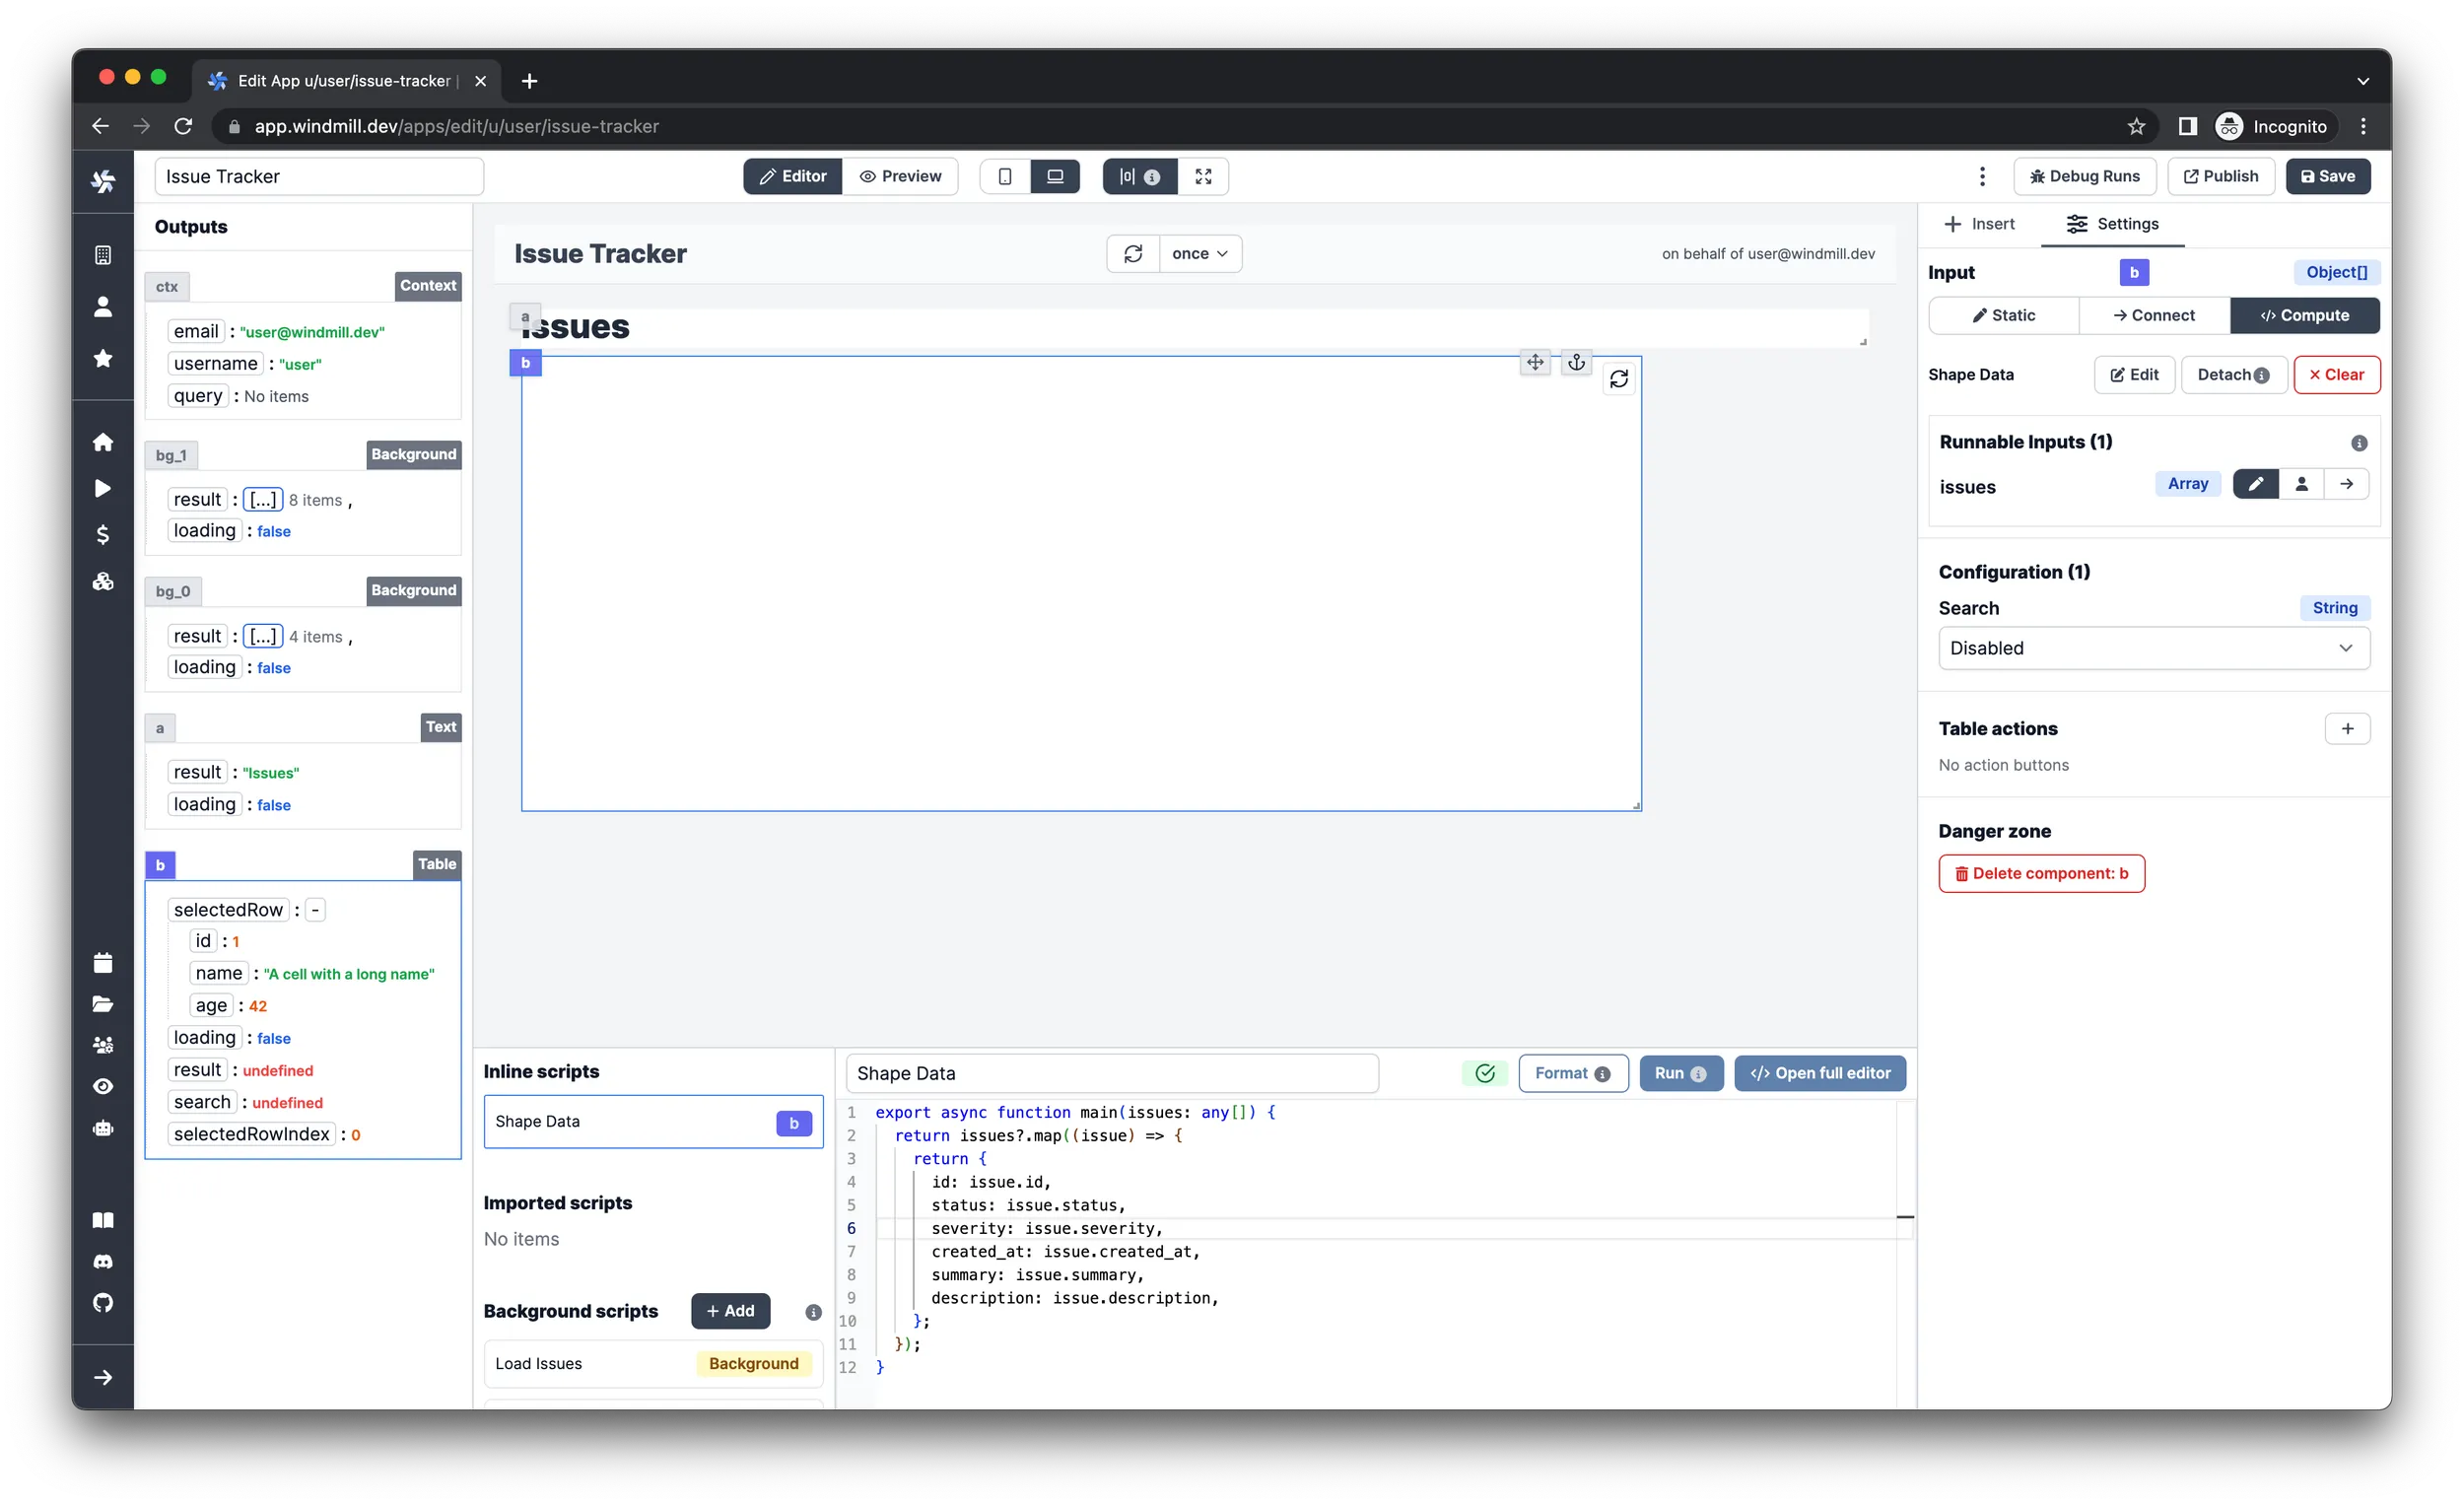
Display the issues
Now we have the data ready and loaded, so let's insert a Table and configure
it:
-
Select
Computeas the input type and clickCreate an inline script.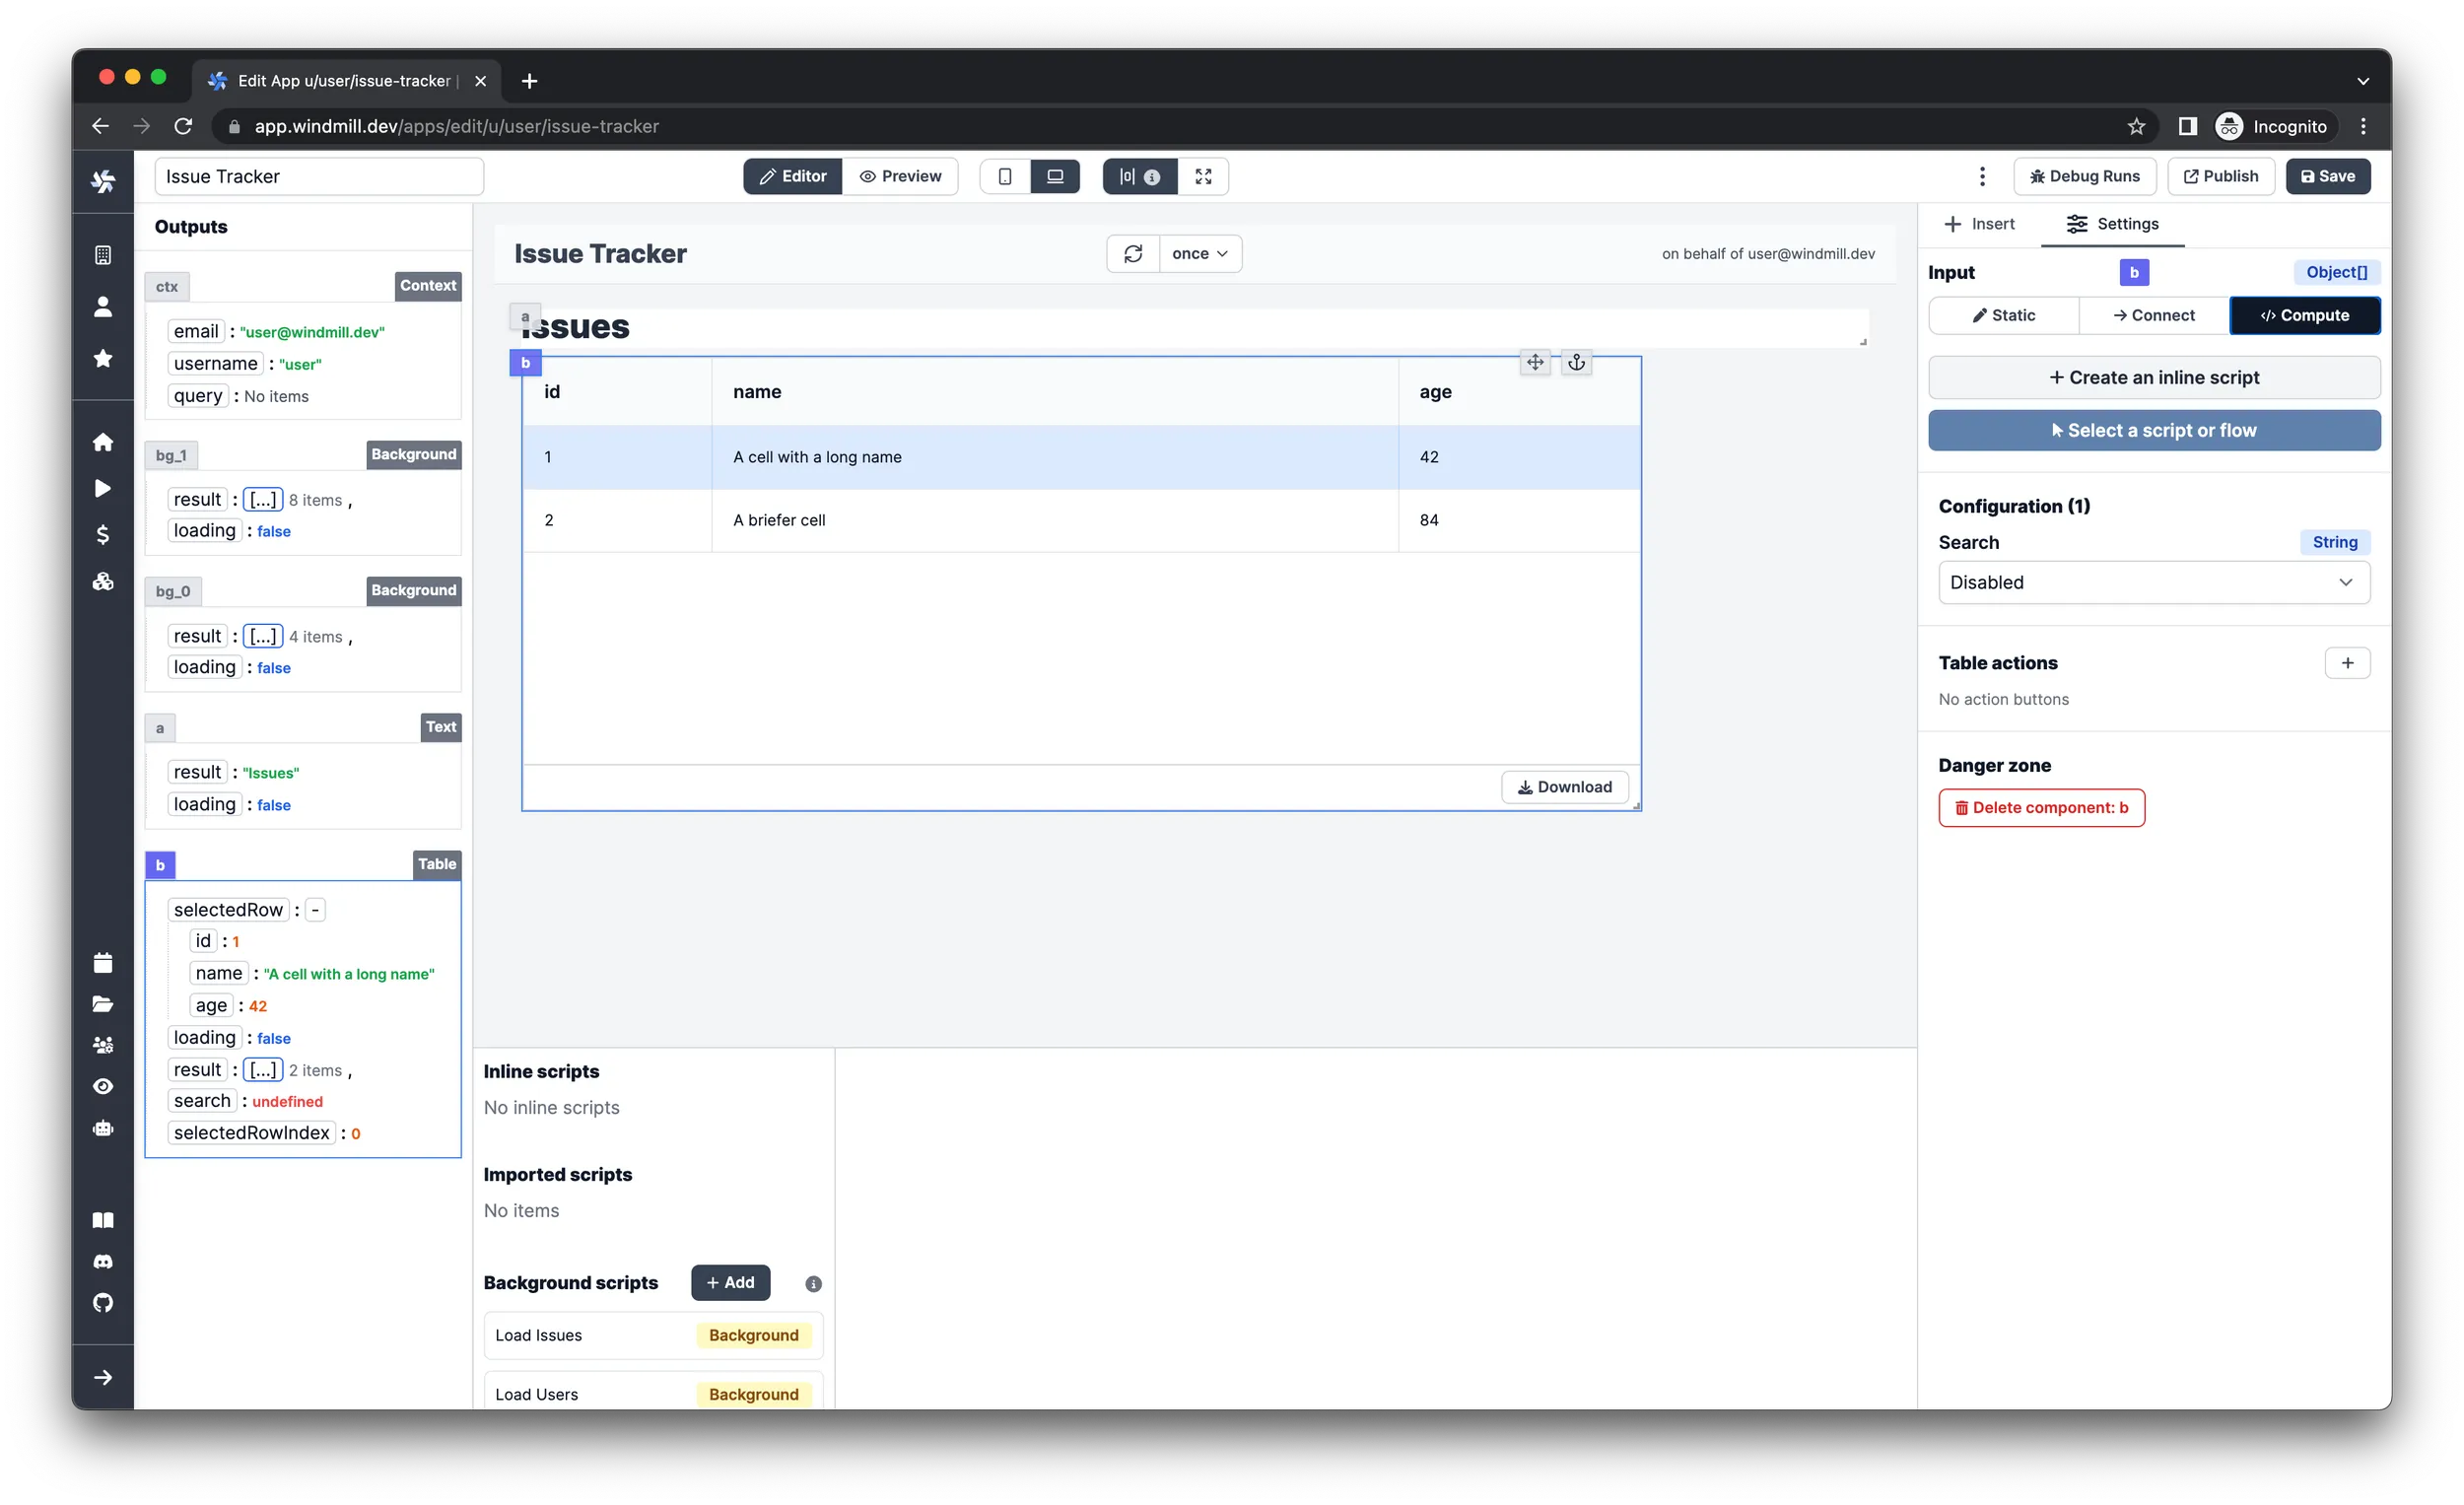
-
Choose
TypeScript (Deno)as language. -
Name it
Shape Data -
Paste in the following code:
export async function main(issues: any[]) {
	return issues?.map((issue) => {
		return {
			id: issue.id,
			status: issue.status,
			severity: issue.severity,
			created_at: issue.created_at,
			summary: issue.summary,
			description: issue.description
		};
	});
}infoThe script is needed so the table will display only the relevant properties of the issues.
-
On the right pane under the
Settingstab, selectConnectas input type of theissuesinput. Now you can select theresultfield of theLoad Issuesbackground runnable you just created. To do this, locate theBackgroundelement on the left pane that has 4 items in the result property and click onresult. info
infoAt this point the issues should be displayed in the table.
-
Finally, to enable searching in the data, select the table component, scroll down to
Configurationin theSettingstab of the right pane and selectBy Componentfor theSearchinput.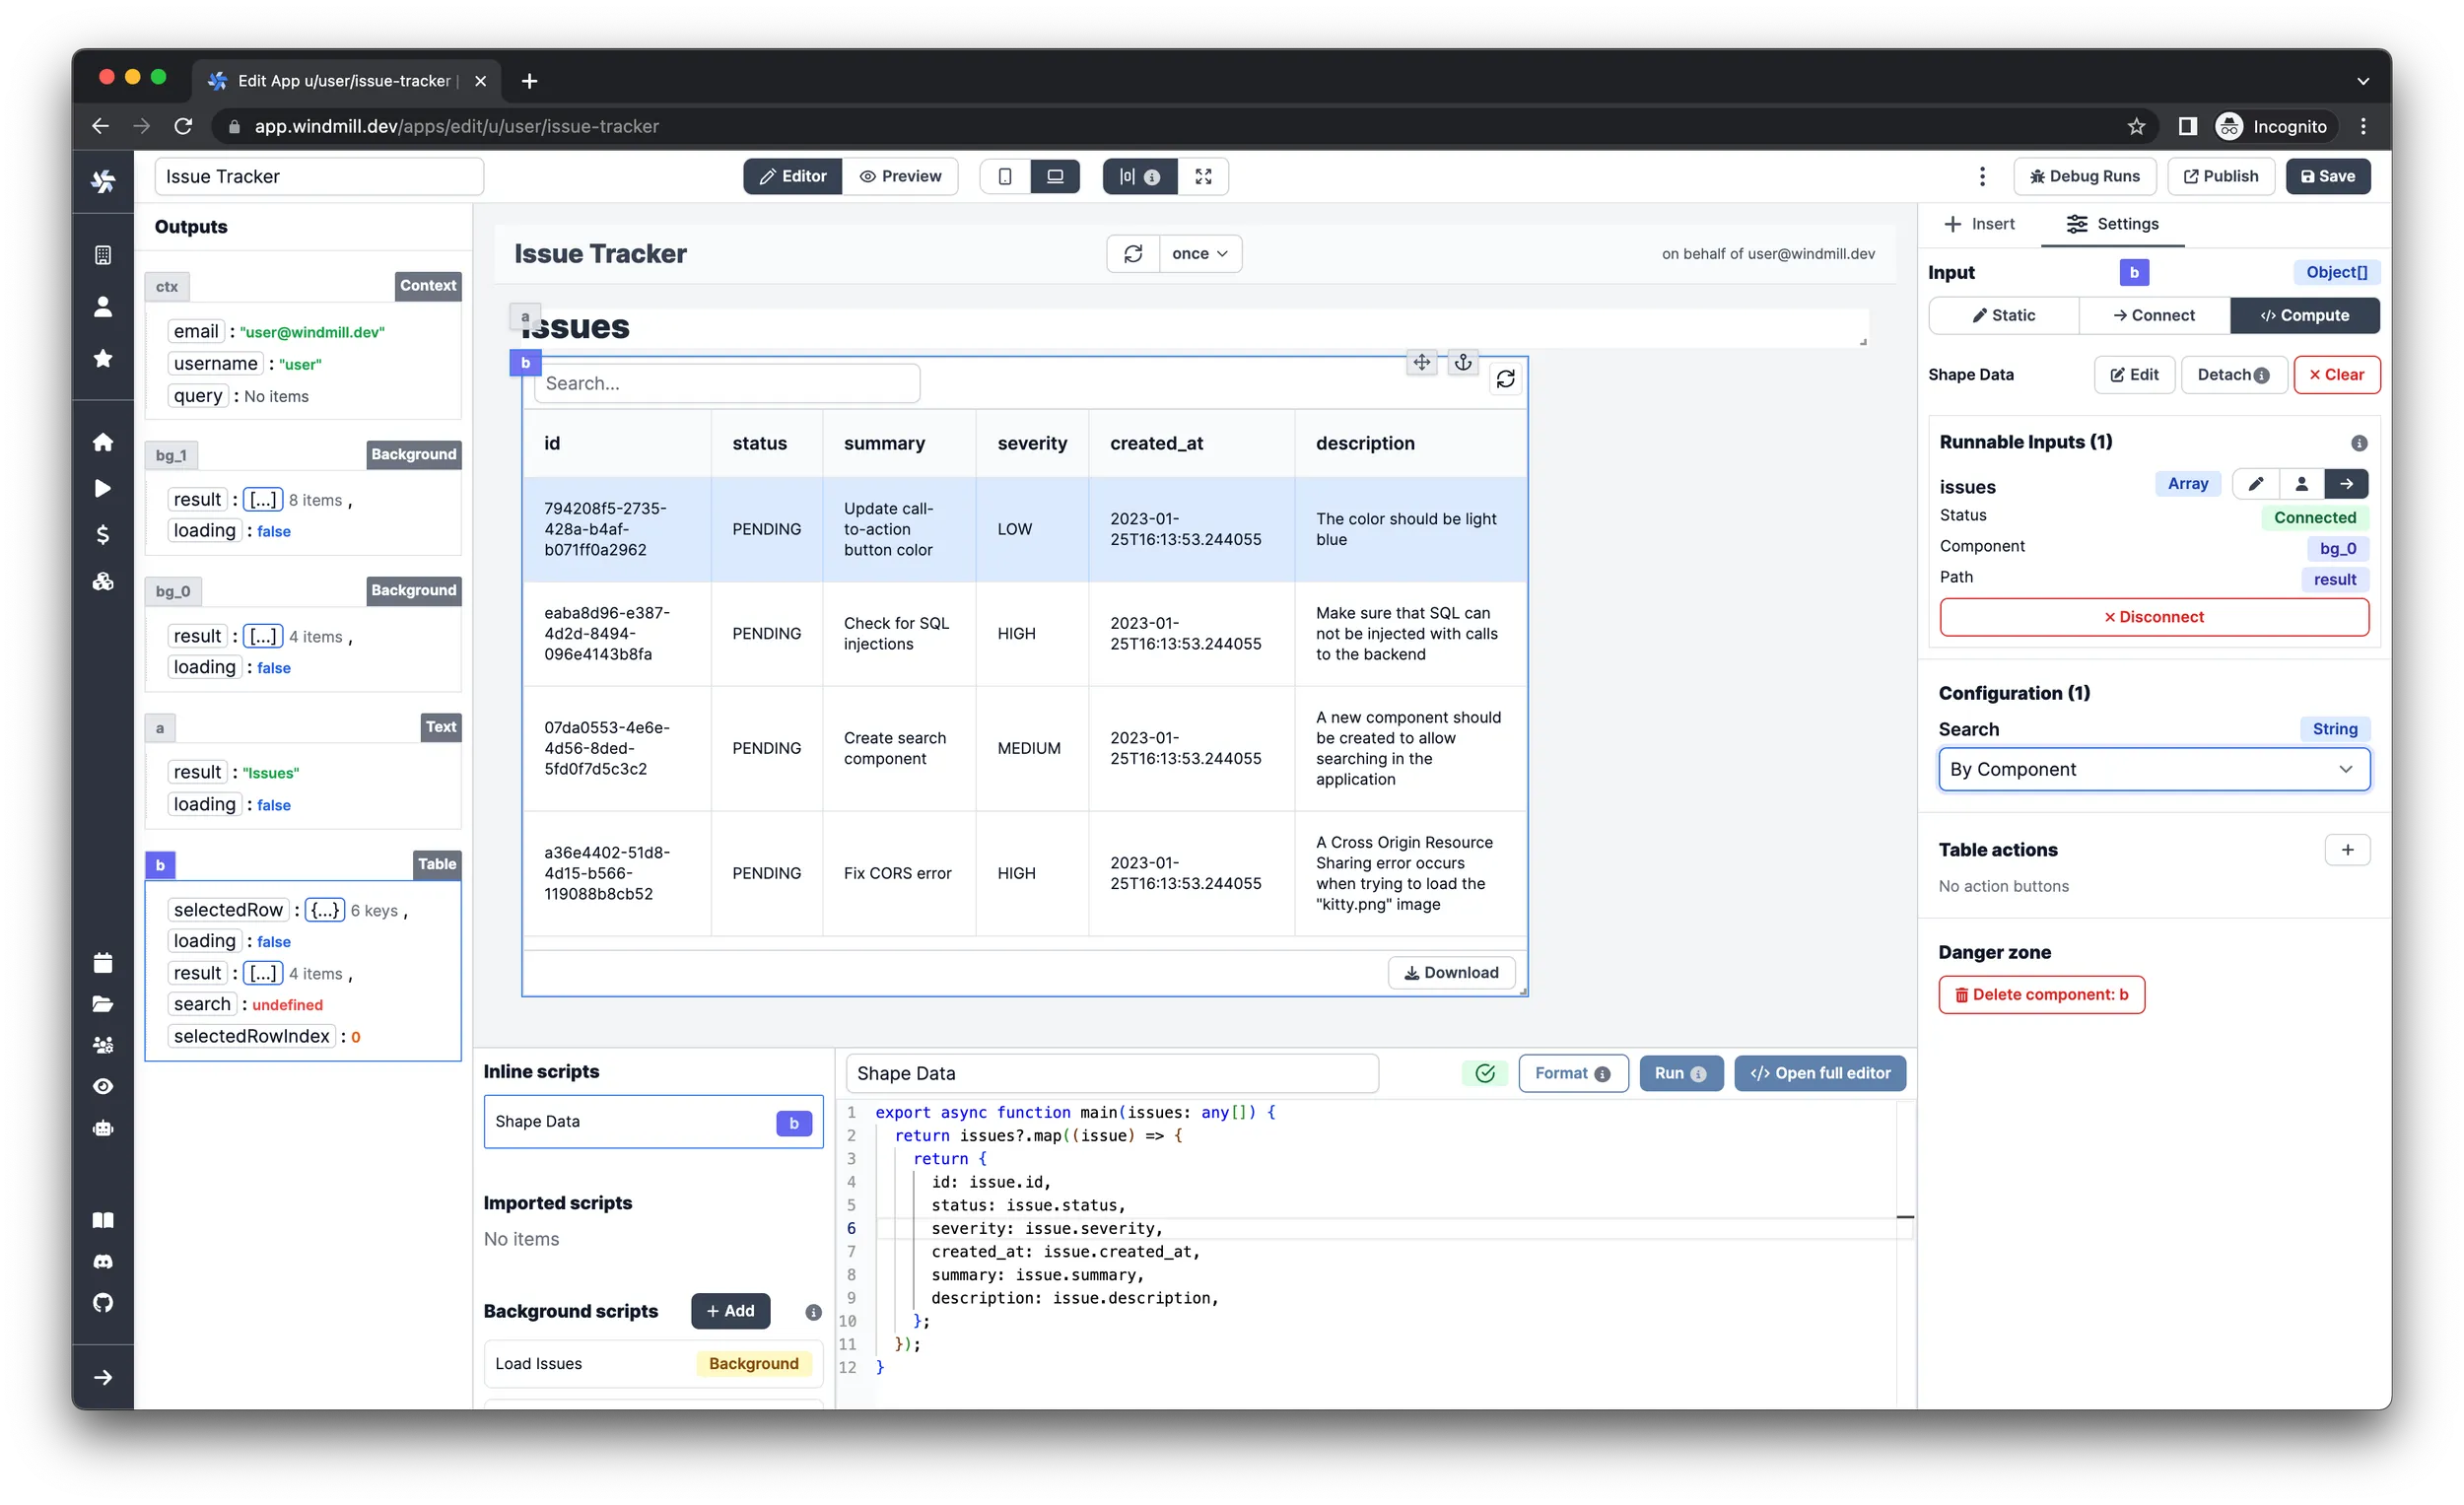
Windmill auto saves your progress but if you are skeptical about it, now would be a good time to click "Save" in the top right corner.
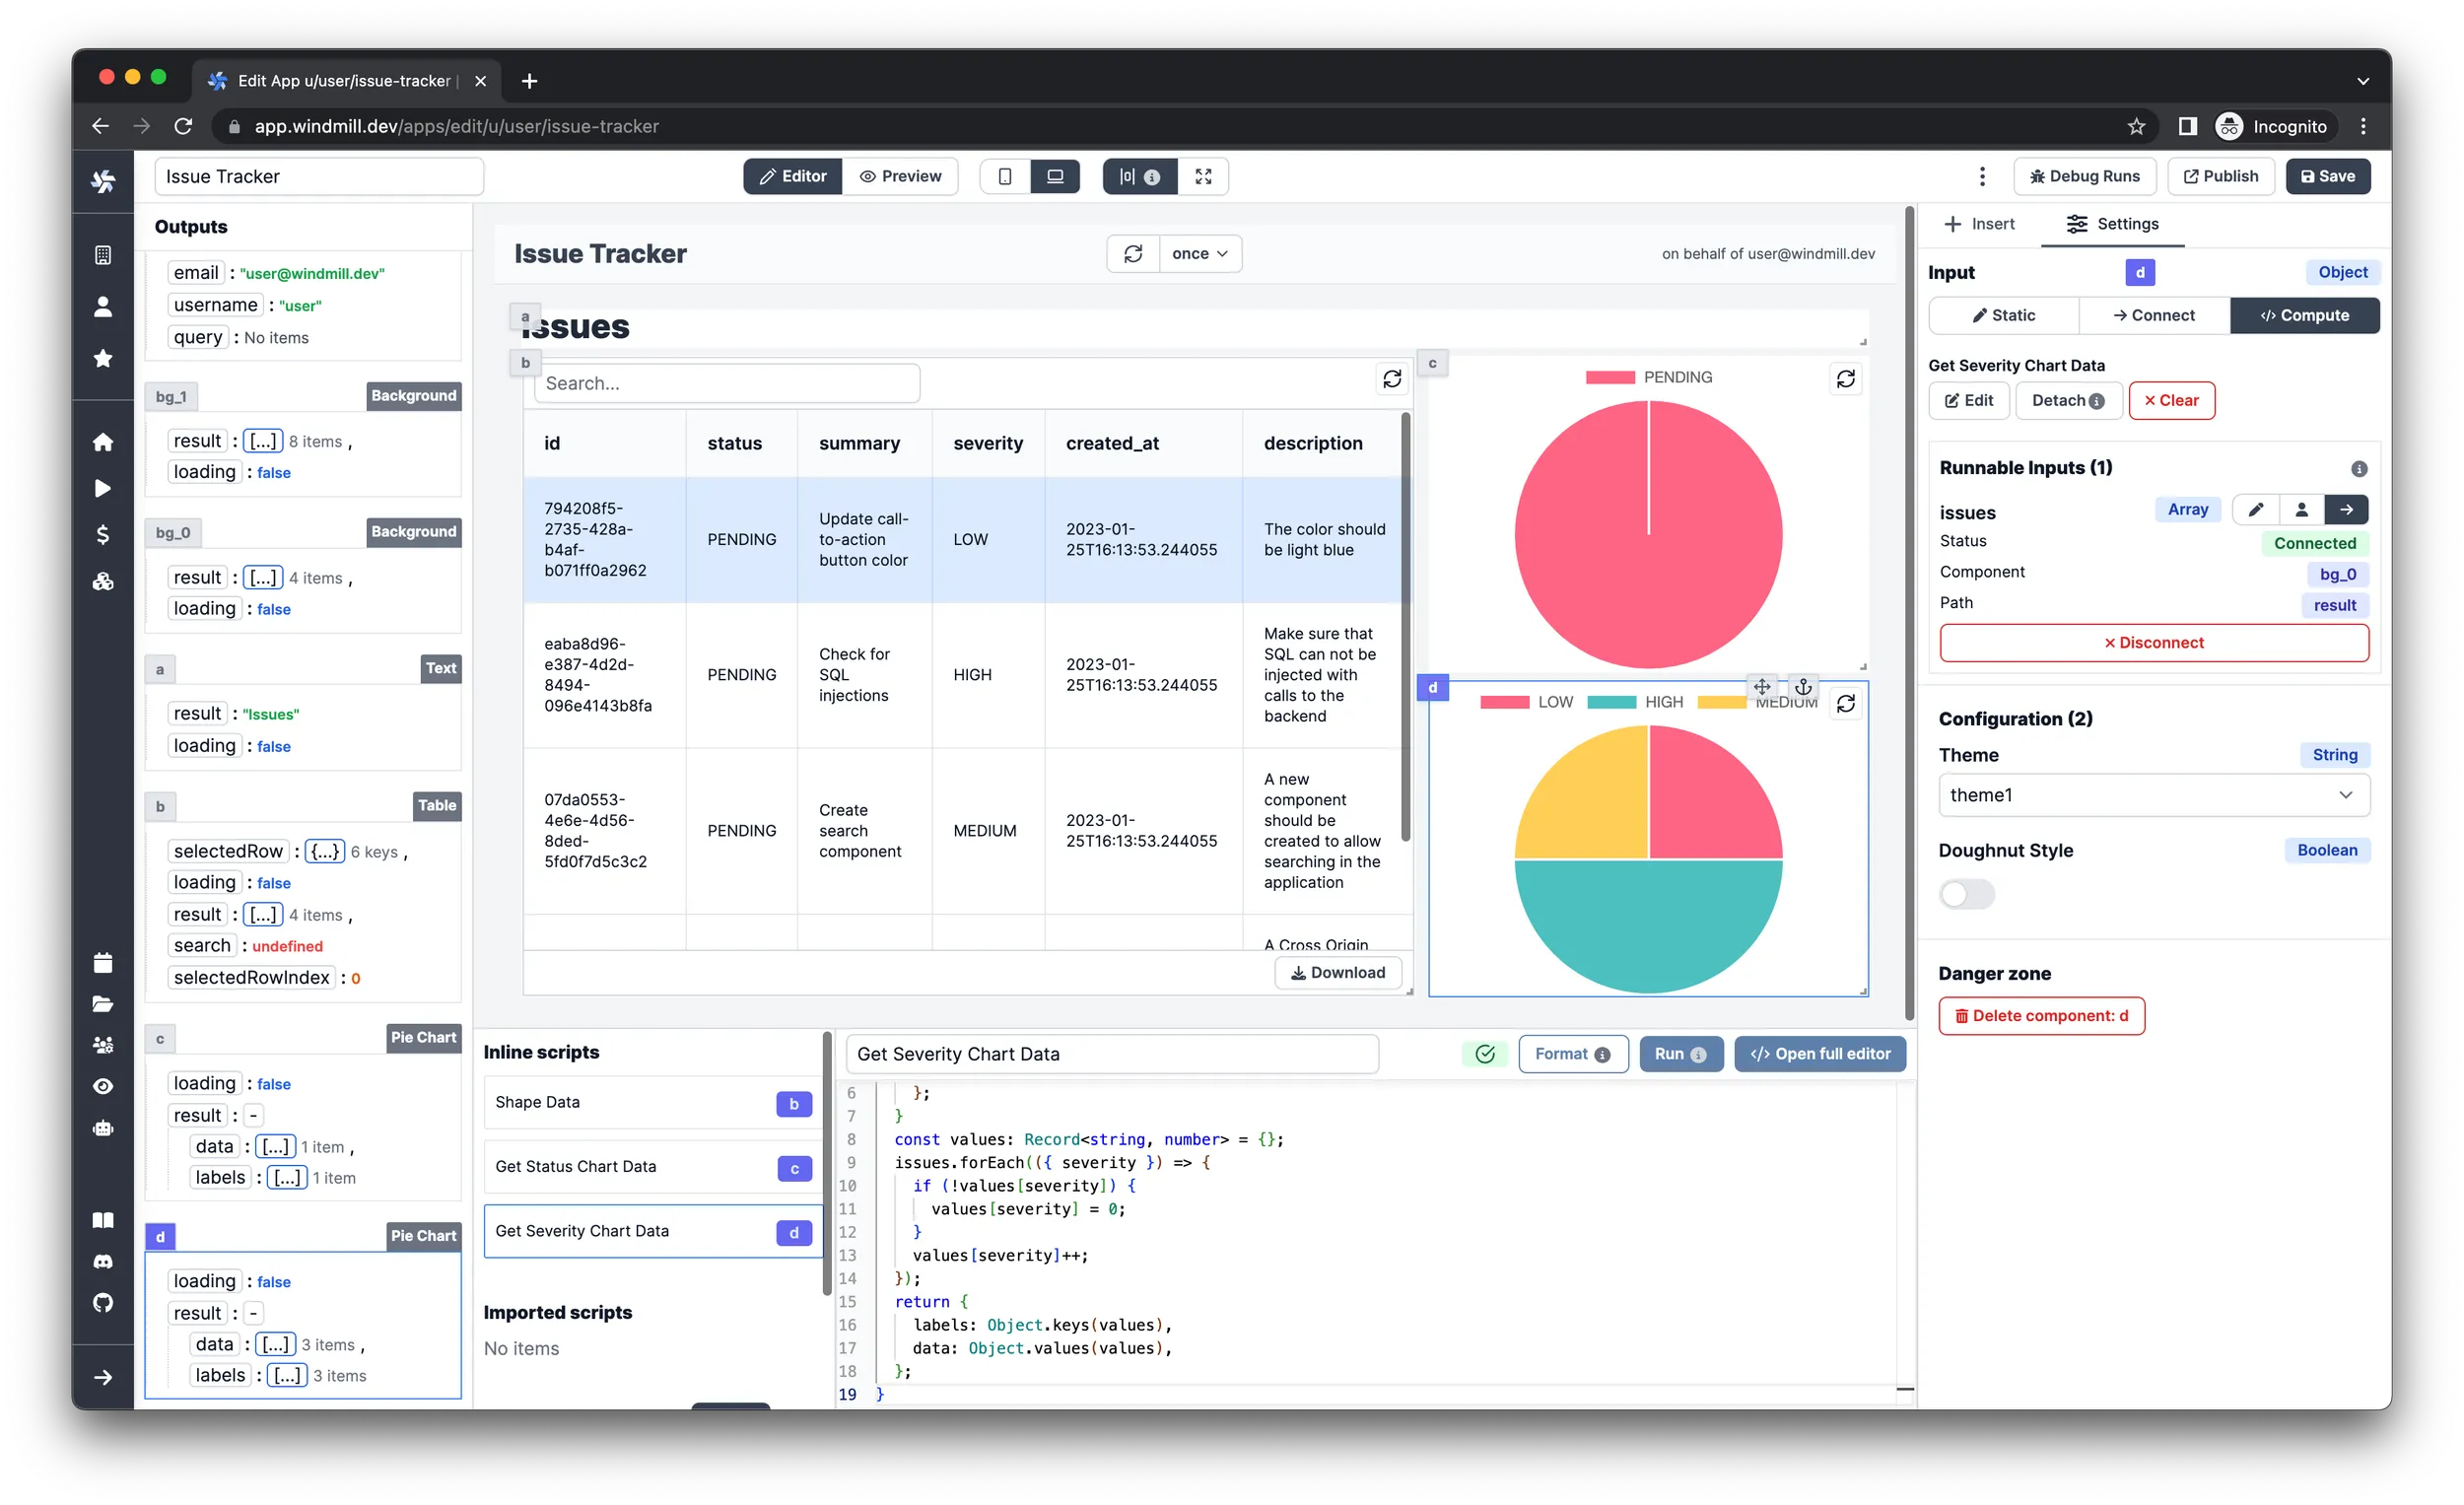
Add charts
It’s always nice to be able to quickly get a general overview of statistics, and charts are really good at conveying data at a glance. Let’s display the number of issues in each status and severity level on pie charts.
Before adding more components, try locking the existing ones in place by hovering them in the editor and clicking the anchor in the top right corner. This will prevent them from changing position while you drag around the charts.
To prevent layout shifting, it's a good practice to lock every component in place with the anchor button when you are done with positioning it - although you'll still be able to move them manually.
Add a chart for the status
-
Insert a
ChartJscomponent from theChartssection. -
Toggle from the
UI Editorto theJSONinput type in the right pane. -
Select
Computeas the data source.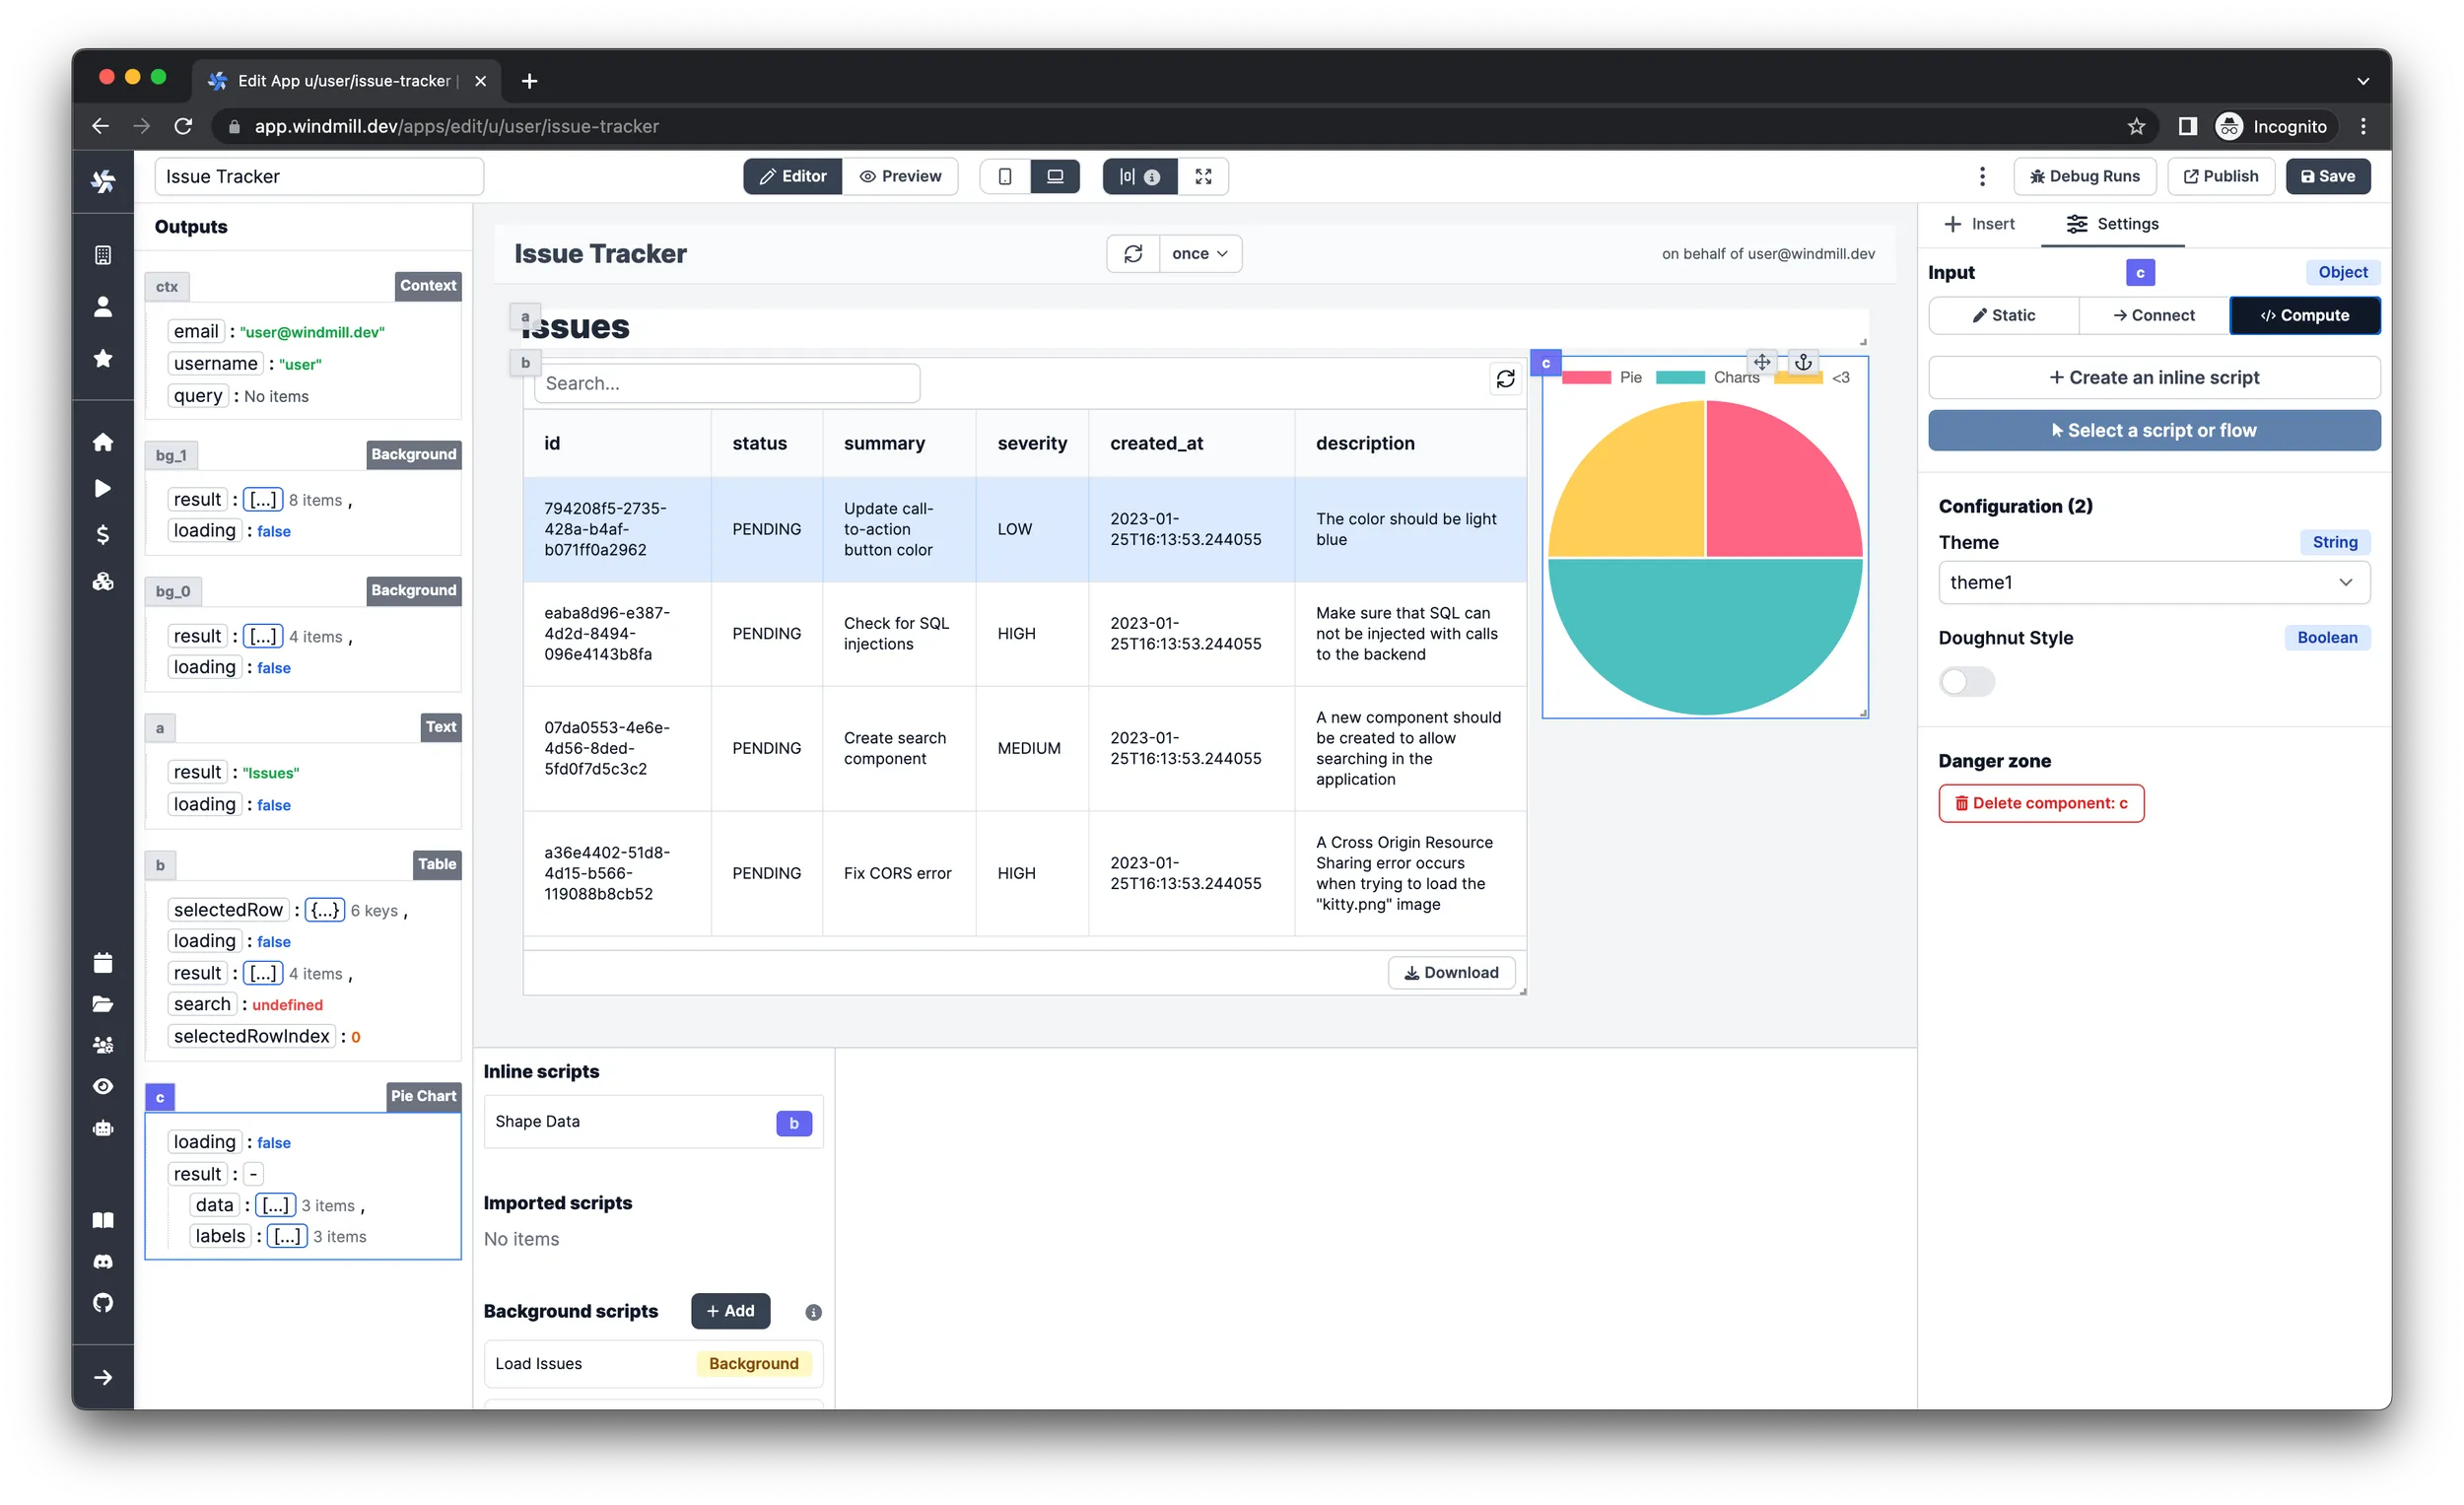
-
Click
Create an inline script. -
Choose
TypeScript (Deno)as the language. -
Name the script
Get Status Chart Data. -
Paste in the following code:
export async function main(issues: any[]) {
   if (!issues) {
      return {
         labels: [],
         datasets: [],
      };
   }
   const values: Record<string, number> = {};
   issues.forEach(({ status }) => {
      if (!values[status]) {
         values[status] = 0;
      }
      values[status]++;
   });
   return {
      labels: Object.keys(values),
      datasets: [
         {
            data: Object.values(values),
            backgroundColor: [
               "#FF8384",
               "#48C0C0",
               "#FFCE56",
            ]
         },
      ],
   };
}infoAs you can see, the ChartJs component takes the data in a specific shape. The input should be an object with 2 properties:
labelsanddatasetslabelsshould be an array of the label names, whiledatasetsshould be an array of dataset objects, each containing adataelement. You can learn more about the format of dataset objects in the ChartJs documentation. The label at position[0]corresponds to the data at position[0]. -
Configure the
issuesinput of the script on the right pane to beConnecttype and then select theresultvalue of thebackgroundrunnable that is responsible for the querying of the issues.
Add a chart for the severity levels
This one is going to be similar to the other chart, in fact the only difference
will be that the targeted field of the individual issues is going to be
severity instead of status. You can go ahead and repeat the first 4 steps of
the Status chart, then optionally name it Get Severity Chart Data and paste in
the following code:
export async function main(issues: any[]) {
   if (!issues) {
      return {
         labels: [],
         datasets: [],
      };
   }
   const values: Record<string, number> = {};
   issues.forEach(({ severity }) => {
      if (!values[severity]) {
         values[severity] = 0;
      }
      values[severity]++;
   });
   return {
      labels: Object.keys(values),
      datasets: [
         {
            data: Object.values(values),
            backgroundColor: [
               "#FF8384",
               "#48C0C0",
               "#FFCE56",
            ]
         },
      ],
   };
}
Finally, connect the result value of the background runnable to the issues
argument of the script, just like in the last step of the other chart.
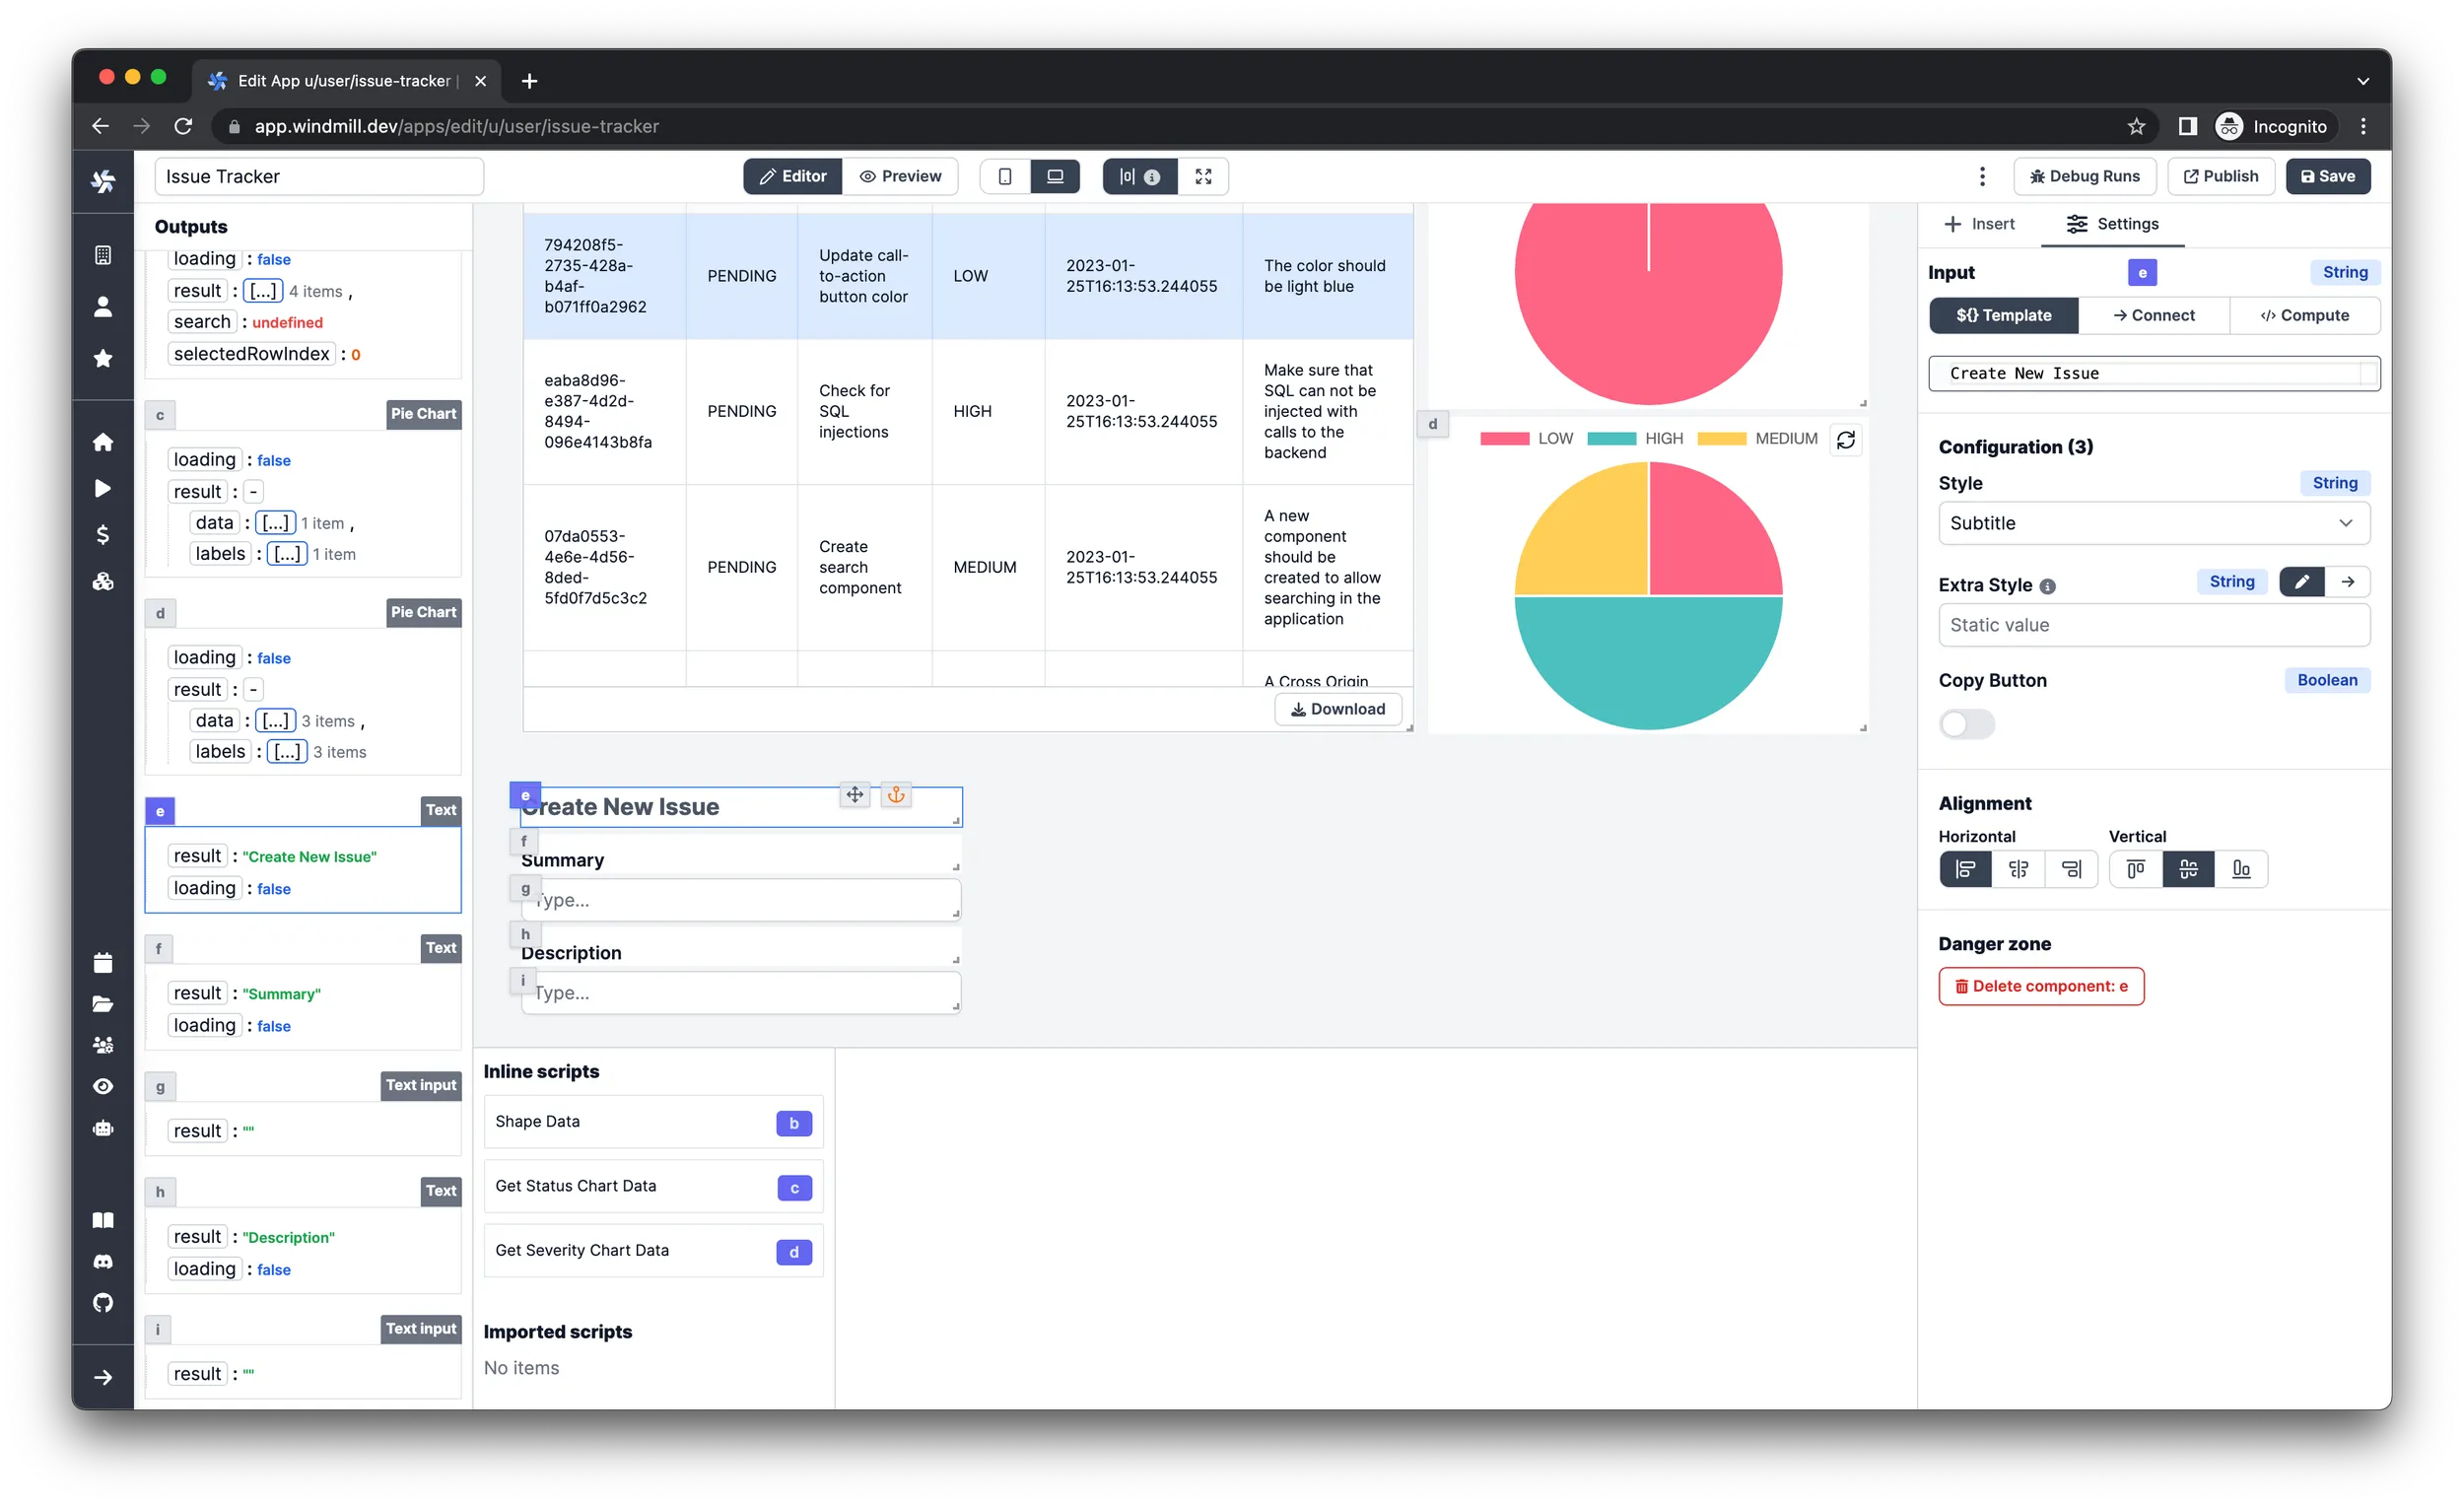
Creating issues
There are multiple ways to add a form to a Windmill App but for now we’ll take
the route to create it manually with individual text and input components.
First, add a title for the form by inserting a Text component, set the input
value to Create New Issue and the style to Subtitle.
We are going to handle 6 properties of an issue: summary, description,
created_by, status, severity and assigned_to, so for each one we’ll have
an input field and a Text component. The summary and description fields
are going to use simple Text input components, the other four are going to be
handled by Select components.
Summary and Description fields
- Insert a
Textcomponent and set the style attribute toLabeland align it vertically on the bottom. - Insert a
Text inputcomponent under the label text.
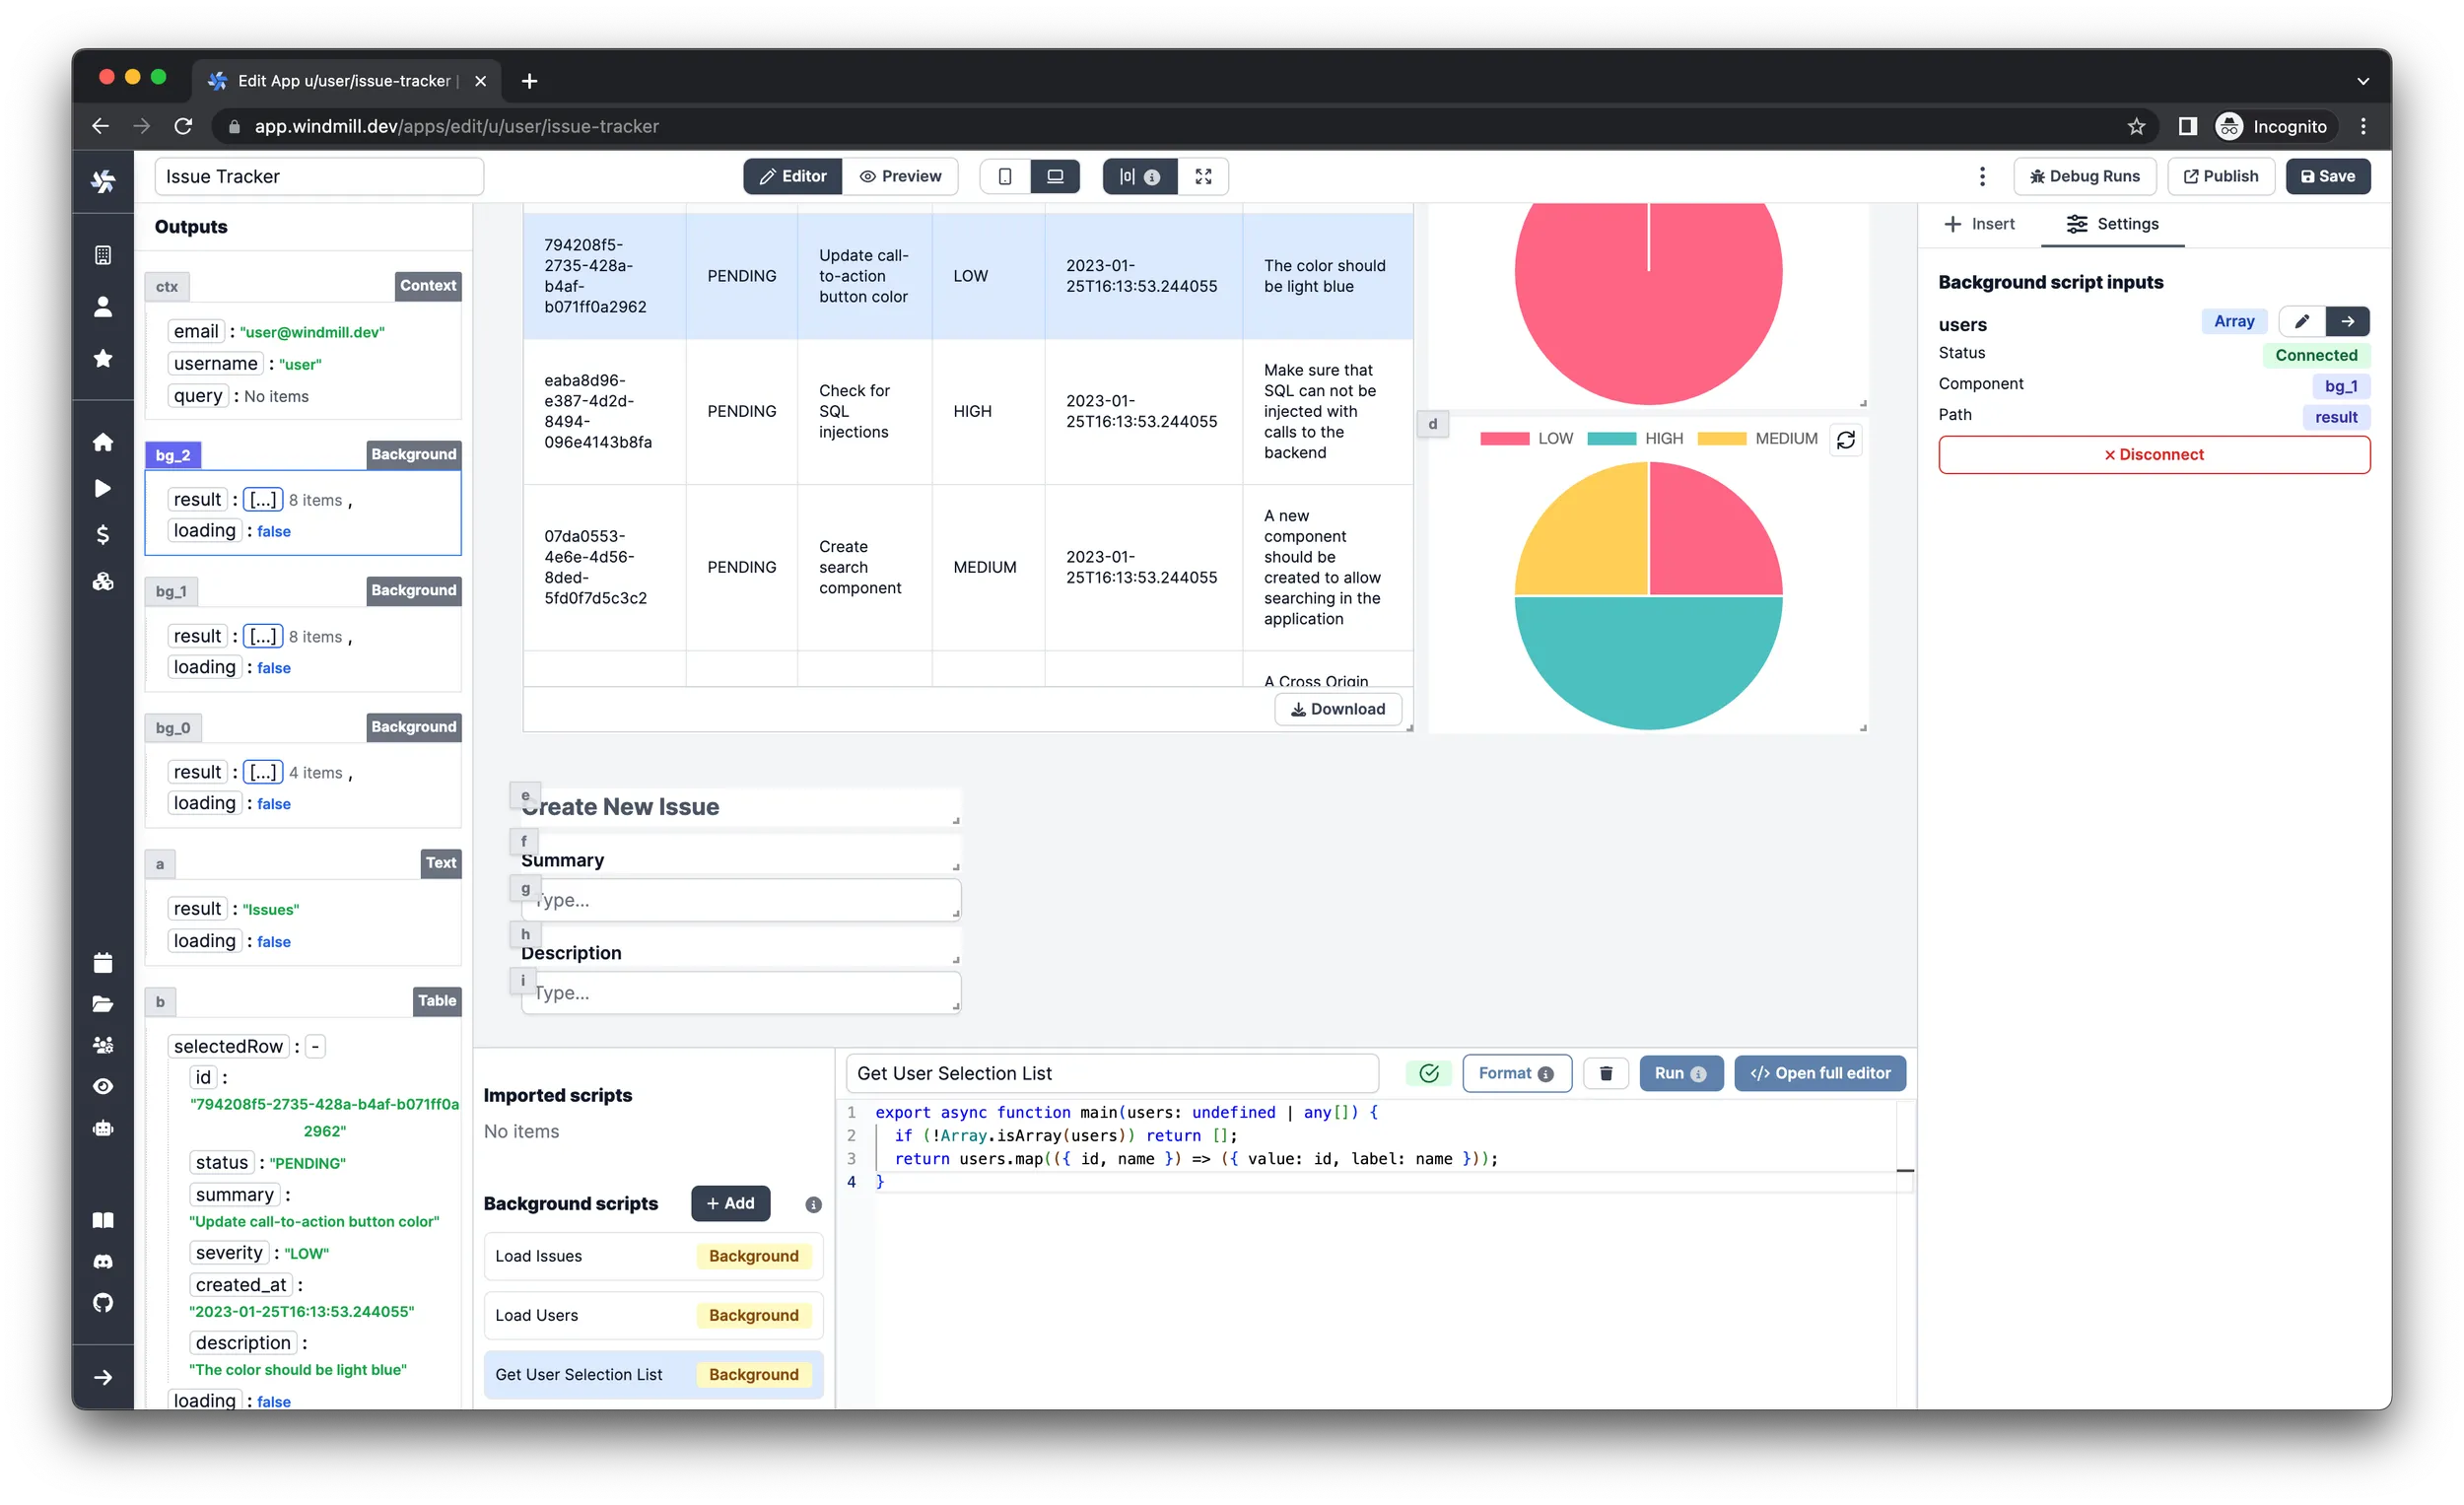
Created By and Assigned To fields
Since the Select components require input data to be in a certain shape, let's
create a Background script first to convert the users list. Add a new
Background script, select TypeScript (Deno) as language and name it Get User Selection List. Paste in the following code:
export async function main(users: undefined | any[]) {
	if (!Array.isArray(users)) return [];
	return users.map(({ id, name }) => ({ value: id, label: name }));
}
Finally, connect the users argument to the result of the Load Users
background runnable. In essence, this will chain the two background runnables to
transform the data into the desired shape.
This script will return the users in the required shape by the Select
components. The TypeScript type looks like this:
{ label: string, value: any }
Now insert the components that will use the newly created users list.
- Insert a
Textcomponent, set the style attribute toLabeland align it vertically on the bottom. - Insert a
Selectcomponent under the label text. - Connect the
itemsconfiguration inputs to the result of the recently addedGet User Selection Listbackground runnable.
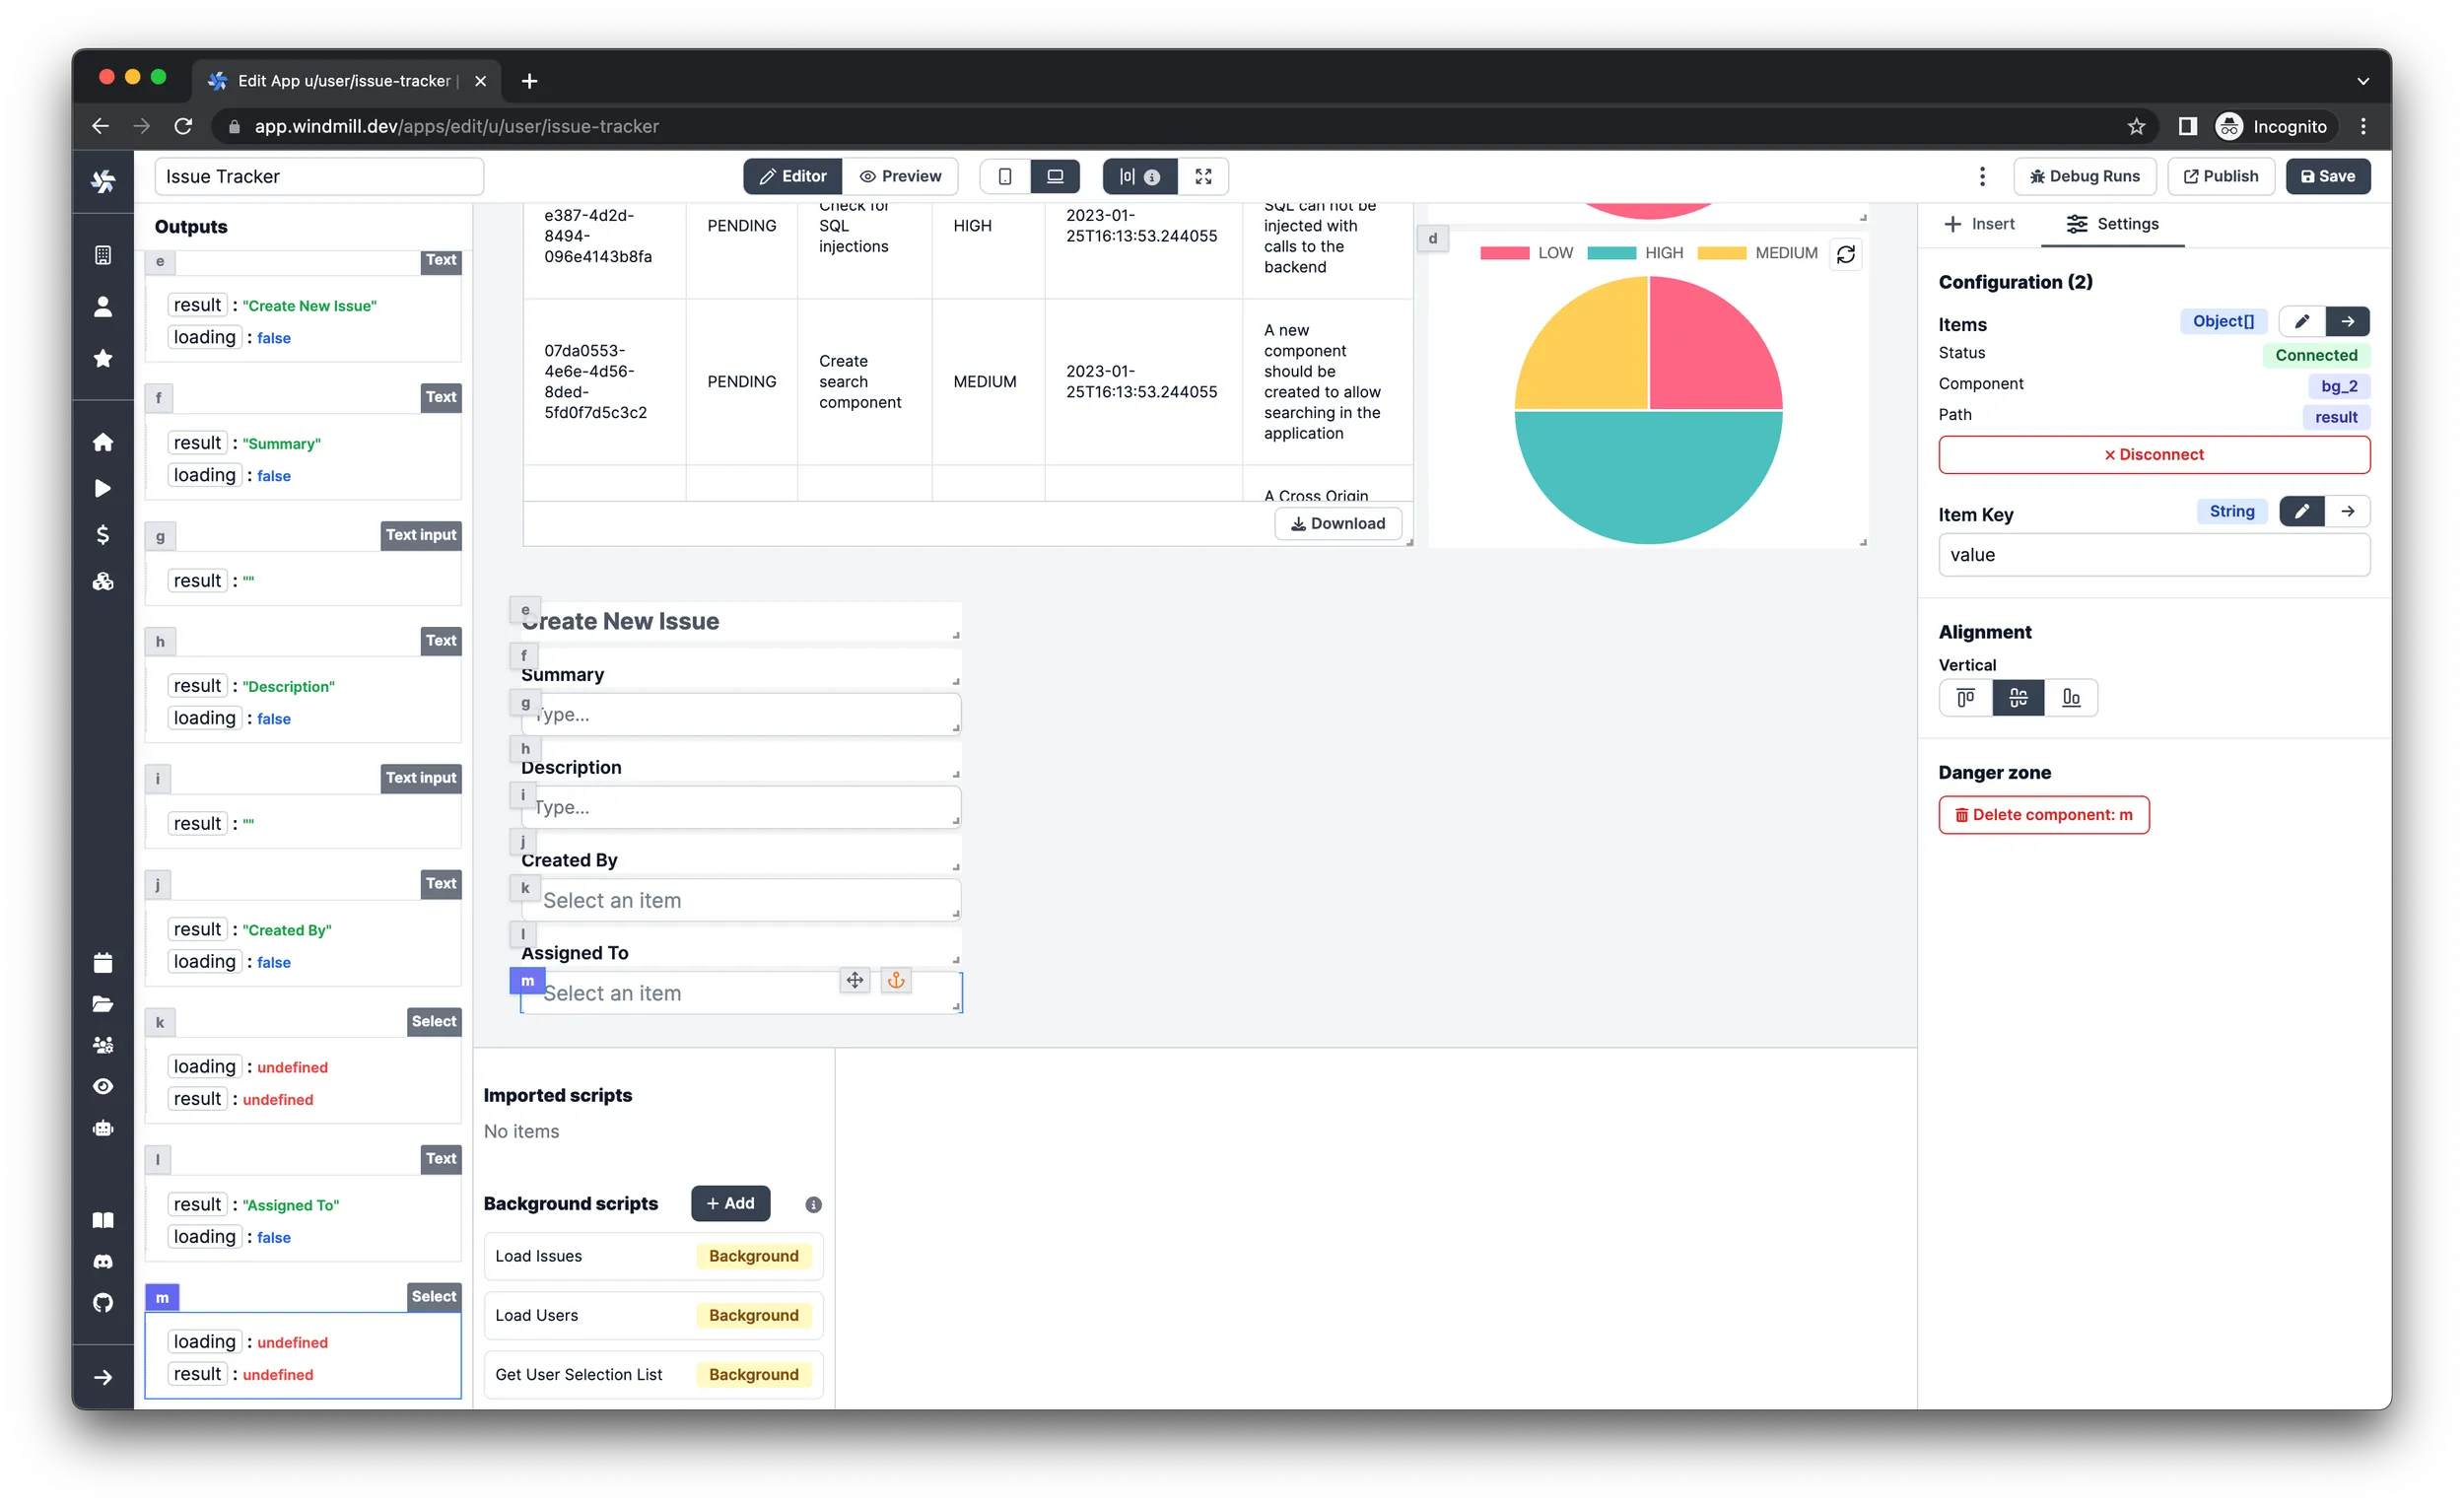
Make sure that you selected the correct background runnable before proceeding to the next steps.
Status field
-
Insert a
Textcomponent and set the style attribute toLabeland align it vertically on the bottom. -
Insert a
Selectcomponent under the label text. -
Leave the
Itemsargument onStaticmode and have these 3 as inputs:{
"value": "PENDING",
"label": "PENDING"
}{
"value": "WORKED ON",
"label": "WORKED ON"
}{
"value": "FINISHED",
"label": "FINISHED"
}

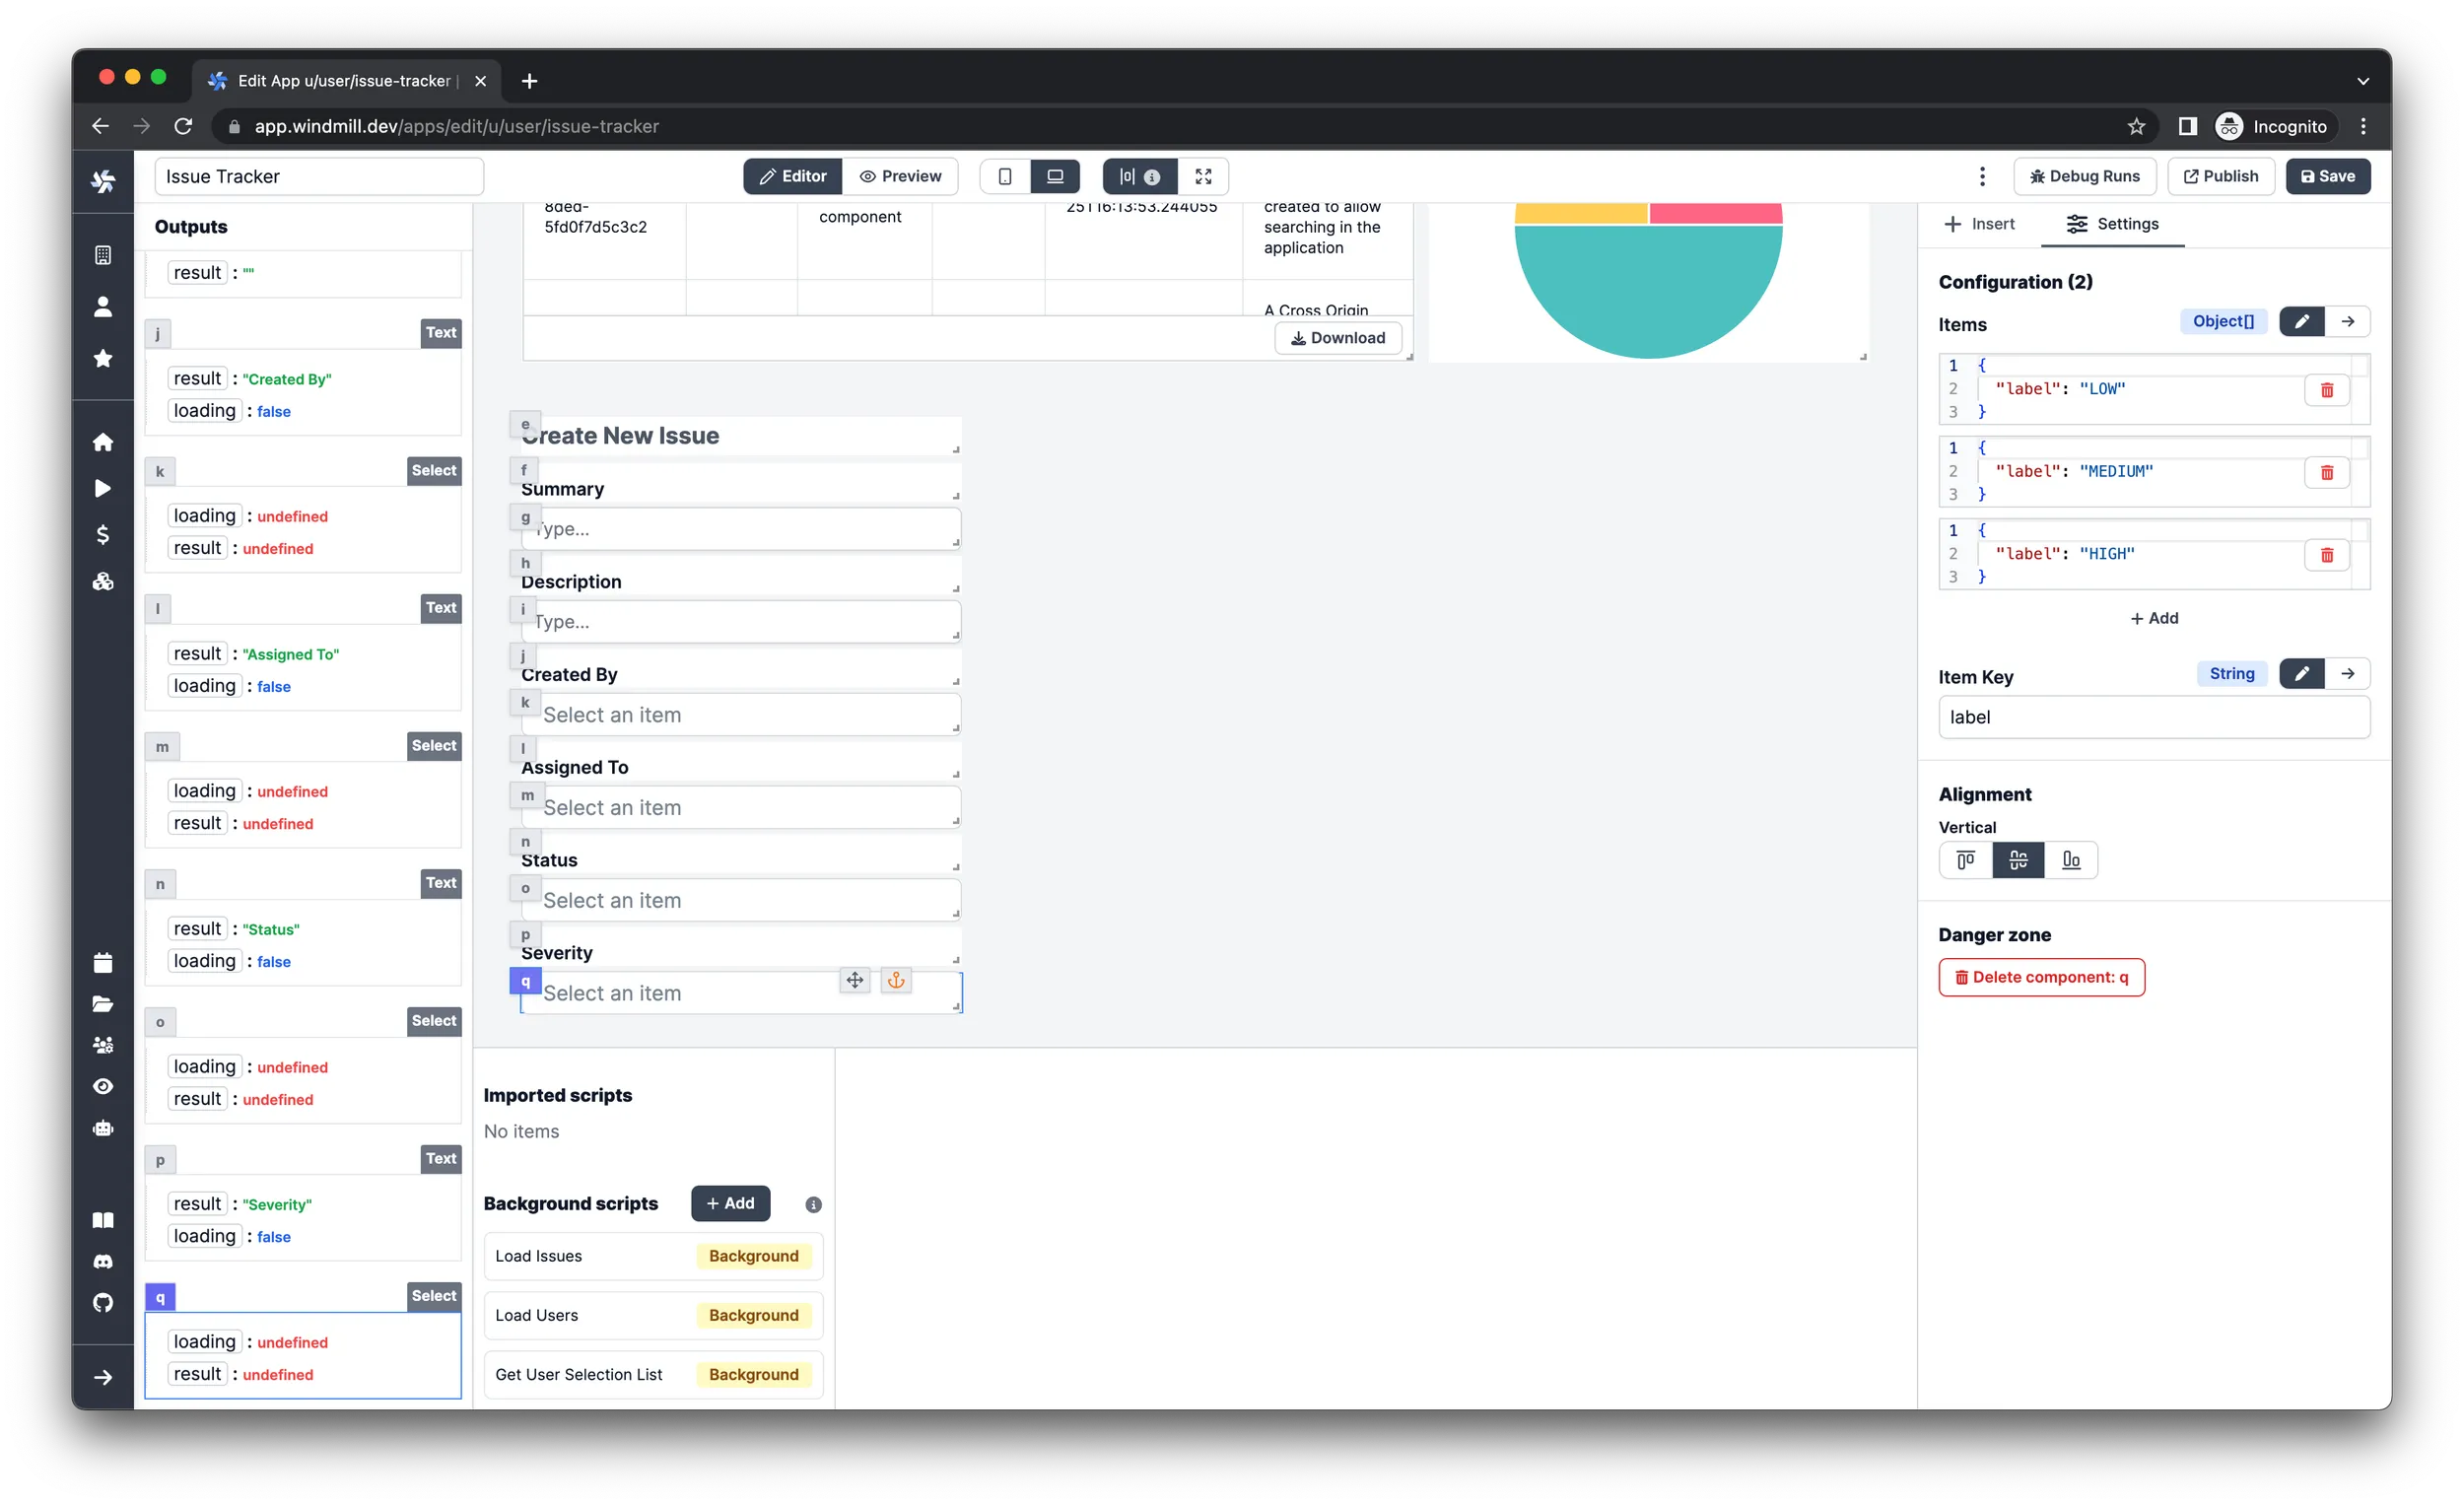
Severity field
-
Insert a
Textcomponent and set the style attribute toLabeland align it vertically on the bottom. -
Insert a
Selectcomponent under the label text. -
Leave the
Itemsargument onStaticmode and have these 3 as inputs:{
"value": "LOW",
"label": "LOW"
}{
"value": "MEDIUM",
"label": "MEDIUM"
}{
"value": "HIGH",
"label": "HIGH"
}
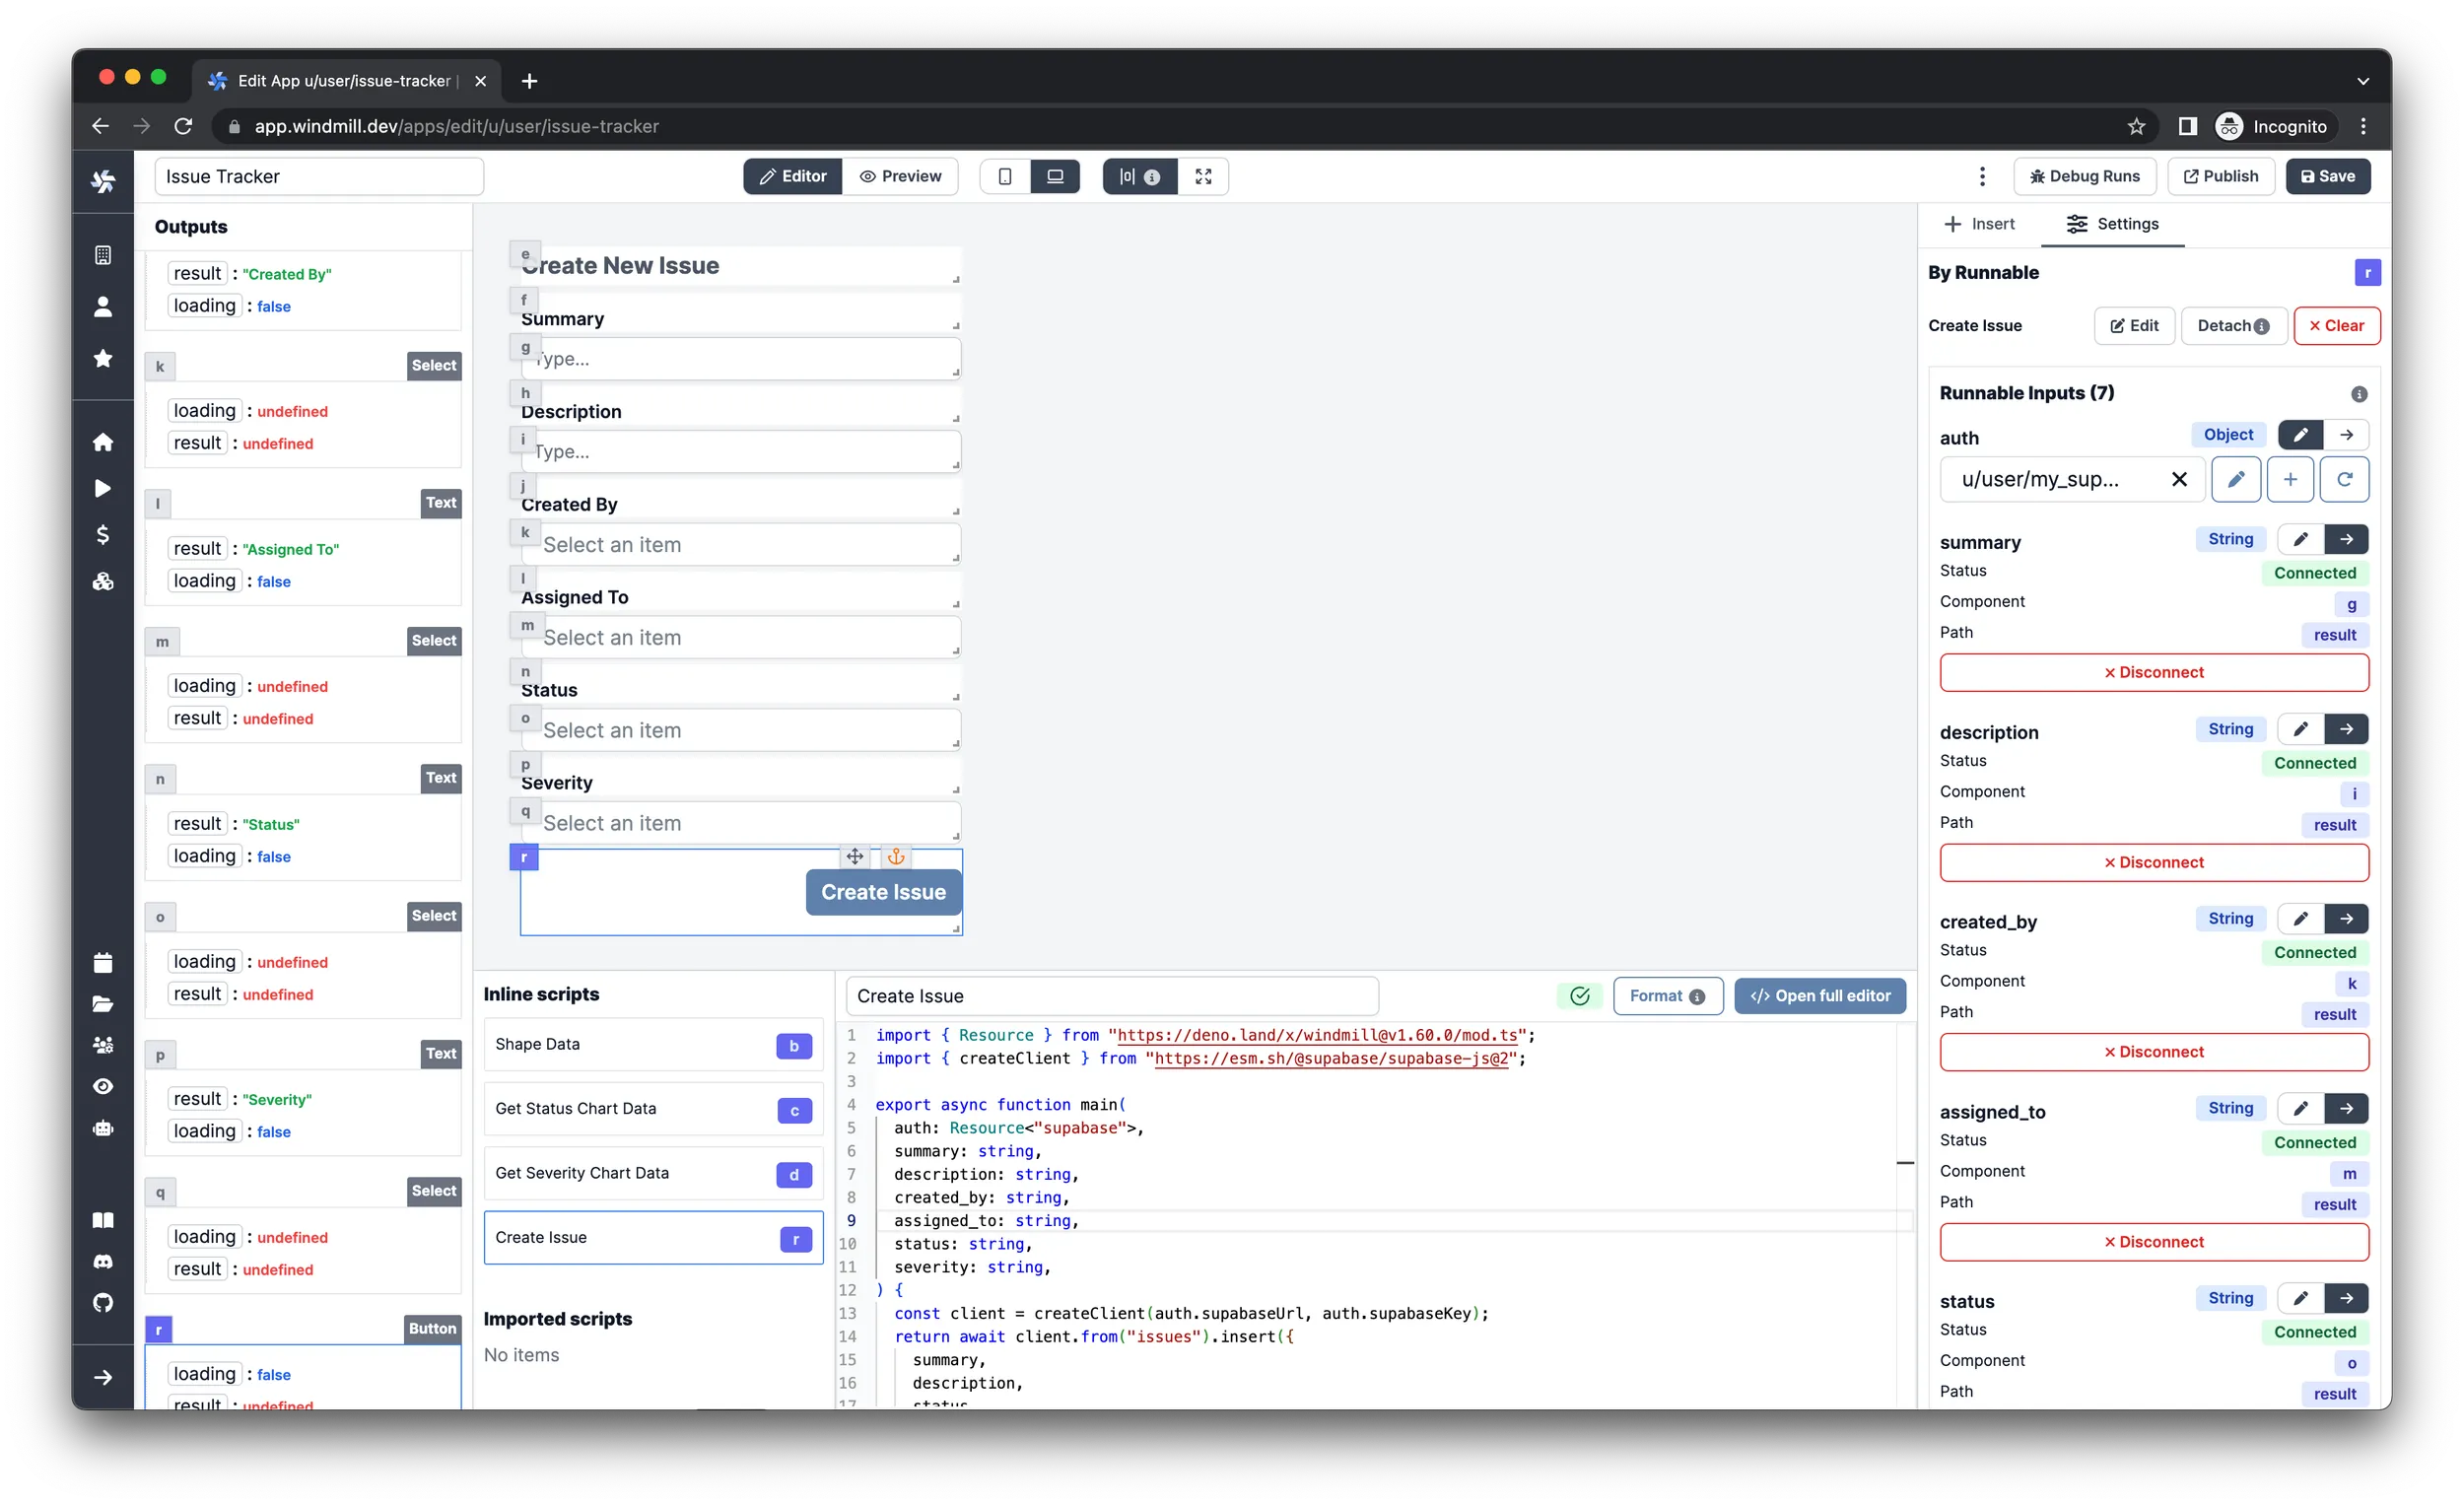
Submit button
Now that all the input fields are added and wired up, the only thing left is
to insert a Button component, which collects all the values entered by the
user and sends them to the database.
-
Insert a
Buttoncomponent. -
Set the
LabeltoCreate Issue. -
Set the
Sizetomd -
Set the
Styling > Alignmentto right-justified -
Find the ID of the
Load Issuesbackground runnable and checkRecomputeon it in theRecompute otherssection.infoThis will result in reloading the issues every time a new one is added and therefore it will be added to the table as well.
-
Click
Create an inline script, selectTypeScript (Deno)as language, name itCreate Issueand paste in the following code:import { createClient } from 'https://esm.sh/@supabase/supabase-js@2';
type Supabase = {
url: string;
key: string;
};
export async function main(
auth: Supabase,
summary: string,
description: string,
created_by: string,
assigned_to: string,
status: string,
severity: string
) {
const client = createClient(auth.url, auth.key);
return await client.from('issues').insert({
summary,
description,
status,
severity,
created_by,
assigned_to
});
} -
Select your Supabase resource for the
authargument of the script in theSettingspane on the right. -
Connect all the other arguments with the
resultvalue of their corresponding inputs.
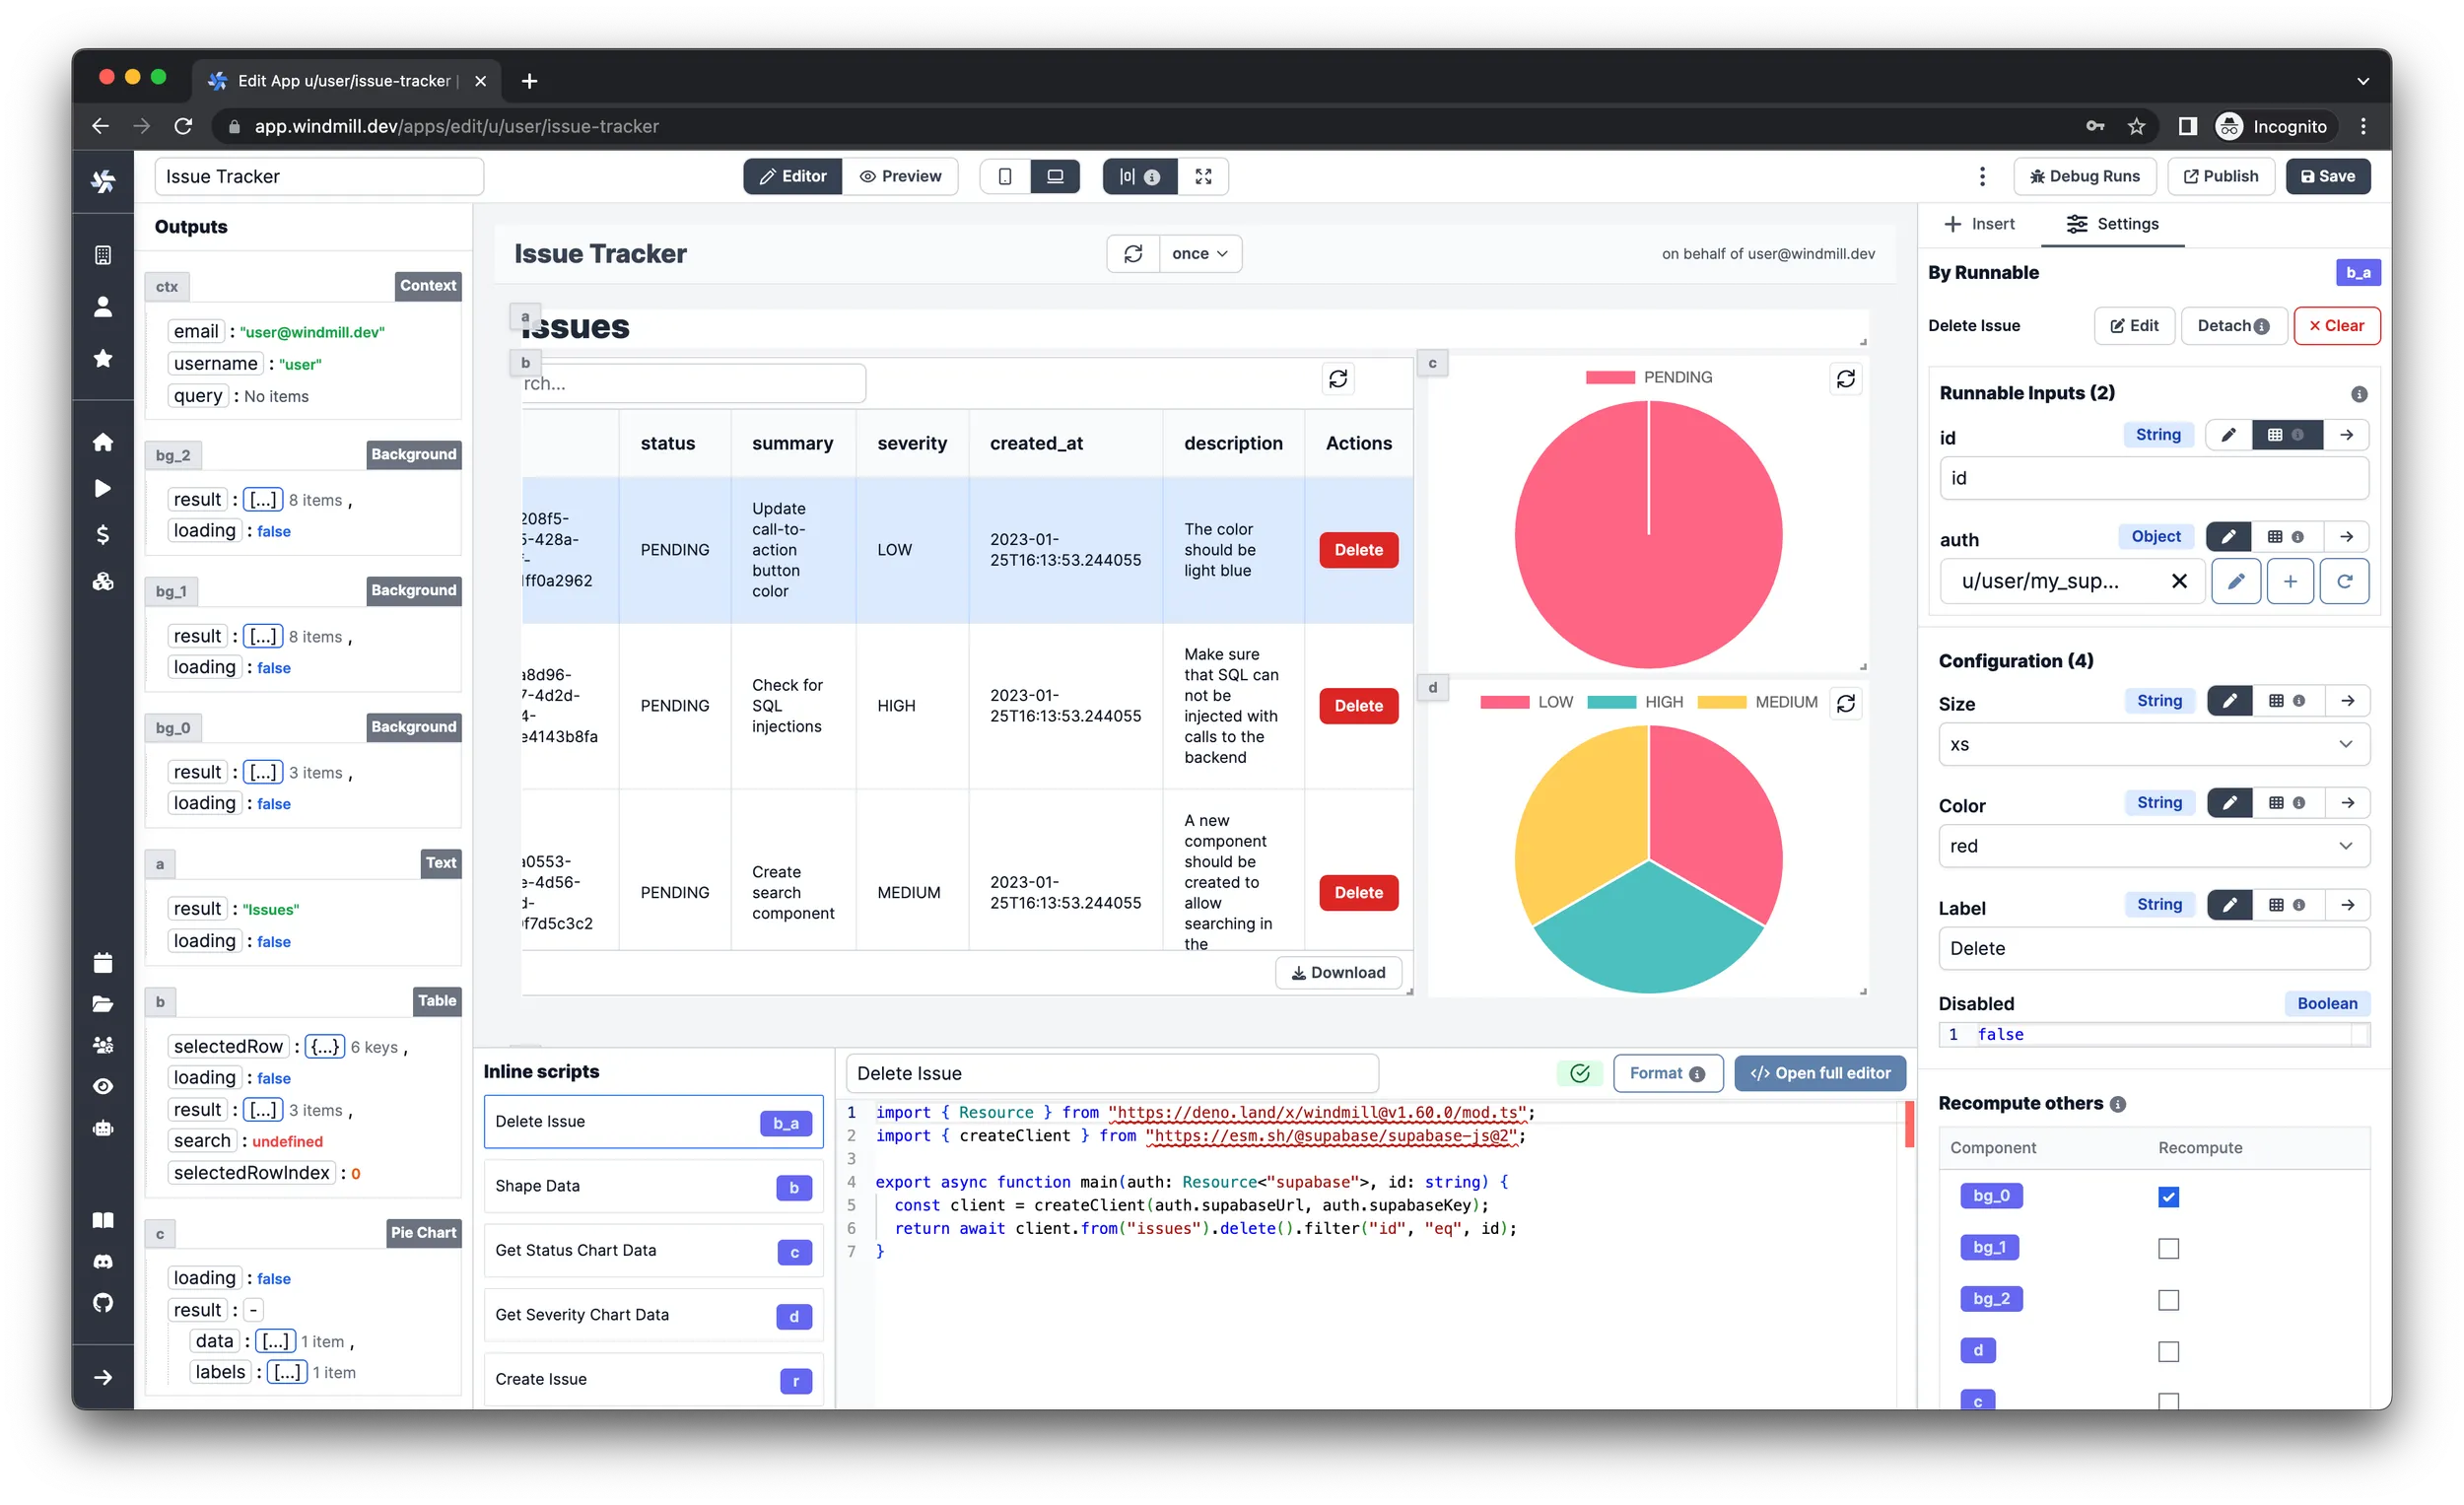
Deleting issues
Table components can have actions which will be added to the end of each row in
the form of buttons. Select the Table component and follow the steps:
-
Under the "Settings" tab in the right pane, add a button action from the
Table actionssection. -
Click the newly added action.
-
Set the
Labelargument toDelete. -
Set the
Colorargument tored. -
Find the ID of the
Load Issuesbackground runnable and checkRecomputeon it in theRecompute otherssection.infoBecause of this, the
issuesdata will be reloaded from the database every time an issue is deleted. -
Click
Create an inline script, selectTypeScript (Deno)as language, name itDelete Issueand paste in the following code:import { createClient } from 'https://esm.sh/@supabase/supabase-js@2';
type Supabase = {
url: string;
key: string;
};
export async function main(auth: Supabase, id: string) {
const client = createClient(auth.url, auth.key);
return await client.from('issues').delete().filter('id', 'eq', id);
} -
Select your Supabase resource for the
authargument of the script in theSettingspane on the right. -
Select the
Evalinput type for theidargument and connect to the.selectedRow.idof the table component.infoThis will result in the
idargument being filled by the value of theidcolumn from the row that the action button was clicked in.
Next steps
You now know how to create your Issue Tracker App with Supabase and Windmill. In the following article "Create an Issue Tracker App with Supabase - Part 2", we'll add functionality to update issues, add more charts and configure the app to fit mobile screens as well.
You can self-host Windmill using a
docker compose up, or go with the cloud app.